06 · Settings & account
Everything about you and your organization's setup lives here: your profile and how you sign in, what the AI has learned about you, your plan and billing, your teammates and their roles, the security and compliance controls that govern your data, and the connections to your other systems. Settings are grouped into four sections, You, Workspace, Security & compliance, and Connections. Some pages are visible only to organization owners; each section below says who can see it.
The settings window. Settings opens as a window of its own rather than as a page inside the workspace, the same Windows style window the Contract Reader and the Benchmark Library use. One frame holds the whole area, so moving from Billing to the audit log redraws only the page, never the window. The map runs down the left as a frosted rail holding all twenty three pages under their four groups, with your organization, your role, and your plan at the top of it, and the Trust center on a plate at the foot. Pages that carry a live fact show it on the entry: the number of people, the plan name, how many systems are connected. A dot marks a setting that needs attention, such as two factor still being off.
- Filter — type in the box at the top of the map to search every settings page by name and by description; press the forward slash key from anywhere in settings to jump into it, and Escape to clear it.
- Nested sections — the Security page's own sections (Posture, Single sign on, Baseline, Data controls, Audit log) appear indented under Security while you are inside it.
- The titlebar — the page you are on is named next to the Settings label. On the right, the sun or moon switches the whole account between light and dark without leaving the page, the square maximizes the window, and the cross closes settings and returns you to Home. The panel icon on the left folds the map away when you want the page at full width.
- Narrow screens — below the desktop breakpoint the map folds into an All settings button at the top of the window; press it to open the same grouped list.
- Page masthead — every page opens with the icon from the map entry you pressed, the group it belongs to, the page name, and one sentence on what the page decides. Pages use the full width of the window, so tables and lists are not squeezed into a column.
- Owner-only pages — if a page is managed by owners and you are not one, it says who can change the setting and what to ask for, rather than showing you an empty form.
- The Trust center — opens inside the same window, so reading how your data is held never takes you out of settings.
The Security & compliance section is deliberately short: one Security page carries account security, posture, single sign on, the baseline, data controls, and the audit log as nested sections, and one Trust center page carries the overview and the figures ledger as underline tabs. Each keeps its own section below, and old bookmarks to the former standalone pages redirect to the right place.
Settings home
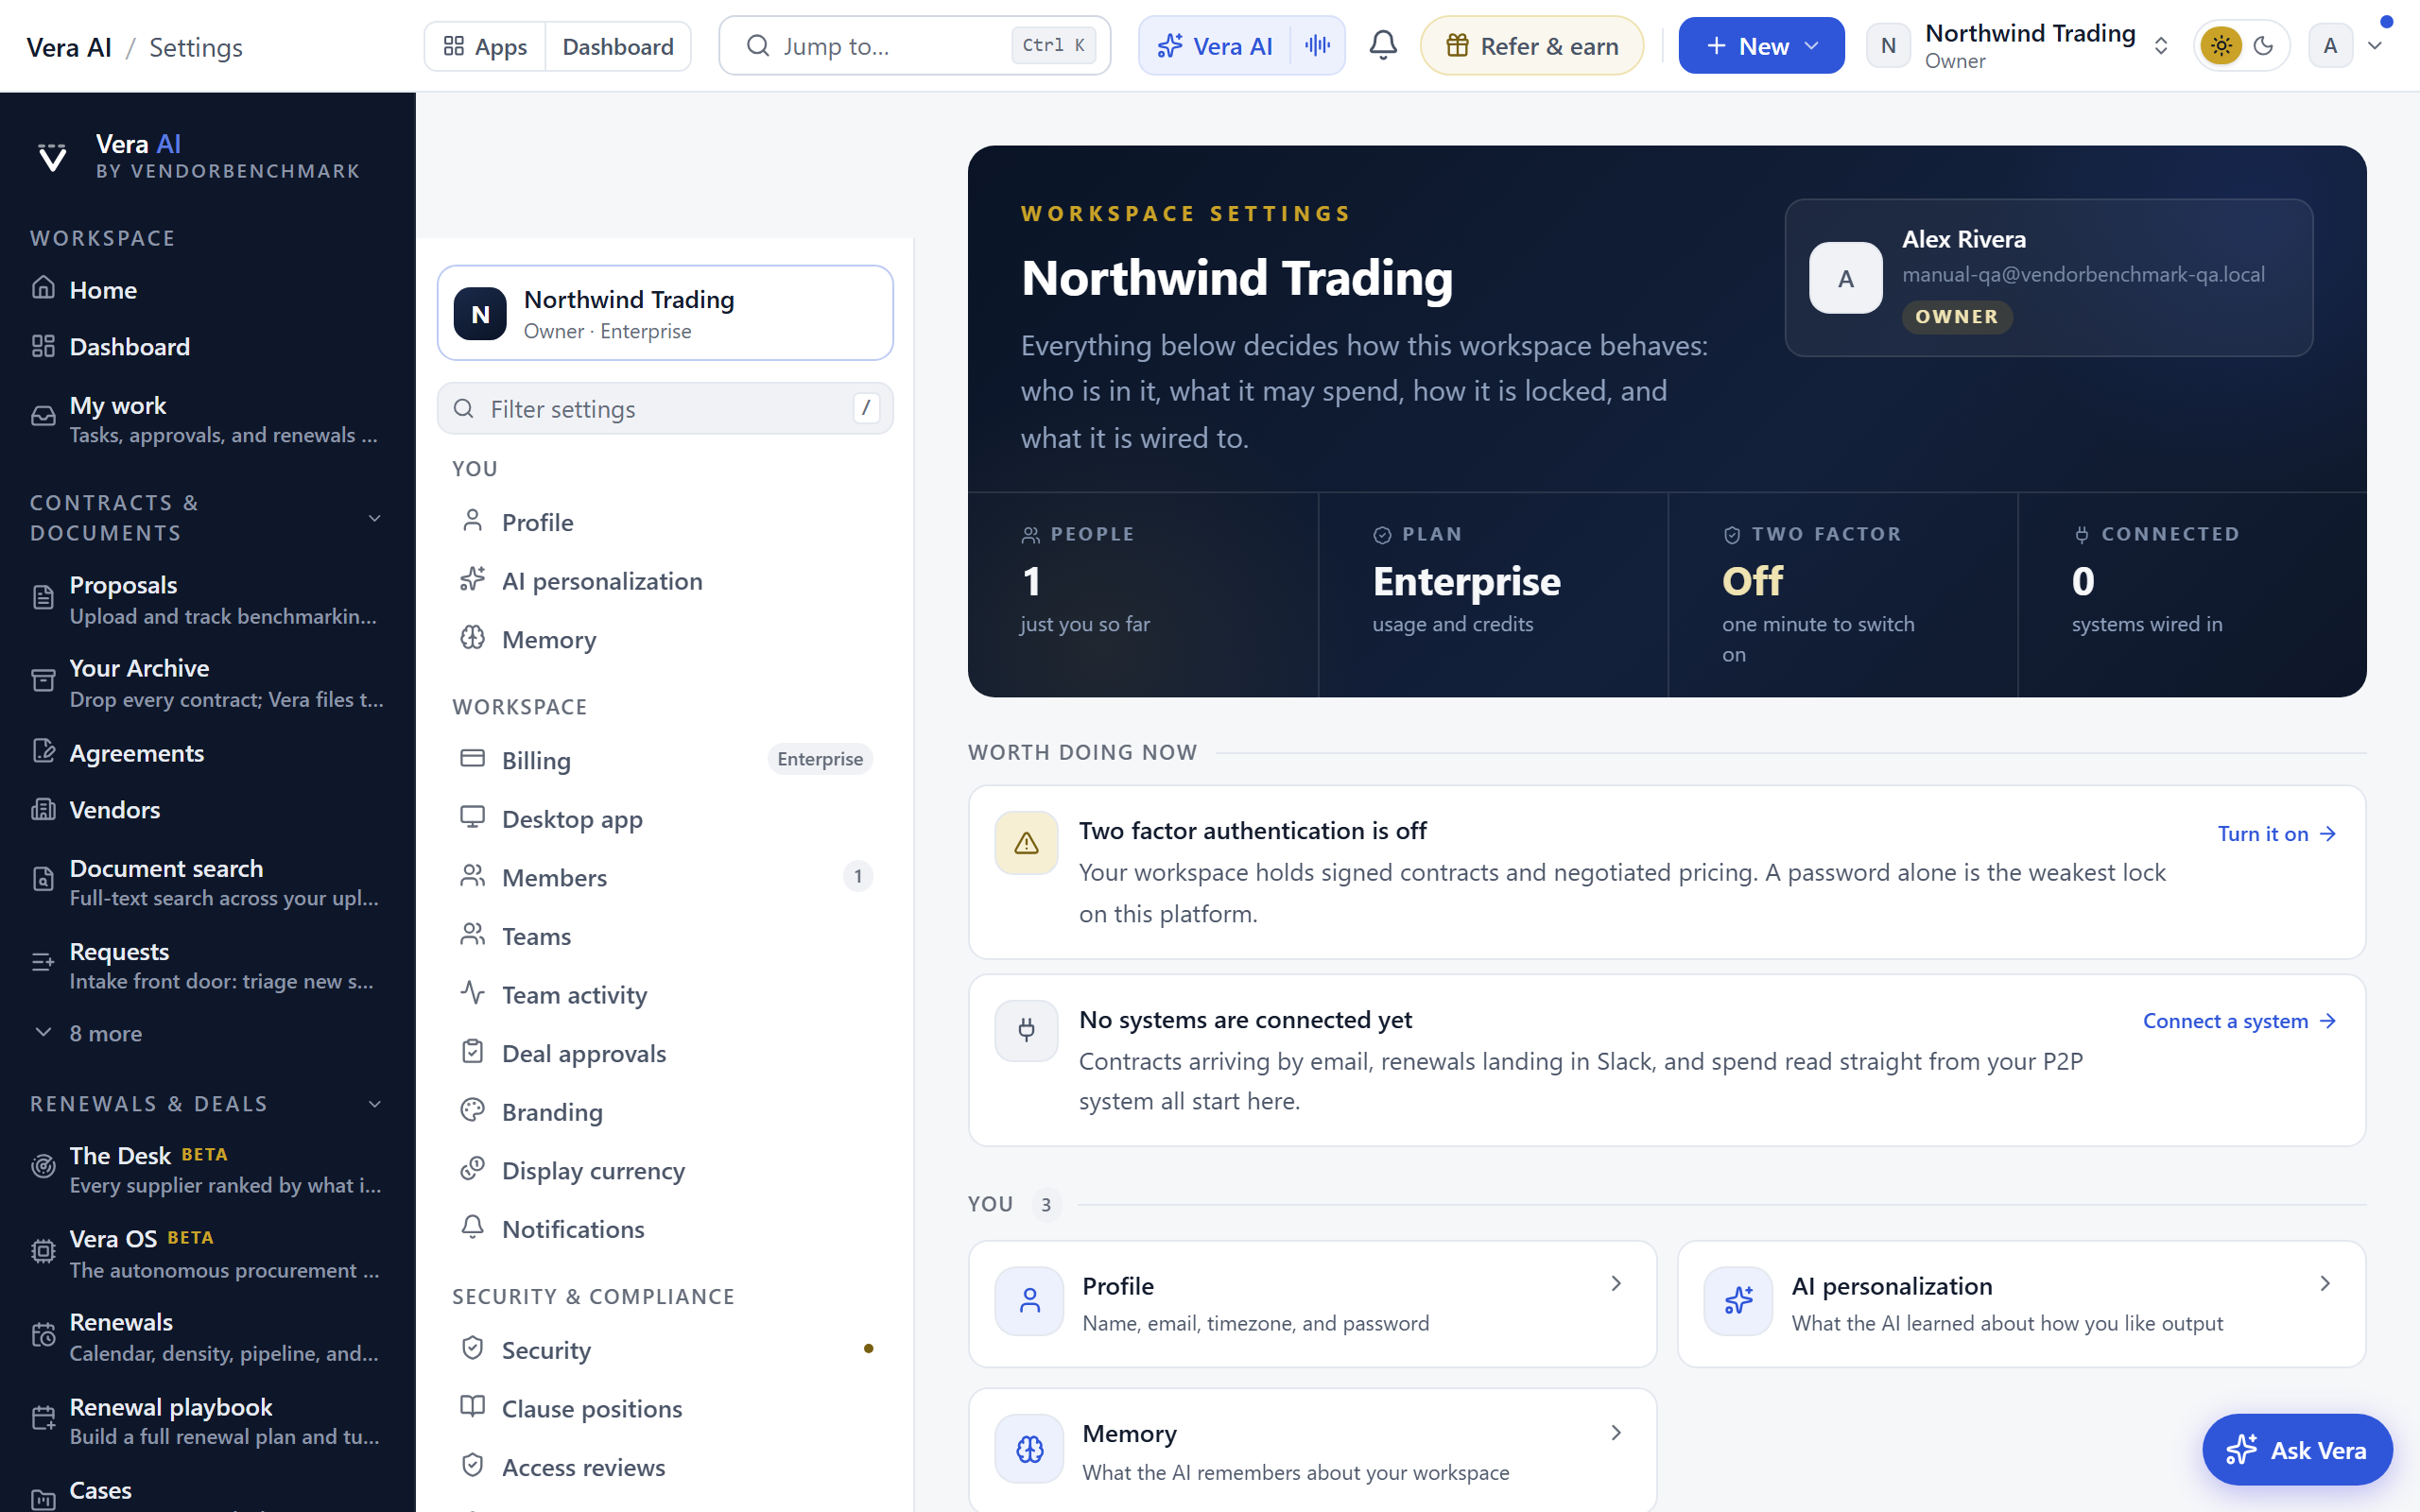
The overview of your workspace: its current state first, then the map. Use it when you want to know where things stand; use the index rail when you already know the page you want.
On the screen
- Masthead — your organization name, and on the right the account you are acting as, with your role. Settings behave differently for owners and members, so the page states which you are.
- Vitals — four live numbers, each a link to the page behind it: People holding a seat, the Plan paying for the workspace (with days left when you are on a trial), whether Two factor is on for your account, and how many systems are Connected.
- Worth doing now — anything genuinely waiting on a decision, computed from the live state of your workspace rather than a fixed list, written in plain words with the page that resolves it. It ranks eight possible items and shows at most four: two factor still off; renewal alerts off on every channel while agreements carry renewal dates; a trial inside its last week; an access review past the quarterly cadence; an API key expiring inside 30 days; an empty security baseline; negotiation memory still empty after four weeks in the workspace; and no systems connected. Access reviews, API keys, and integrations are owner-only, so a member never sees those three. Nothing appears here when there is nothing to do. Every row is a link that states where you stand: the panel itself never changes a setting.
- The four groups — You, Workspace, Security & compliance, and Connections, each page with its one-line description and its live fact.
- Trust center — the panel closing the page, leading to how your data is held.
How to use it
- Read the vitals. Anything reading Off or 0 is a gap worth closing.
- Work through Worth doing now; each row goes straight to the page that fixes it.
- Use the index rail on the left for everything else, or the filter if you are not sure which page owns the setting.
Related: Security · Billing · Trust center
Profile
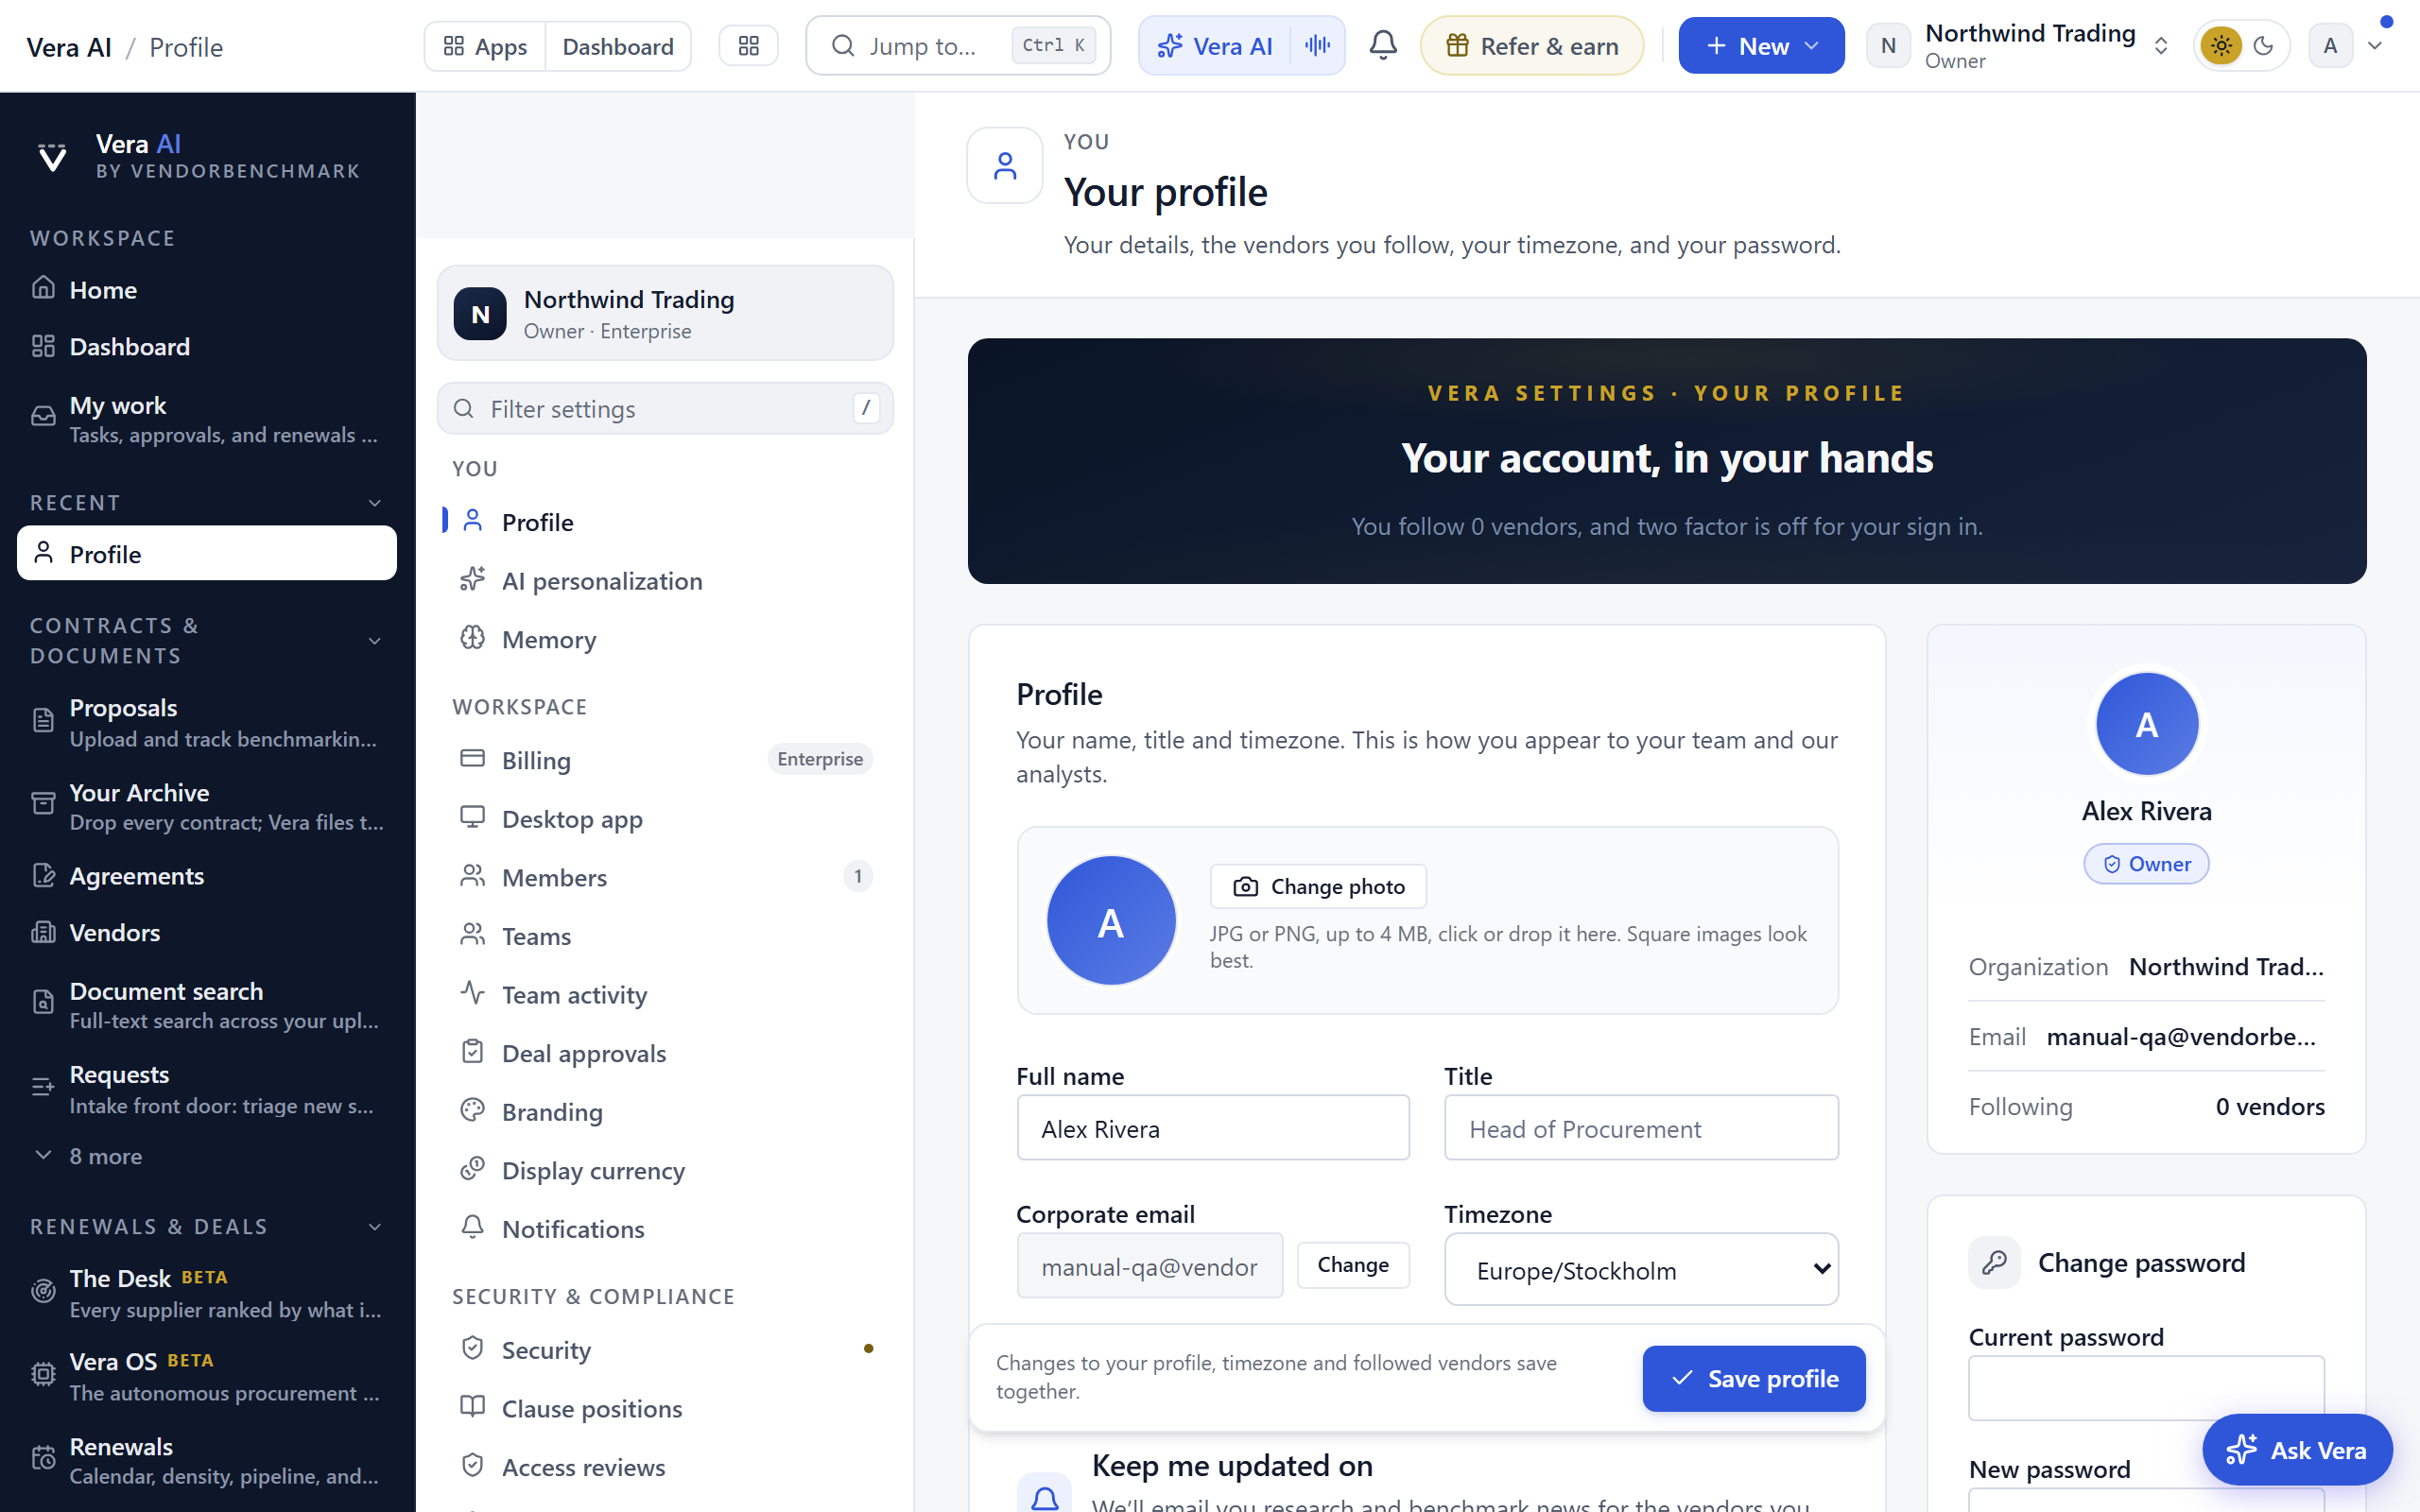
Your personal details: your name, job title, timezone, photo, the vendors you follow, and your password. This is also where you connect your Microsoft account.
On the screen
- Name, title, and timezone — how you appear to teammates and the timezone used for dates and digests.
- Your phone number, for calling Vera (since 11 September 2026) — with a country code. When your workspace has a number for Vera, calling it from this phone reaches your own Vera with your workspace behind her: no laptop, no screen, short turns, one point at a time, and the memo of the call is on your desk when you hang up. Ask her for a person and she puts you through to the analyst desk when one is on the line. A number nobody has claimed is not answered.
- Photo — drag an image on or click to upload; used for your avatar across the app.
- Email — your sign-in address, with a Change button. Enter the new address and your current password; we email a confirmation link to the new address, and nothing changes until it is clicked.
- Followed vendors — the vendors you want updates about; they drive your weekly report and vendor alerts. Email subscriptions themselves live under Notifications.
- Password — set a new password without leaving the page. You confirm your current password first, the new one is checked against known breaches, and every other session is signed out when it changes.
- Your data — download everything the platform holds about you as one JSON file (profile, memberships, preferences, assistant memory, sign-in devices, your own activity trail), or file a delete-my-account request our team processes within 30 days. You can cancel the request until it is processed.
- Microsoft account — connect Microsoft so contract files and calendar data can flow in (when your organization has it configured).
- Calendar — connect your work calendar (Microsoft 365 or Google, where configured) and your meetings find the call room by themselves: the Coming up rail knows what is next, and the desktop companion can offer Vera as each meeting starts. Its own consent and its own disconnect, separate from the Microsoft account above; pick which calendars count with Choose calendars. Titles, times, attendees and join links only; event bodies are never stored.
- Invite a colleague — a quick invite card; only owners can actually send invites.
- Leave this workspace — remove your own seat from the current workspace. Your account and any other workspaces stay; an owner can invite you back. If you are the only owner, promote someone else first.
How to use it
- Fill in your name, title, and timezone, then save.
- Add the vendors you care about so your alerts and weekly report are relevant.
- Use Change password to rotate your password whenever you need to; use Change next to your email when you move addresses.
Related: Security · Members · Notifications
Security
*In plain words: your account's locks: two-factor, sessions, and the org-wide policy.*
When to reach for this
- Day one, three minutes: turning on two-factor is the highest-value security step you personally control.
- Something feels off: the sign-in history and active sessions answer "was that me?"
- Owners setting the org-wide requirement: the handbook's security defaults sequence it.
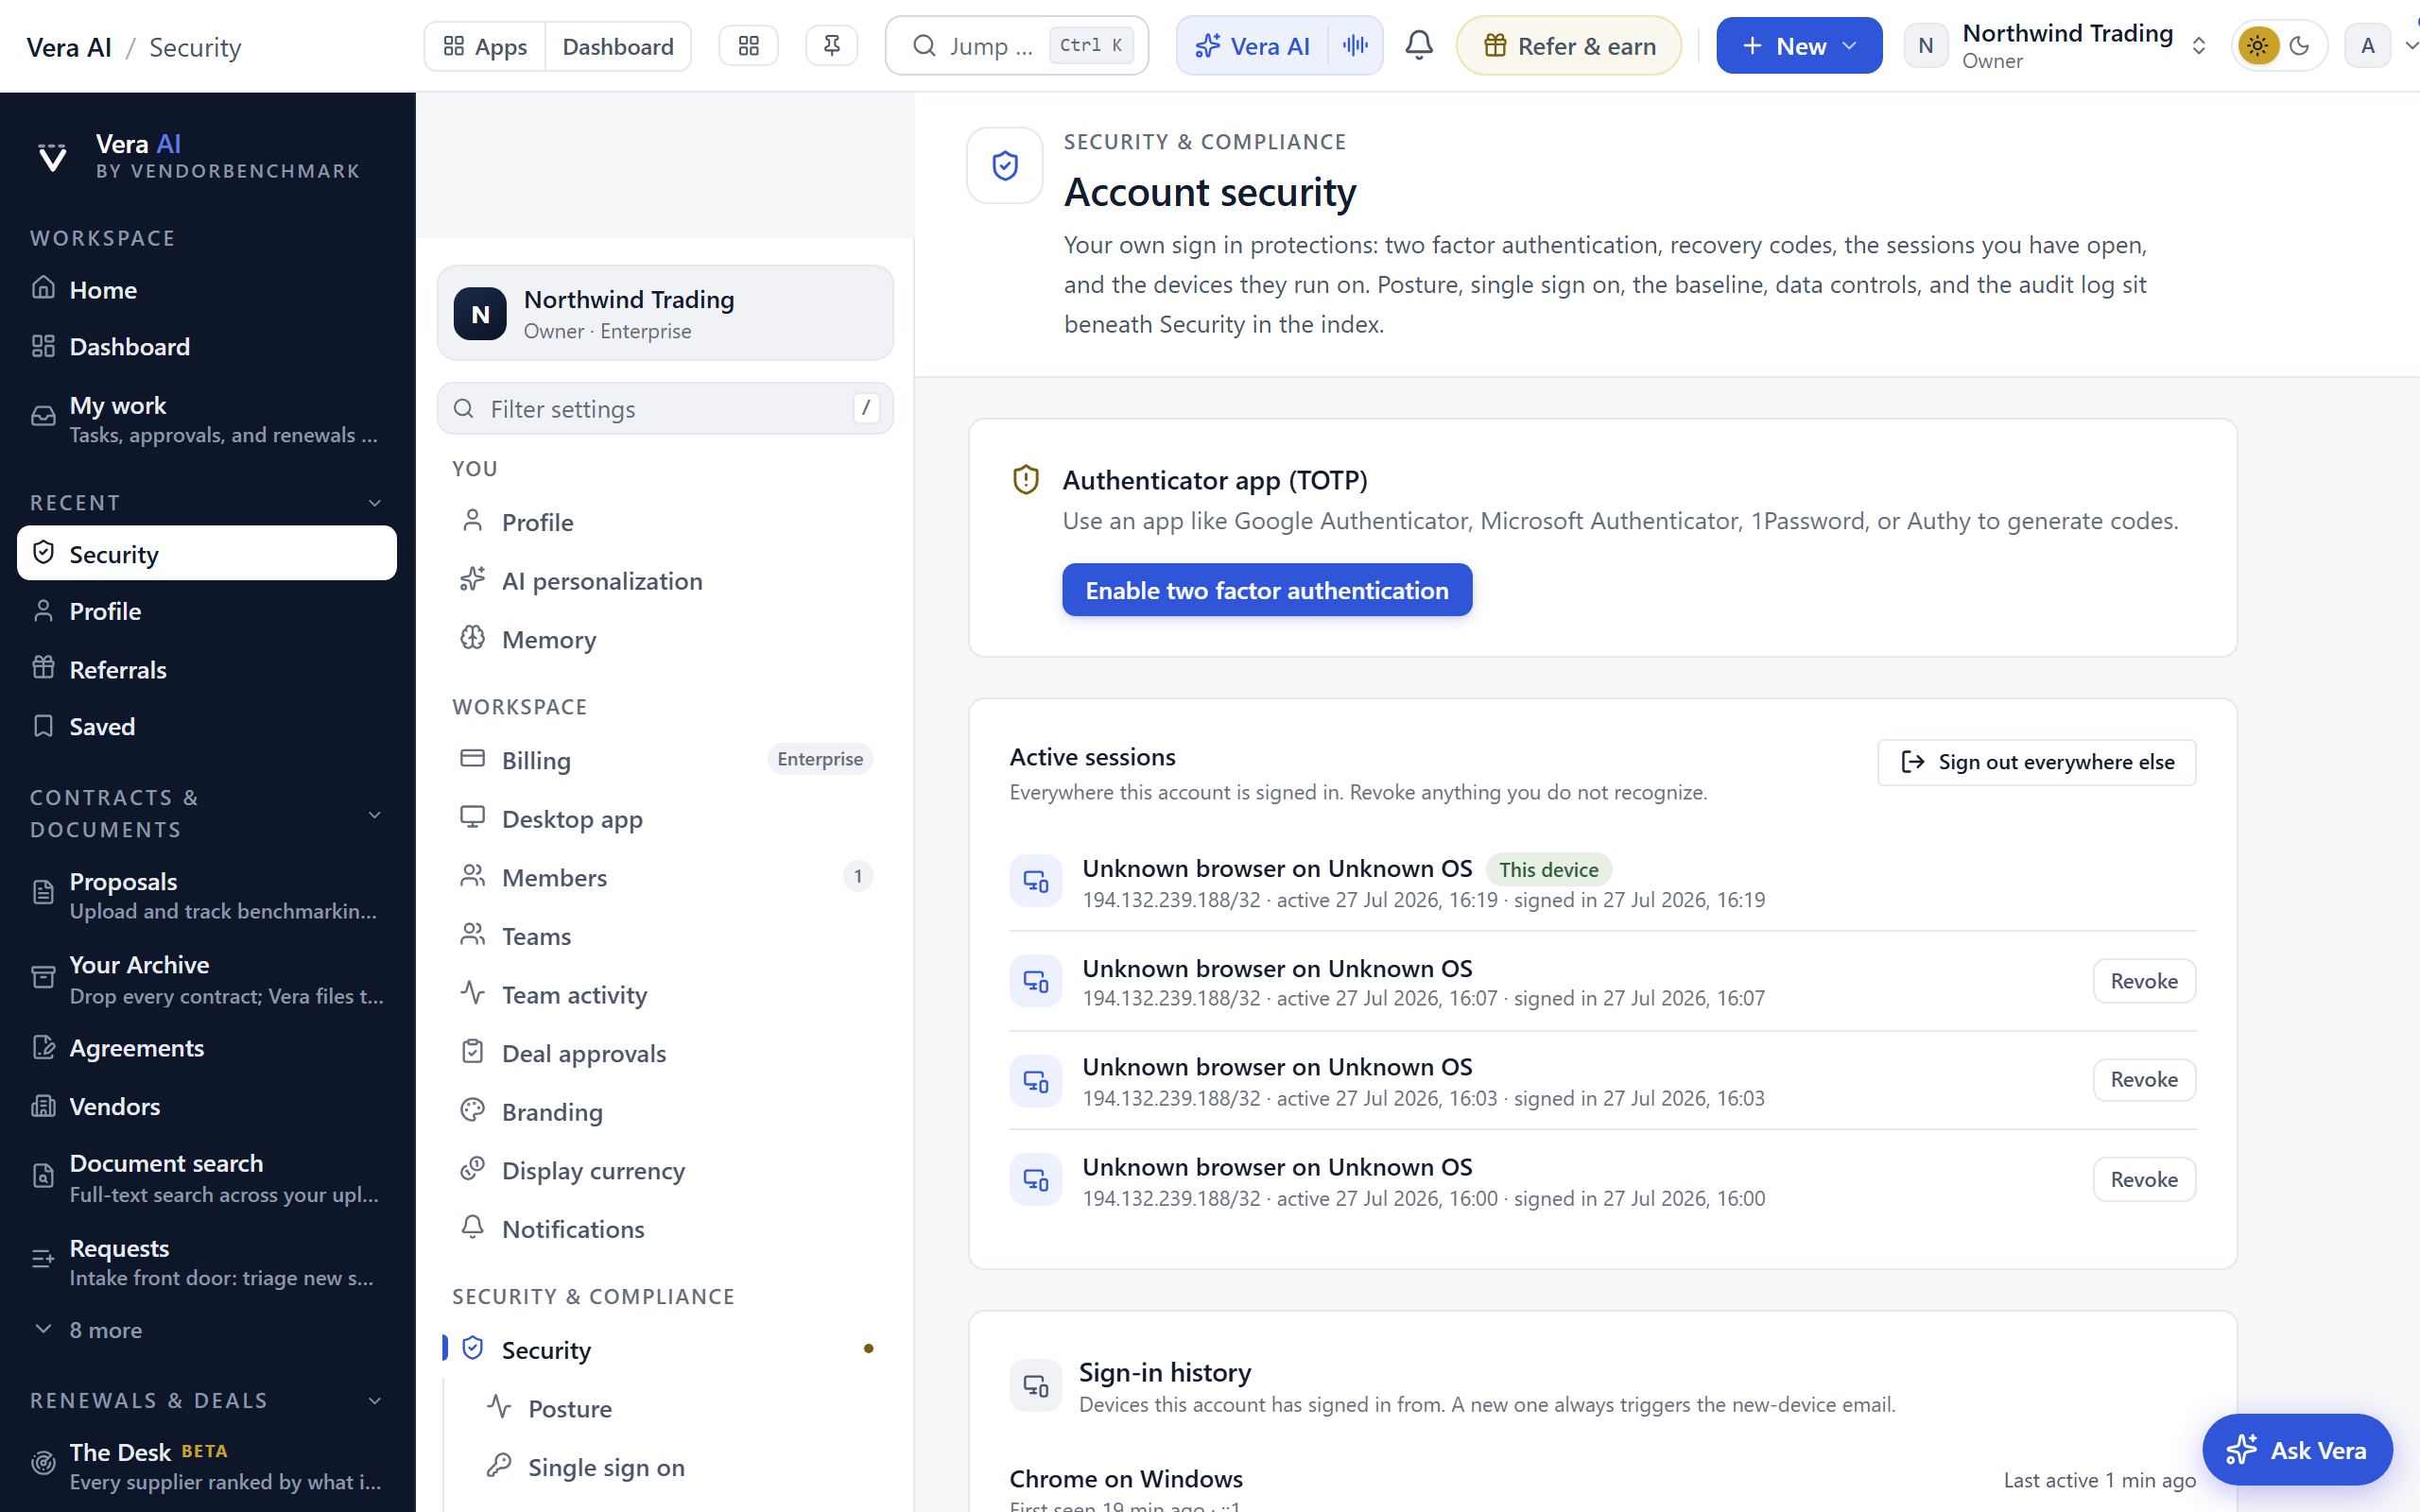
The landing section (Account security) of the one Security page. Protect your account with two-factor authentication and see the devices where you are signed in; owners also set the organization-wide two-factor policy here. The other five sections, Posture, Single sign on, Baseline, Data controls, and Audit log, sit indented under Security in the index rail while you are inside it, and each is documented below.
On the screen
- Two-factor authentication — register an authenticator app and turn on the rotating six-digit code. Once on, that code becomes your sign-in: the sign-in screen asks for it in place of your password.
- Backup codes — one-time recovery codes to use if you lose your authenticator; the count remaining is shown.
- Active sessions — the sessions signed in to your account, with the option to sign out everywhere else.
- Sign-in history — every device your account has signed in from, with first seen, last active, and the IP address. A device you have never used before always triggers the new-device email; an entry you do not recognize means change your password (which signs out every other session) and review the active sessions above it.
- Organization policy (owners) — require two-factor for every member of the organization.
- Agent drive ceiling (owners) — how far a specialist may drive screens for the workspace on a call: Off, Show and explain, Moves, Moves and staged cards (the standing behavior), or Queued commits, with a separate answer per screen family. The fifth rung is earned, never granted: it unlocks only after the workspace has held zero divergence across at least 20 verified moves in 30 days, the card states your own numbers against that bar, and the server refuses the grant with the same numbers if a request arrives another way. With it on, the overnight drive may queue commits that wait for a human press, at most three a night and one per renewal, of three declared kinds: a renewal inside 35 days still at Upcoming proposed to In negotiation, a renewal that needs you with no owner proposed to you yourself, and an auto renewal whose notice window has already closed proposed quiet until the day after it renews. Enforced on the server; the wheel and the seat name this policy when it stops them, and commits are never on the ladder because they are only ever a person's press. Every driven action lands in the audit log below with its verification outcome. Since 2 September 2026 the ceiling is a signed grant: saving a change stamps it with your name and the date, the card shows who signed the standing policy and when, every rung stays revocable in one press, and each change lands in the audit log.
- The autonomy report (owners) — under the ceiling, what the agents did with the wheel in the last 30 days, counted from the drive ledger and the pen's decided cards: driven actions and how many the screen refused to confirm, the refusals the gates held, the times a person took the wheel back, trips run, and staged cards kept against discarded. One figure is a stated assumption and says so on the card: "given back" prices a landed move at two minutes of pressing. The staged figures are workspace totals only; nobody's individual drafts are read. The bar for extending a mandate is divergence holding at zero, and every miss names its surface in the drive ledger on the Activity page. Under the report, Email me this report every Monday sends the week's figures for each workspace you own, in the platform's executive brief dress; a silent week sends nothing, rehearsal drills are excluded from every figure, and the same switch turns it off. Nobody who has not pressed it ever receives one.
How to use it
- Open your authenticator app (Google Authenticator, 1Password, Authy, and the like) and scan the code shown.
- Enter the six-digit code to confirm, then save your backup codes somewhere safe.
- Review active sessions and sign out any you do not recognize.
- Owners: set the agent drive ceiling to how much your workspace wants specialists doing by voice; the tightest family answer wins.
Tips
- Turning on two-factor is the single highest-value thing you can do for your account. If your organization requires it, you will be held here until you set it up.
Related: Security posture · Two-factor authentication
AI personalization
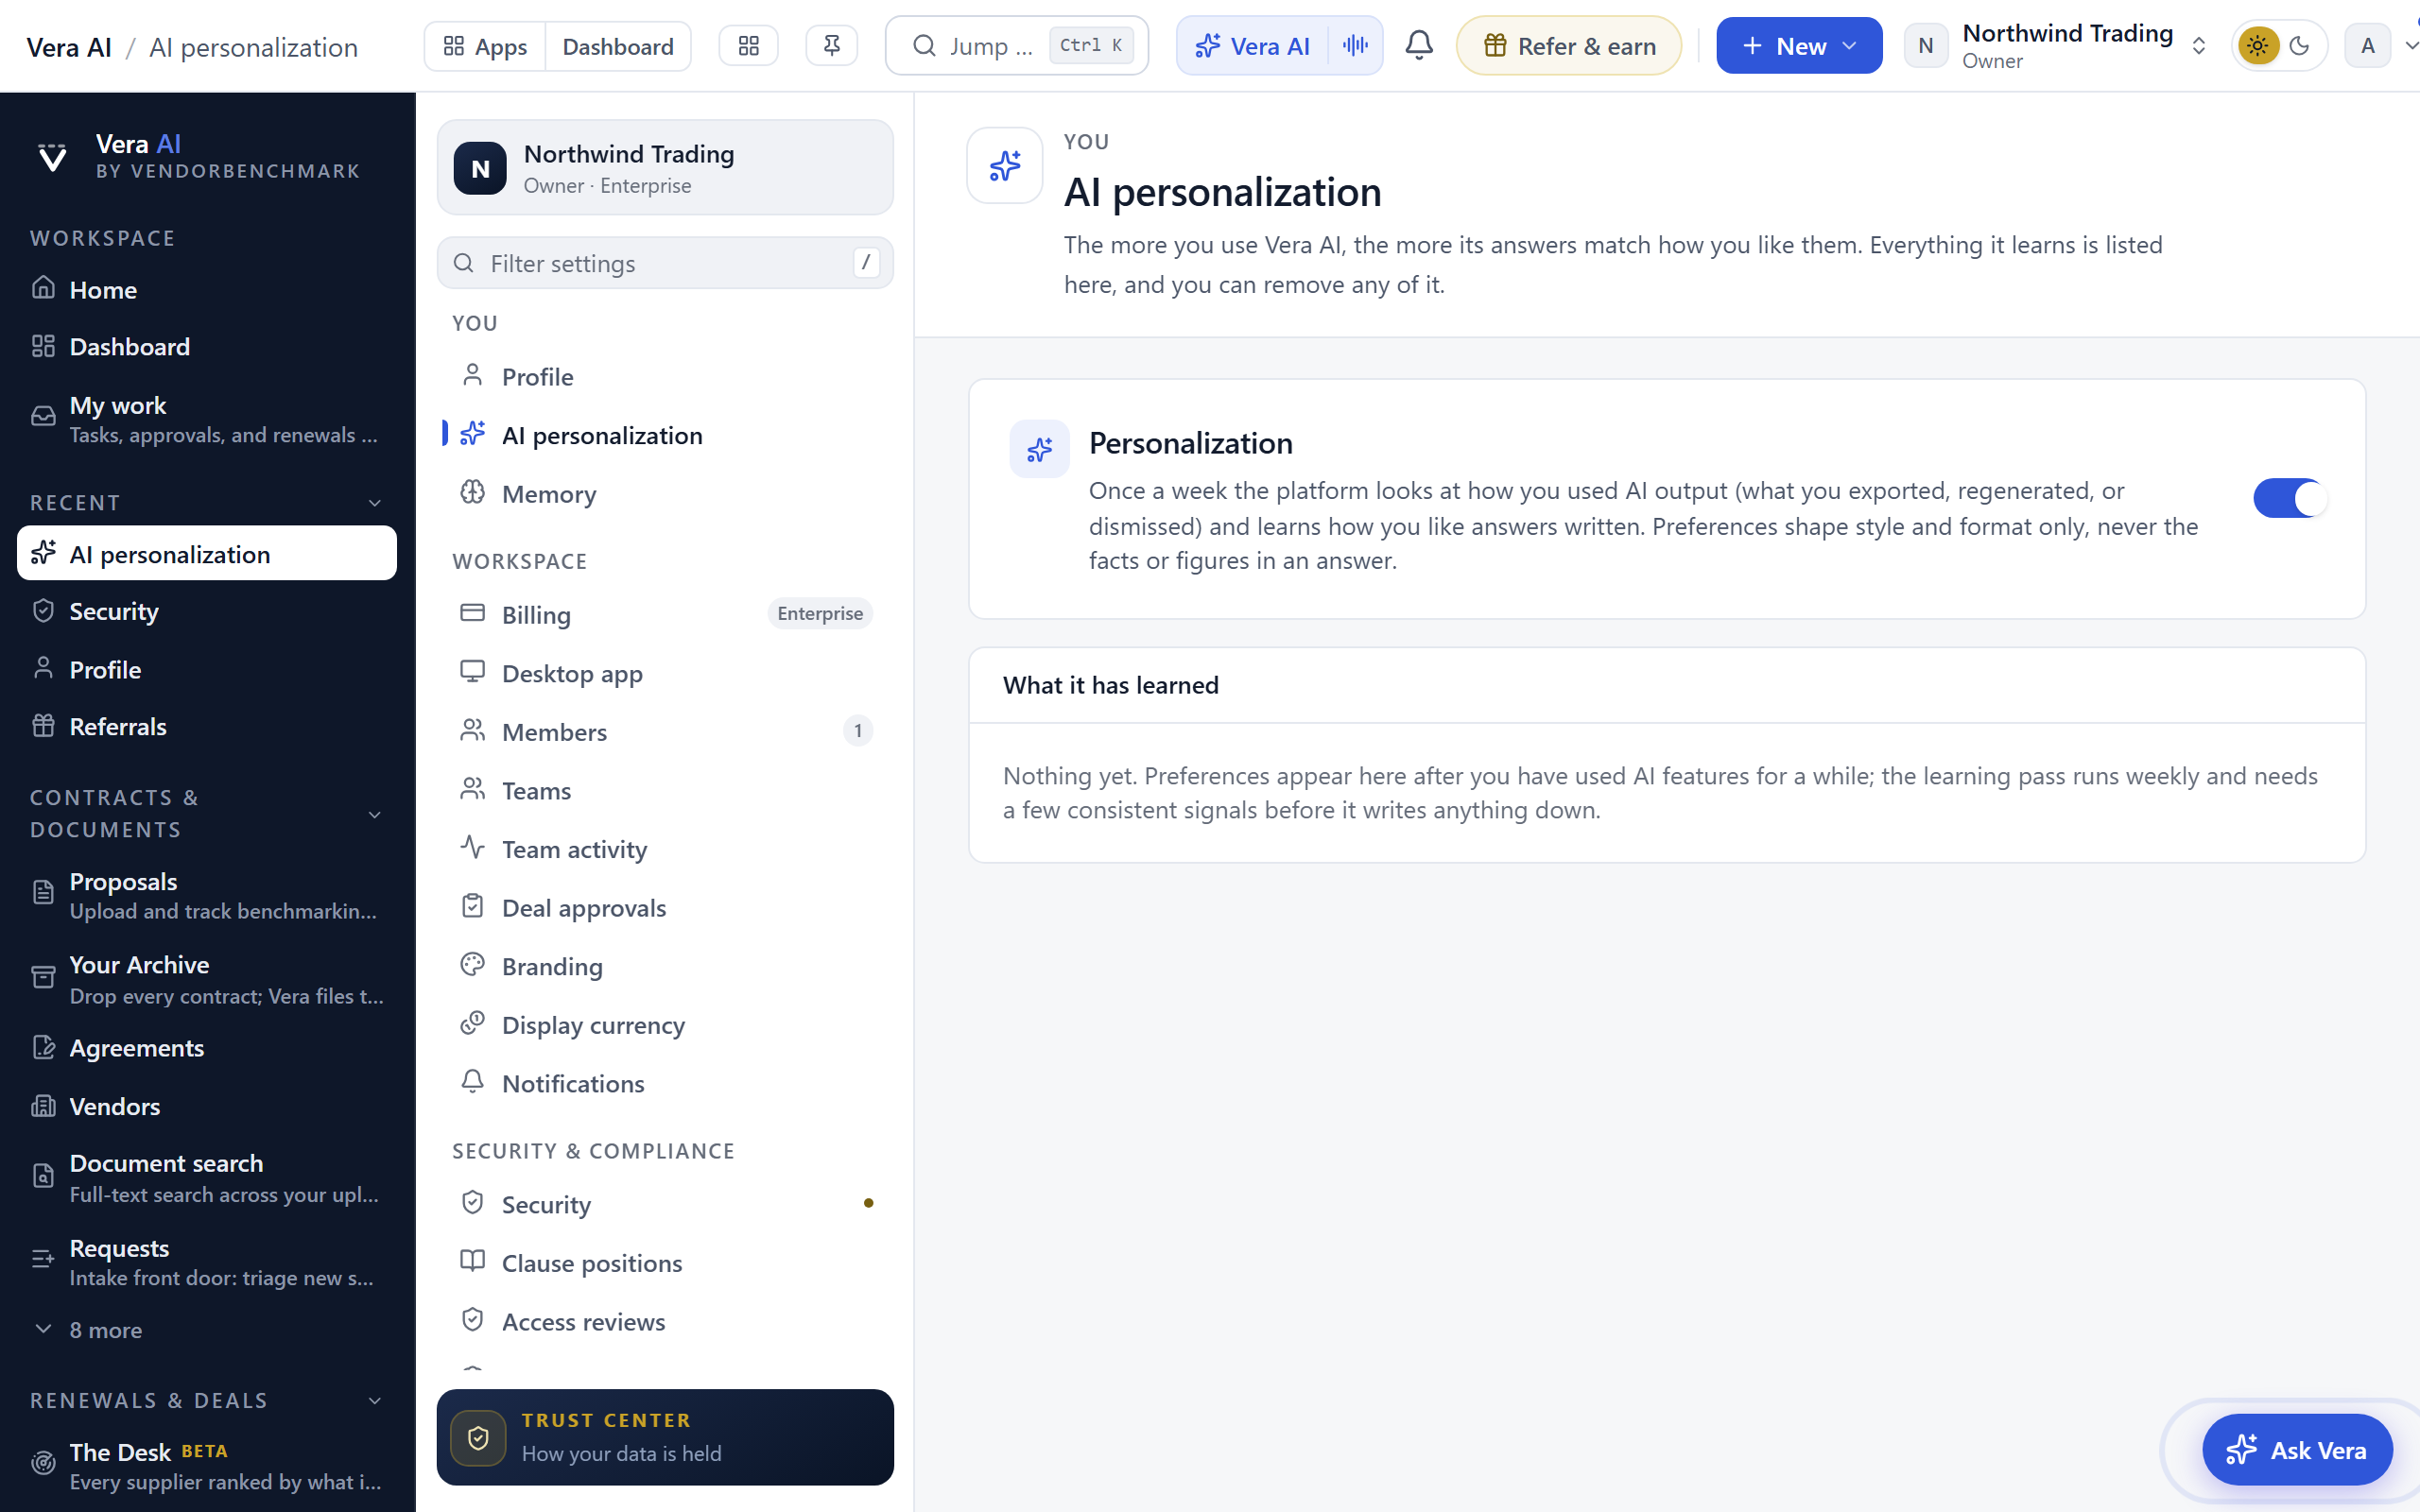
What the platform has learned about how you like output, in plain language and fully under your control. The more you use Vera AI, the more its answers match your preferences.
On the screen
- Learned preferences — each thing the AI has picked up about how you like answers, newest first.
- Remove — delete any single preference; it stops shaping your answers immediately.
- Who drives your screens — your standing answer to a specialist offering to drive a screen for you on a call: Ask each time, Drive when asked (a handover is remembered per screen family), or Never, which keeps the wheel with you everywhere and has specialists talk you through instead. Under it, the remembered per family answers, each removable so the next handover asks again.
- The overnight drive — a switch and a window (Inside 60, 90 or 120 days). On, and each night your specialist runs every renewal inside the window through the benchmark library and leaves the morning on Home: what is fine, what needs you, and the replay of every move. It runs in every workspace you belong to, up to 20 renewals a night, worst first. In a workspace whose owner has earned and raised the ceiling to Queued commits, the night may also queue up to three narrow proposals that wait on the morning card for your one-press confirm; everywhere else nothing is committed overnight, and the agent drive ceiling on the Security page still wins, so a workspace whose owner set it to Off gets no night drive whatever this switch says.
How to use it
- Review the list to see what the AI has inferred.
- Remove anything that is wrong or that you would rather it not use.
- Set who drives your screens, and prune any remembered family answer you have changed your mind about.
- Turn on the overnight drive and pick the window if you want the mornings; the card appears on Home the day after the first night runs.
Tips
- This list is private to you. Your organization's shared negotiation memory is separate, on the Memory page.
- Learning feeds on what you do with AI output, not on how much you chat: rating an answer, exporting a deliverable, applying or rejecting a suggestion Vera staged, turning an answer into a watch, regenerating, or dismissing an insight. The learning pass runs weekly and writes a preference only after it sees the same pattern a few times, so a new account starts empty. A written feedback comment is the fastest way to teach it something.
- Whatever the standing answer says, touching a driven screen always hands the wheel straight back. The setting decides whether a specialist may take it when you ask; nothing ever stops you taking it back.
Memory
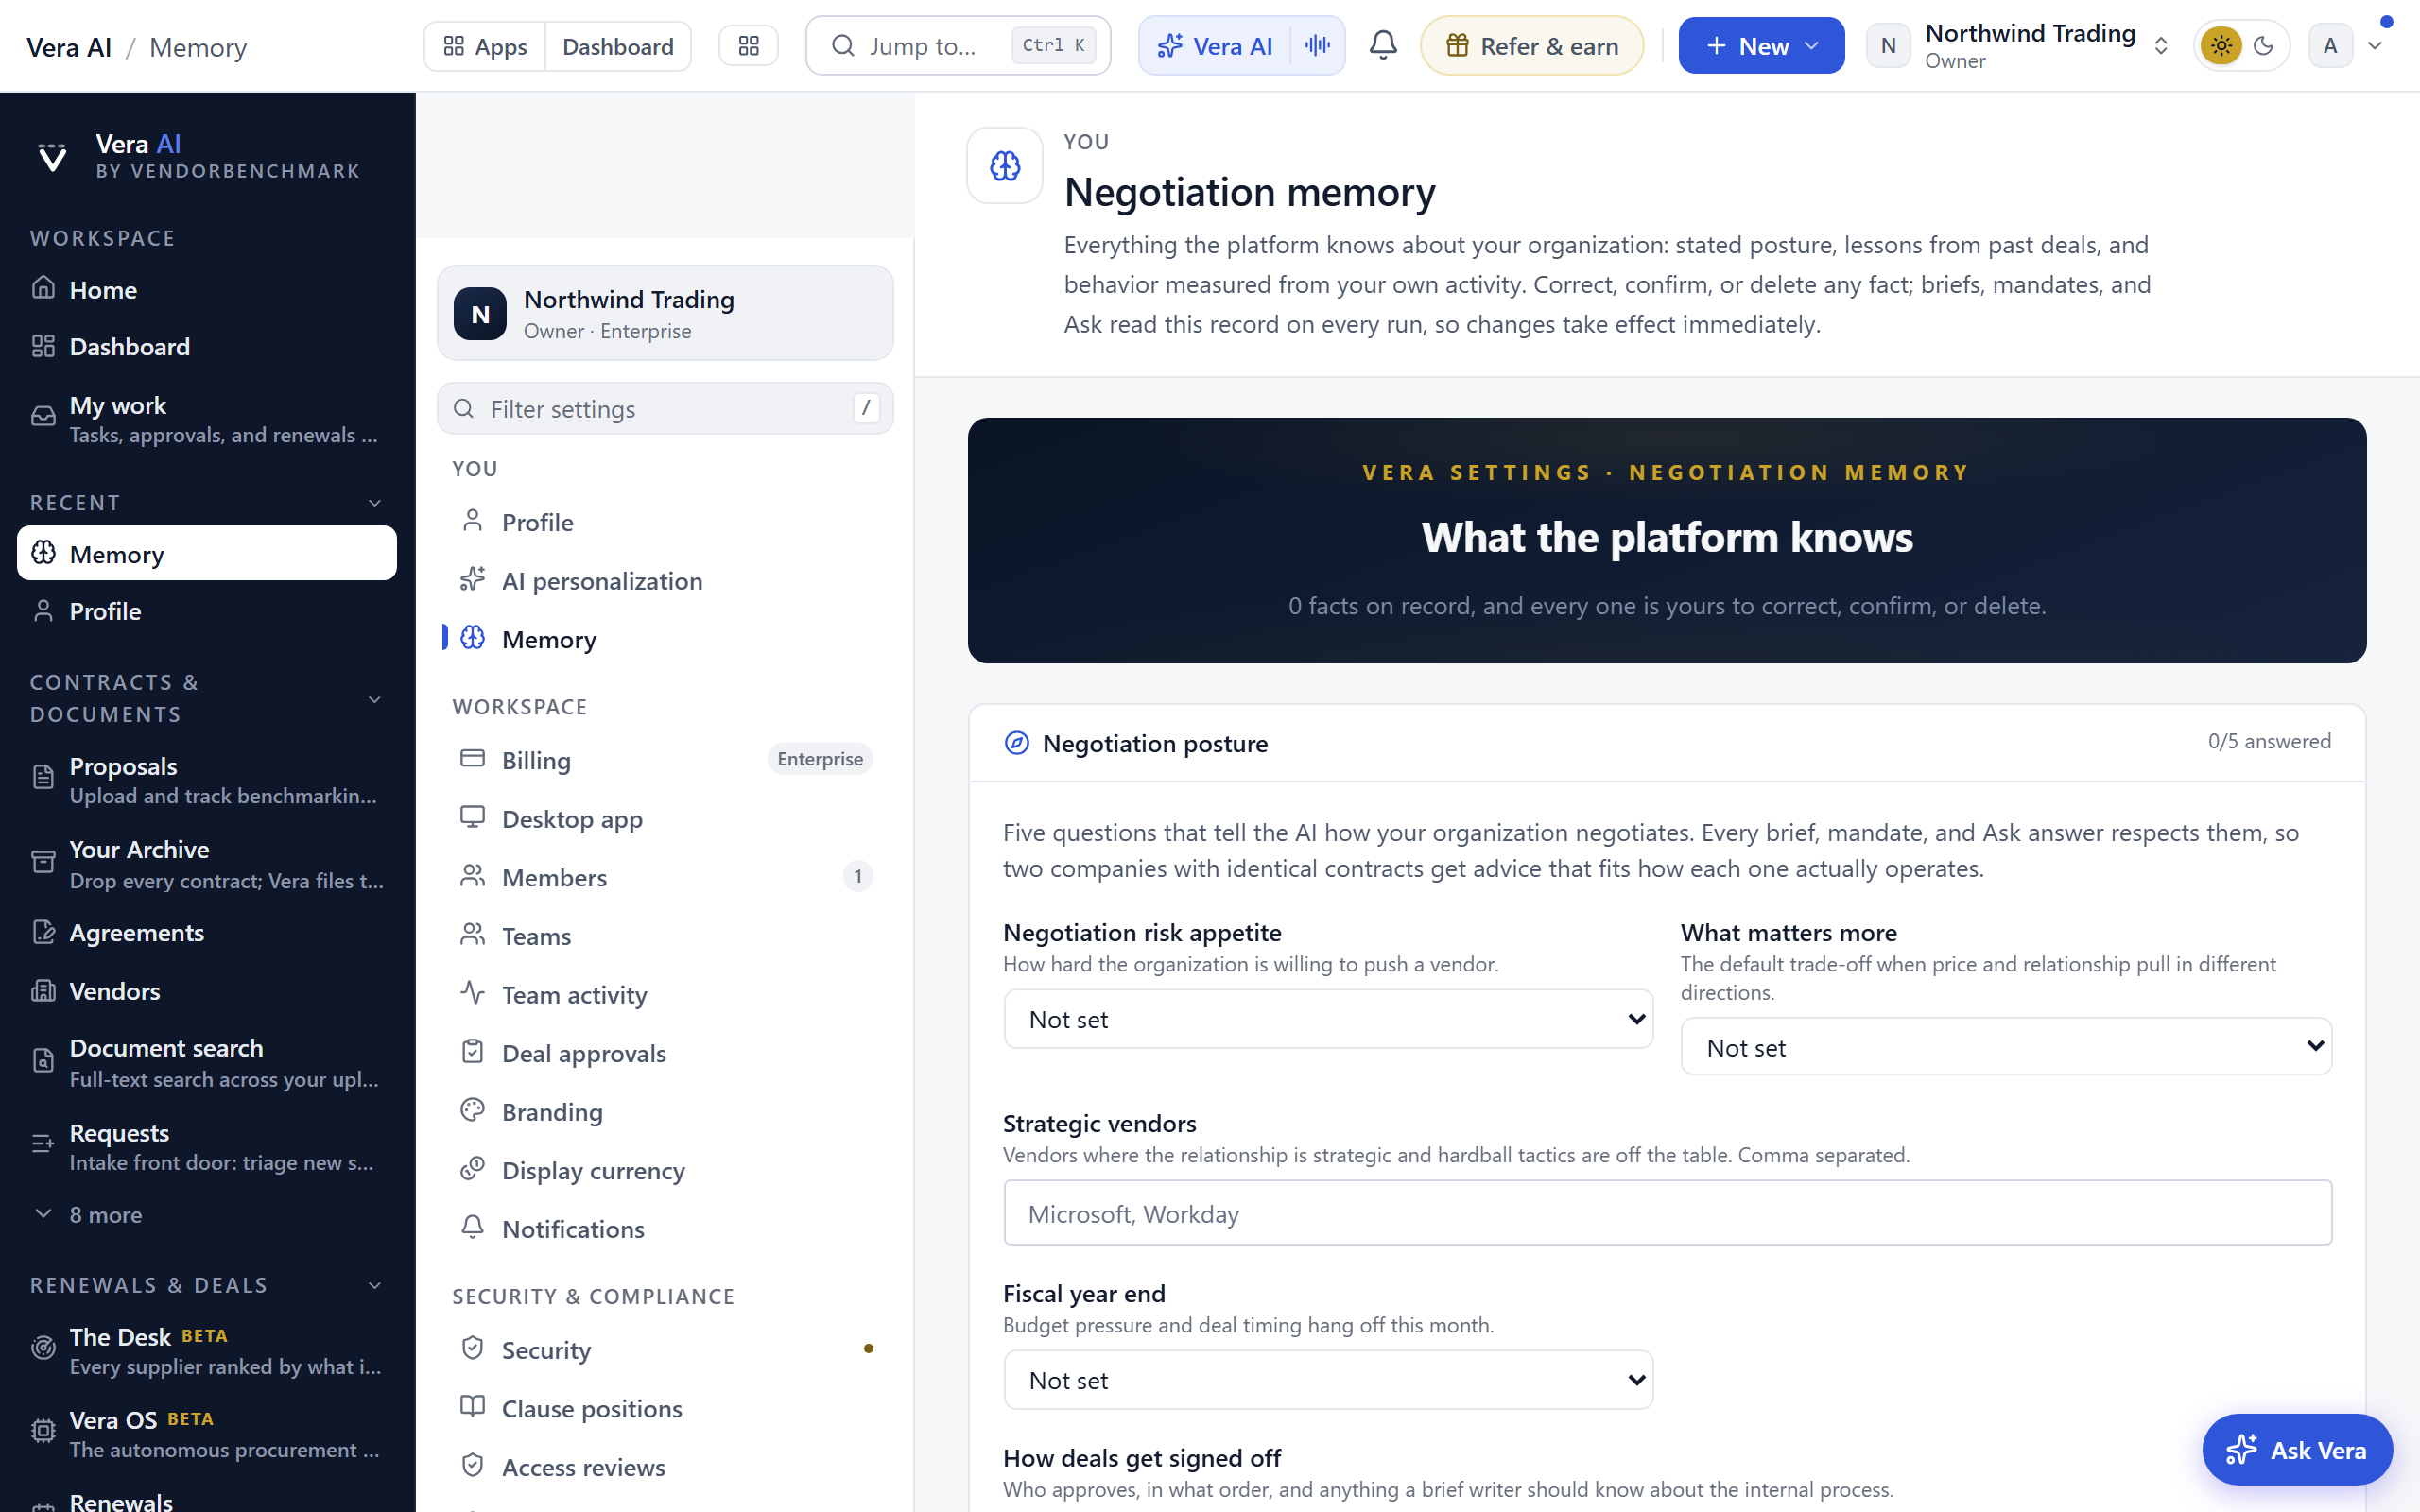
What your organization learned in past negotiations and how it likes to negotiate. Briefs, mandates, and Ask all open with this record, so it is worth keeping current.
On the screen
- Negotiation posture — your organization's stance and preferences, editable by owners.
- Facts — durable conventions about your workspace, for example how a vendor's contracts are classified. Some are added by hand; some are learned automatically when your reviewers correct the same extracted field the same way twice.
- Remembered facts — the individual things learned across past negotiations, each of which you can edit or remove.
How to use it
- Check the posture reflects how your organization actually negotiates.
- Prune or correct any remembered fact that is out of date.
- Corrections you make in the extraction review queue also teach the extractor directly: the next document from that vendor is read with your past corrections in hand.
Related: AI personalization
Billing
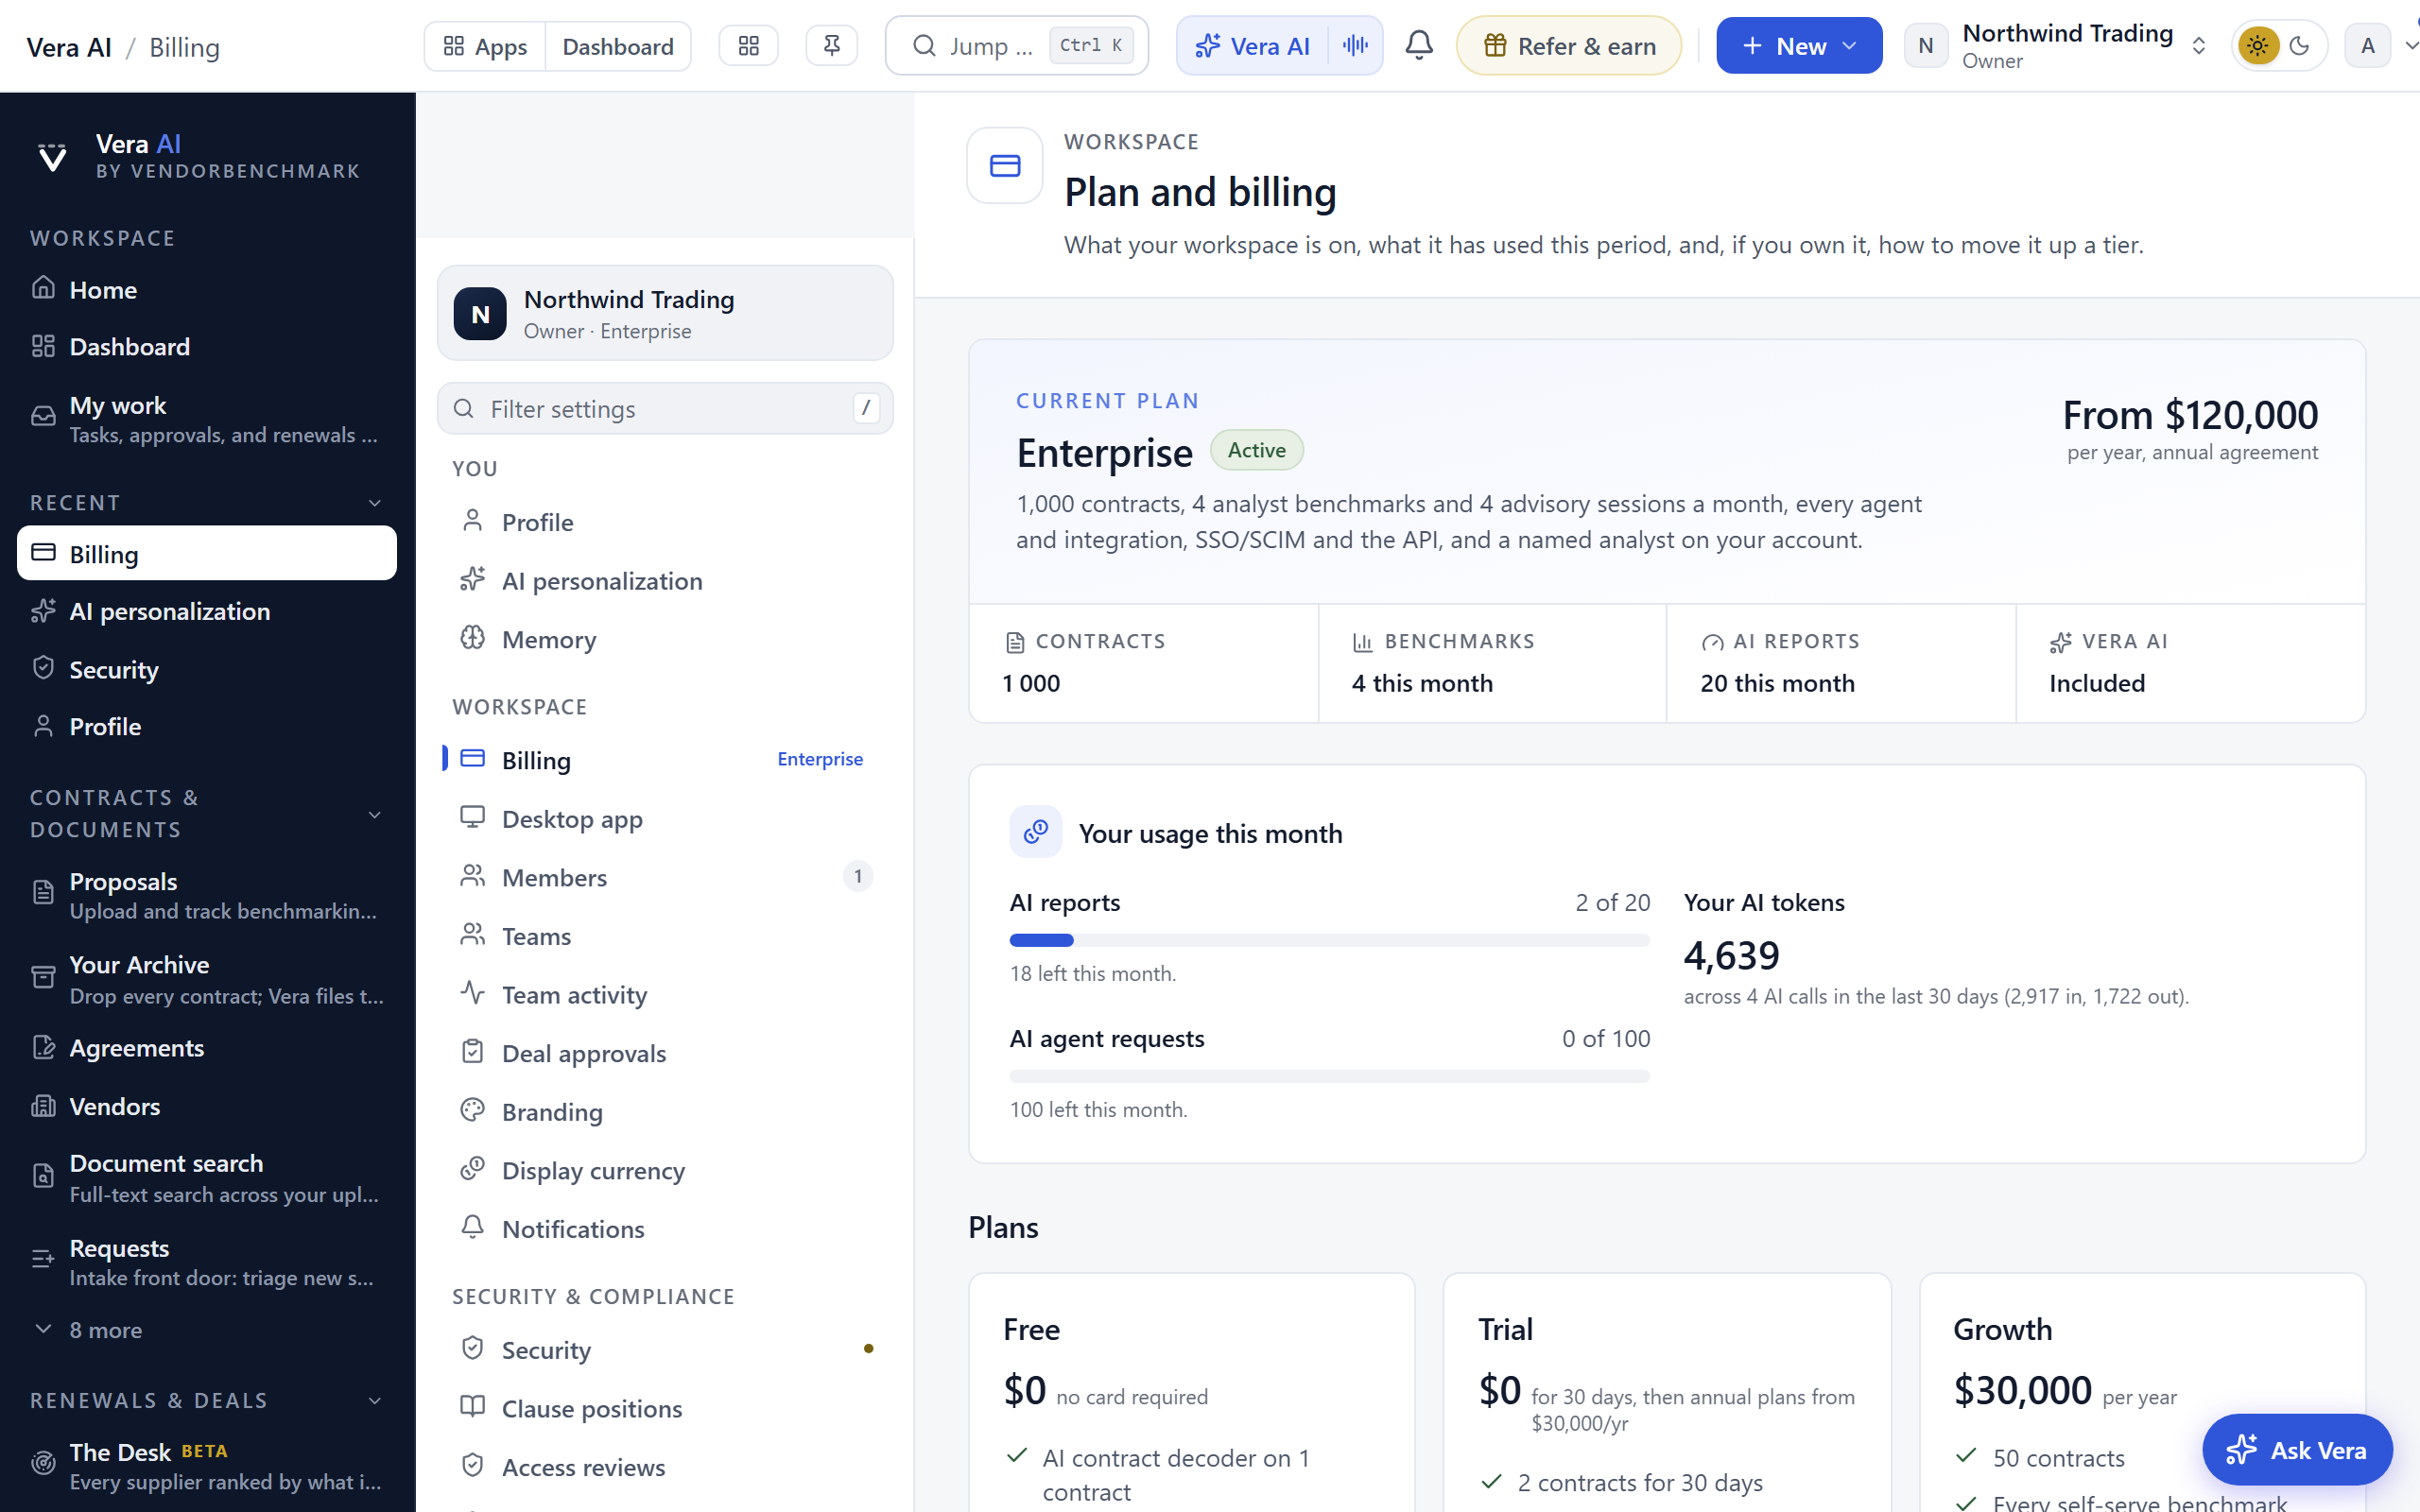
See what plan your workspace is on, how much of your allowance you have used, your benchmark credits, and, if you own the organization, upgrade.
*In plain words: your plan, your meters, and the upgrade path.*
When to reach for this
- A feature says an allowance ran out: the meter here says when the window frees up (Chapter 10 defines every allowance).
- The quarterly owner check: does the plan still fit how the team actually uses the platform?
On the screen
- Current plan — your plan, its status, and price, with the five figures that define it across the foot: how many people it seats, how many contracts it holds, your monthly Vera AI talk time, your analyst benchmarks, and what the AI reports cost you, which is nothing on every plan.
- Usage this period — how many AI reports and agent requests you have run this month, stated as counts because neither is capped, plus your personal AI token usage over the last window.
- AI allowance meter — on seat-priced plans, the percent of your monthly allowance used and roughly how many runs are left; the allowance is yours alone, not pooled.
- Plans — the sellable plans side by side, with an upgrade button on each.
How to use it
- Check where you sit against your allowance for the period.
- If you own the organization and need more, pick a plan and message our team; upgrades are set up the same day and billed by invoice, net 30.
- Not an owner? Ask an owner to upgrade, or message the team.
Related: Members
Desktop app
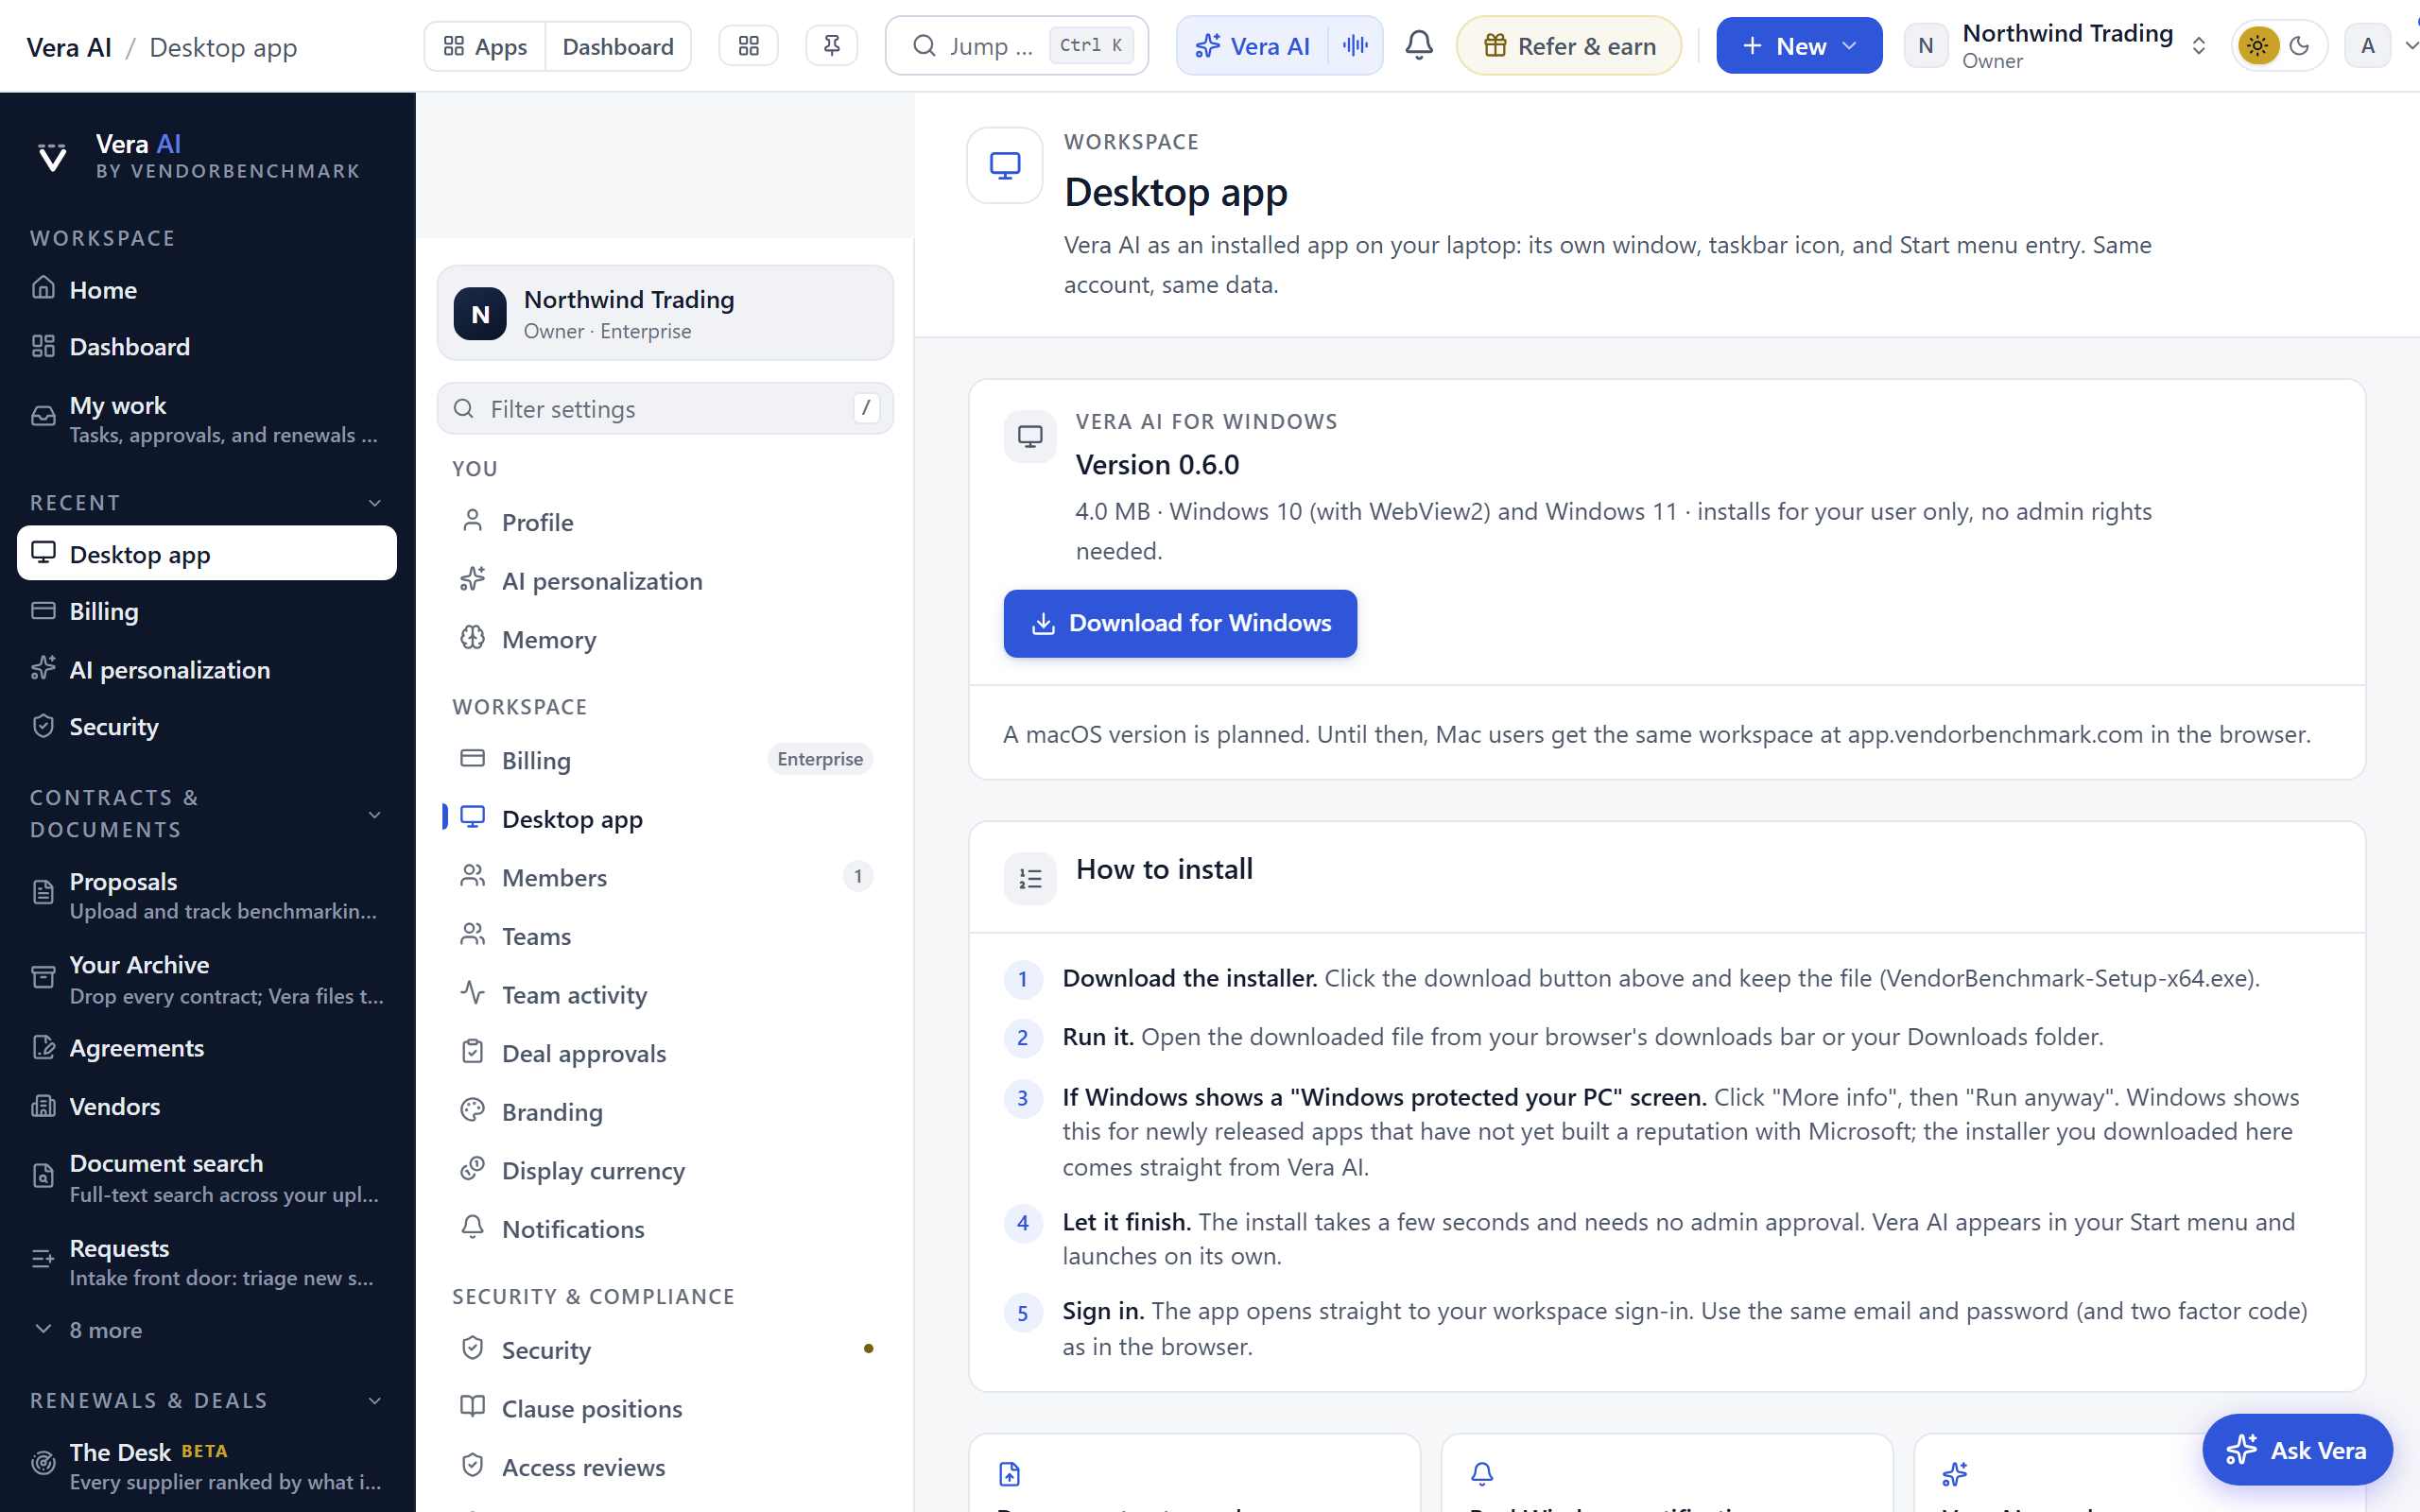
Install the platform as its own app on your laptop: its own window, taskbar icon, and Start menu entry, on the same account and data as the browser. The page offers two applications, VendorBenchmark Desk and Second Chair, each for Windows and, where noted, for macOS.
On the screen
- Download the Desk — the installer for VendorBenchmark Desk, the whole platform as an app, with version and size shown; it installs for your user only, no admin rights needed. Download the Desk for Mac beside it is the same build for macOS 13 and later.
- Download Second Chair — the separate meeting app, described below and in full in chapter 23.
- How to install — the numbered steps, including what to do if Windows shows a "Windows protected your PC" screen, and the extra step a Mac needs the first time.
- Removing it — uninstall any time from Windows Settings, or drag the app to the Bin on a Mac; your account and data are untouched.
How to use it
- Click Download the Desk and run the downloaded installer.
- If Windows warns about a new app, choose More info, then Run anyway.
- Sign in with the same email, password, and two-factor code you use in the browser.
Your contracts as folders on the machine. From version 0.19.0 the Desk can keep your estate on this computer as ordinary Windows folders, one per vendor. Open the Desk, go to Settings inside it, and under Your contracts as folders choose where they should live, then press Bring my contracts down. Every contract lands in its vendor’s folder, where it opens, moves and files like any other document. Drag a paper from one vendor folder to another in Explorer and it changes vendor everywhere, exactly as refiling it in the window does. Deleting a file there removes only your copy: the contract stays in the estate and comes back on the next pass, because removing a contract stays something you do in the app, where it asks twice. Stopping the mirror leaves the files alone, since they are your own copies of your own contracts.
The earlier Vera AI shell, a window around the browser workspace, is no longer offered here: the Desk replaces it and carries more. Copies already installed keep working and keep updating themselves.
Second Chair, the meeting app (early preview)
- Download Second Chair — a separate Windows application for the meetings themselves, installed beside the Desk with its own window and Start menu entry, signed in with the same email and password. The button states the version on offer, and the app updates itself from then on.
- The first run — Windows shows the same "Windows protected your PC" screen as for any newly released app; choose More info, then Run anyway. The app then walks you through three steps: sign in, connect a calendar, and check that it can hear a call.
- What it does — it preps you before a meeting from your own agreements, records both sides of the call to your machine, coaches you while the call runs, turns the recording and your notes into grounded minutes, files them to the workspace, and seats Vera in the meeting when you want her there. Chapter 23 is the full manual for it, screen by screen.
VendorBenchmark Desk, the platform as an app (early preview)
- Download the Desk — the whole platform as its own Windows application, no browser: one window with a paper rail down the left, installed for your user only, signed in with the same email and password.
- Home is the market — the Wire leads the desk: what moved in licensing, pricing, and vendor news, with a yours mark on items touching your estate, then the newest research briefs and films, the main apps as tiles, and an ask bar that opens Vera with your question.
- The Market screen: your vendors, one press from a verdict — the Market tile opens a native screen listing every vendor on your shelf from the Desk's own copy, largest paper first, with the paper count, the annual value, and the next expiry. Pressing a row opens that vendor's benchmark with your figures carried in, and the Contracts and Renewals lists carry the same quiet Benchmark it action on every row. A vendor you do not hold is still one press away: type it in the Market search, or type it into the command palette anywhere and choose Benchmark: what you typed; the library behind the screen holds more than a thousand vendors. A Wire item about a vendor on your shelf offers Benchmark your position right on the row, and a benchmark room names its vendor in the titlebar so several open rooms stay tellable apart.
- The Benchmark Library, drawn by the app — the curve on the rail opens the library itself, the same window as in the browser, and the Market screen and every Benchmark it press land in it. Type the five fields, vendor, products, contract value, industry and region, and the offer, and the sheet answers in order: the discount you are being offered, what comparable buyers at your size get as a plain range with its midpoint, and where the deal ranks, Poor, Below market, At market, Good, or Top of the market, with the gap stated in points and in money over the term. Drag your deal up or down the discount curve to test an ask, or press the plus and minus keys, and the verdict, the four figures and the brief follow it; the offer on your paper stays marked so there is always a way back. Under it the market map places every comparable deal on the line by size and discount with yours among them, and the ranked table puts your workspace in the list by name. The inspector on the right reads the deal four ways: Your deal for the fields and the offer, Levers for the ask ladder and what earns each rung, Brief for the summary, a question box Vera answers from this benchmark, and the exports, and Activity for what the figures rest on and the positions your workspace has saved. What you type is kept as you type it and is there when you come back; Save to the library joins the same portfolio roll up as a position saved in the browser. The shelf of vendors and every line you have opened are held on the machine, so the curve draws and the verdict reads with no network at all, and the foot of the window says when it is showing the copy rather than the live read.
- Every door, one window — the second rail tab lists every app on the desk with search, and each one opens full bleed inside the window as a room wearing the Desk's warm paper and green dress, with back, forward, reload, and a Desk button on the titlebar. Park a room and return to it without losing your place.
- Drop the paper — a PDF or DOCX dropped anywhere on the window is filed and benchmarked through the same pipeline as the upload wizard, then opens as a room.
- The estate lives on the machine — Contracts, Renewals and Market open from the Desk's own copy rather than loading a page: instant, searchable, readable with no network at all, and reading as one office through shared tabs. Contracts opens on the stake: the annual value on file, papers with identical duplicates folded into one row with a count, the next notice deadline counted to the day you must act, and what is in flight, with a Needs you first rail ranking the largest paper on a running clock ahead of the list. Rows carry consequence, values right aligned and larger past a million a year, dates labeled with what they are and marked inside sixty days, and each row opens the paper in the reader with quiet Benchmark it and Record actions beside it. Group the list by stage or by vendor, sort by value, term end or newest, and sample paper waits in its own line outside your totals. Renewals counts the notice deadline, the date you actually have to act by, rather than the expiry, and says expired when an agreement has already ended. The whole archive, the upload wizard and the watched folder are one press away at the foot. Everything held locally is a copy of what you already had access to, kept in your own Windows profile, and erased when you sign out.
- The desk opens on what it knew — the Wire, the briefs and the films appear immediately from the last time the app had a network, labelled with how old they are until the live read lands.
- Vera anywhere — press Ctrl Shift Space in any application and the Desk comes forward with the ask bar ready, even from the tray. Select text anywhere, press Ctrl Shift A, and Vera opens with that text as the question; nothing is read without the keypress and your clipboard is restored exactly as it was.
- Right click a contract in Explorer — PDF and DOCX files gain a Benchmark with VendorBenchmark entry that files the paper through the same pipeline as the upload wizard, asks for the benchmark, and opens the contract. It works whether the Desk is open, in the tray, or closed, in the reader.
- The Contract Management Portal, one press from the rail — the cabinet on the rail opens the Contract Management Portal, the platform's one window over the whole estate: drop papers or a folder tree onto Files, read them with the standard read or a lens you describe in your own words, work the renewals, search every word with the page it sits on, and see where each agreement stands against the market. It fills the Desk's window rather than floating inside it, because on a desktop the app is already the window. It is also a card on Your apps and five rows in the jump palette, so typing archive, explorer, upload, indexing, passage or benchmark finds it.
- The Reading room — the rail's book carries reading itself. It opens on the papers this machine has read, newest first, so you land back where you left off, and under them every paper on the machine, searchable, each one a press from the reader. Record beside a row opens the record page instead when that is what you wanted. The list is the Desk's own copy, so it is there before any network.
- A filed contract opens in the reader — whichever way a paper reaches the Desk, dropped on the window, caught by the watched folder, opened from Explorer or Finder, or pressed in the Desk's own contract list, it opens as the document rather than as its record page: the paper filling the window, and beside it Vera's read, the markup you can edit line by line, the comments, and the way to send it to a teammate. The window carries the rest of the reading suite in the same frame: the contract, MSA and SOW Agents, Compare against a second paper, the comment ledger, a conversation with Vera about the paper, the document's thread, and search across every document in the workspace. It is the platform's own reader, so the reading, the markup and the audit trail are the same whether you are in the browser or the app.
- Give it a folder and it files what lands there — under Settings › This machine inside the app, point the Desk at any folder on your computer. Every PDF or DOCX that arrives in it is filed and benchmarked through the same pipeline as the upload wizard, with nobody opening the app: the scanner's output folder, the shared drive legal saves to, or your own downloads. It knows a file by its contents rather than its name, so the same agreement saved twice, or downloaded again under a different name, stays one contract. The app tells you what it took and what came back, and Stop watching ends it.
- The machine lock — on the same screen, switch on Windows Hello and the Desk asks for your face, fingerprint or PIN each time it opens. It is a lock on the window, not on the account: your platform sign in still stands behind everything the app reads. A machine with no Hello enrolled is never locked out of its own desk, and the Mac build does not offer the switch at all rather than offering one that would do nothing.
- It waits in the tray — closing the window parks the app rather than quitting it: Windows notifications still arrive for what needs you, with Open landing in the right room and Mark as read clearing it quietly, and the tray tooltip carries the unread count. Quit lives in the tray menu.
- Every contract tool has a door — the app catalog and the command palette carry Vendors, Compare contracts, Coverage, the Rights register, the Clause library, Diligence, Review tables, Document clusters, Agreement Studio and the Vault, alongside the tools that were already there. Search finds them by the words you would actually use rather than only their names: redline finds Compare contracts, dd finds Diligence, entitlements finds the Rights register, data room finds both the Vault and Diligence.
- Your account settings, from inside the app — Settings › This machine lists every account and workspace setting the platform has, grouped the way the website groups them: billing, notifications, members and teams, security and single sign on, the audit log, data controls, integrations and the API. Each one opens the real settings screen inside the window, so what you change is what your team sees everywhere. Settings only an owner can change appear only if you are an owner. They are searchable from the command palette too, by the words you would actually type rather than the words on the label: sso finds single sign on, 2fa finds security, gdpr finds data controls, invoice finds billing.
- It keeps itself current, and shows its working — the app looks for a new version shortly after it opens and every six hours after that, then installs it on its own. Under Settings › This machine, Updates names the version you are running, what the last check did and when, and the handful before it, with Check now to run one on the spot. A check that fails says why rather than failing quietly.
- On a Mac — Download the Desk for Mac gives one universal build for Apple silicon and Intel, macOS 13 and later, from the same commit as the Windows installer. It is not signed by Apple yet, so the first open is refused: open the Applications folder, right click VendorBenchmark Desk, choose Open, then confirm. Once only. The keyboard shortcuts are Cmd Shift Space for the ask bar and Cmd Shift A for selected text, and the Explorer verb's Mac form is right click the file in Finder › Open With › VendorBenchmark Desk. macOS asks once for Accessibility permission before the selection shortcut can read what you highlighted; until you grant it under System Settings › Privacy & Security, that one shortcut opens an empty ask bar. The watched folder works the same on both. Windows Hello is the one Windows-only piece and always will be.
- What arrives next — the signature that stops Windows and macOS warning about a new app. It is an early preview and says so in the corner.
- The first run — Windows shows the same "Windows protected your PC" screen as for any newly released app; choose More info, then Run anyway.
Mobile app
Vera AI on your phone. Five native screens for the things a phone is better at, and a Rooms tab that opens the instruments themselves, signed in, running the same figures as the web app.
On the screen
- Renewals — the notice countdown, nearest deadline first, with the price and terms watch alerts underneath. This is the screen the app exists for: a notice window you miss on a laptop is a notice window you miss.
- Rooms — sixteen instruments grouped by the job they do, with a search field over the lot. Start (the workspace desk, Ask Vera, the contract and SOW Agents, second opinion), Negotiate (the call room, case files, playbooks, the renewal calendar), Watch (the research library, videos, instant benchmark, the buyer network), and Operate (agents, agreements, the full catalog). These are the same rooms as on your laptop rather than phone copies of them, so anything shipped on the web is on your phone the same day and the two can never disagree on a number.
- Ask — the assistant, streaming, with your own contracts and the research library behind the answer.
- Submit — photograph or pick a contract and send it for benchmarking, the same path as the upload wizard in the browser.
- Reports — your delivered benchmark reports and documents, readable offline once opened.
- Settings — notification kinds and channels, your registered devices, and the fingerprint or Face ID lock.
- The call room on a phone — the call room opens with the microphone wired through, so Vera can listen and prompt during a vendor call while you are away from the desk. The app asks for the microphone the first time you open that room and never before it, and the room's own consent panel governs recording exactly as it does on a laptop.
- Links out — a link that leaves the platform opens in your phone's own browser, with the address bar visible, rather than inside the app.
How to use it
- Install the app, then sign in with the same email, password, and two-factor code you use in the browser.
- Turn on the fingerprint or Face ID lock in Settings if the phone is shared or travels with you.
- Choose your alert kinds in Settings; renewal alerts start off, exactly as they do on the web.
Tips
- Signing out clears the session inside the app's rooms as well as the native screens, so a shared phone cannot be handed on with an account still open.
Related: Notifications, Desktop app
Members
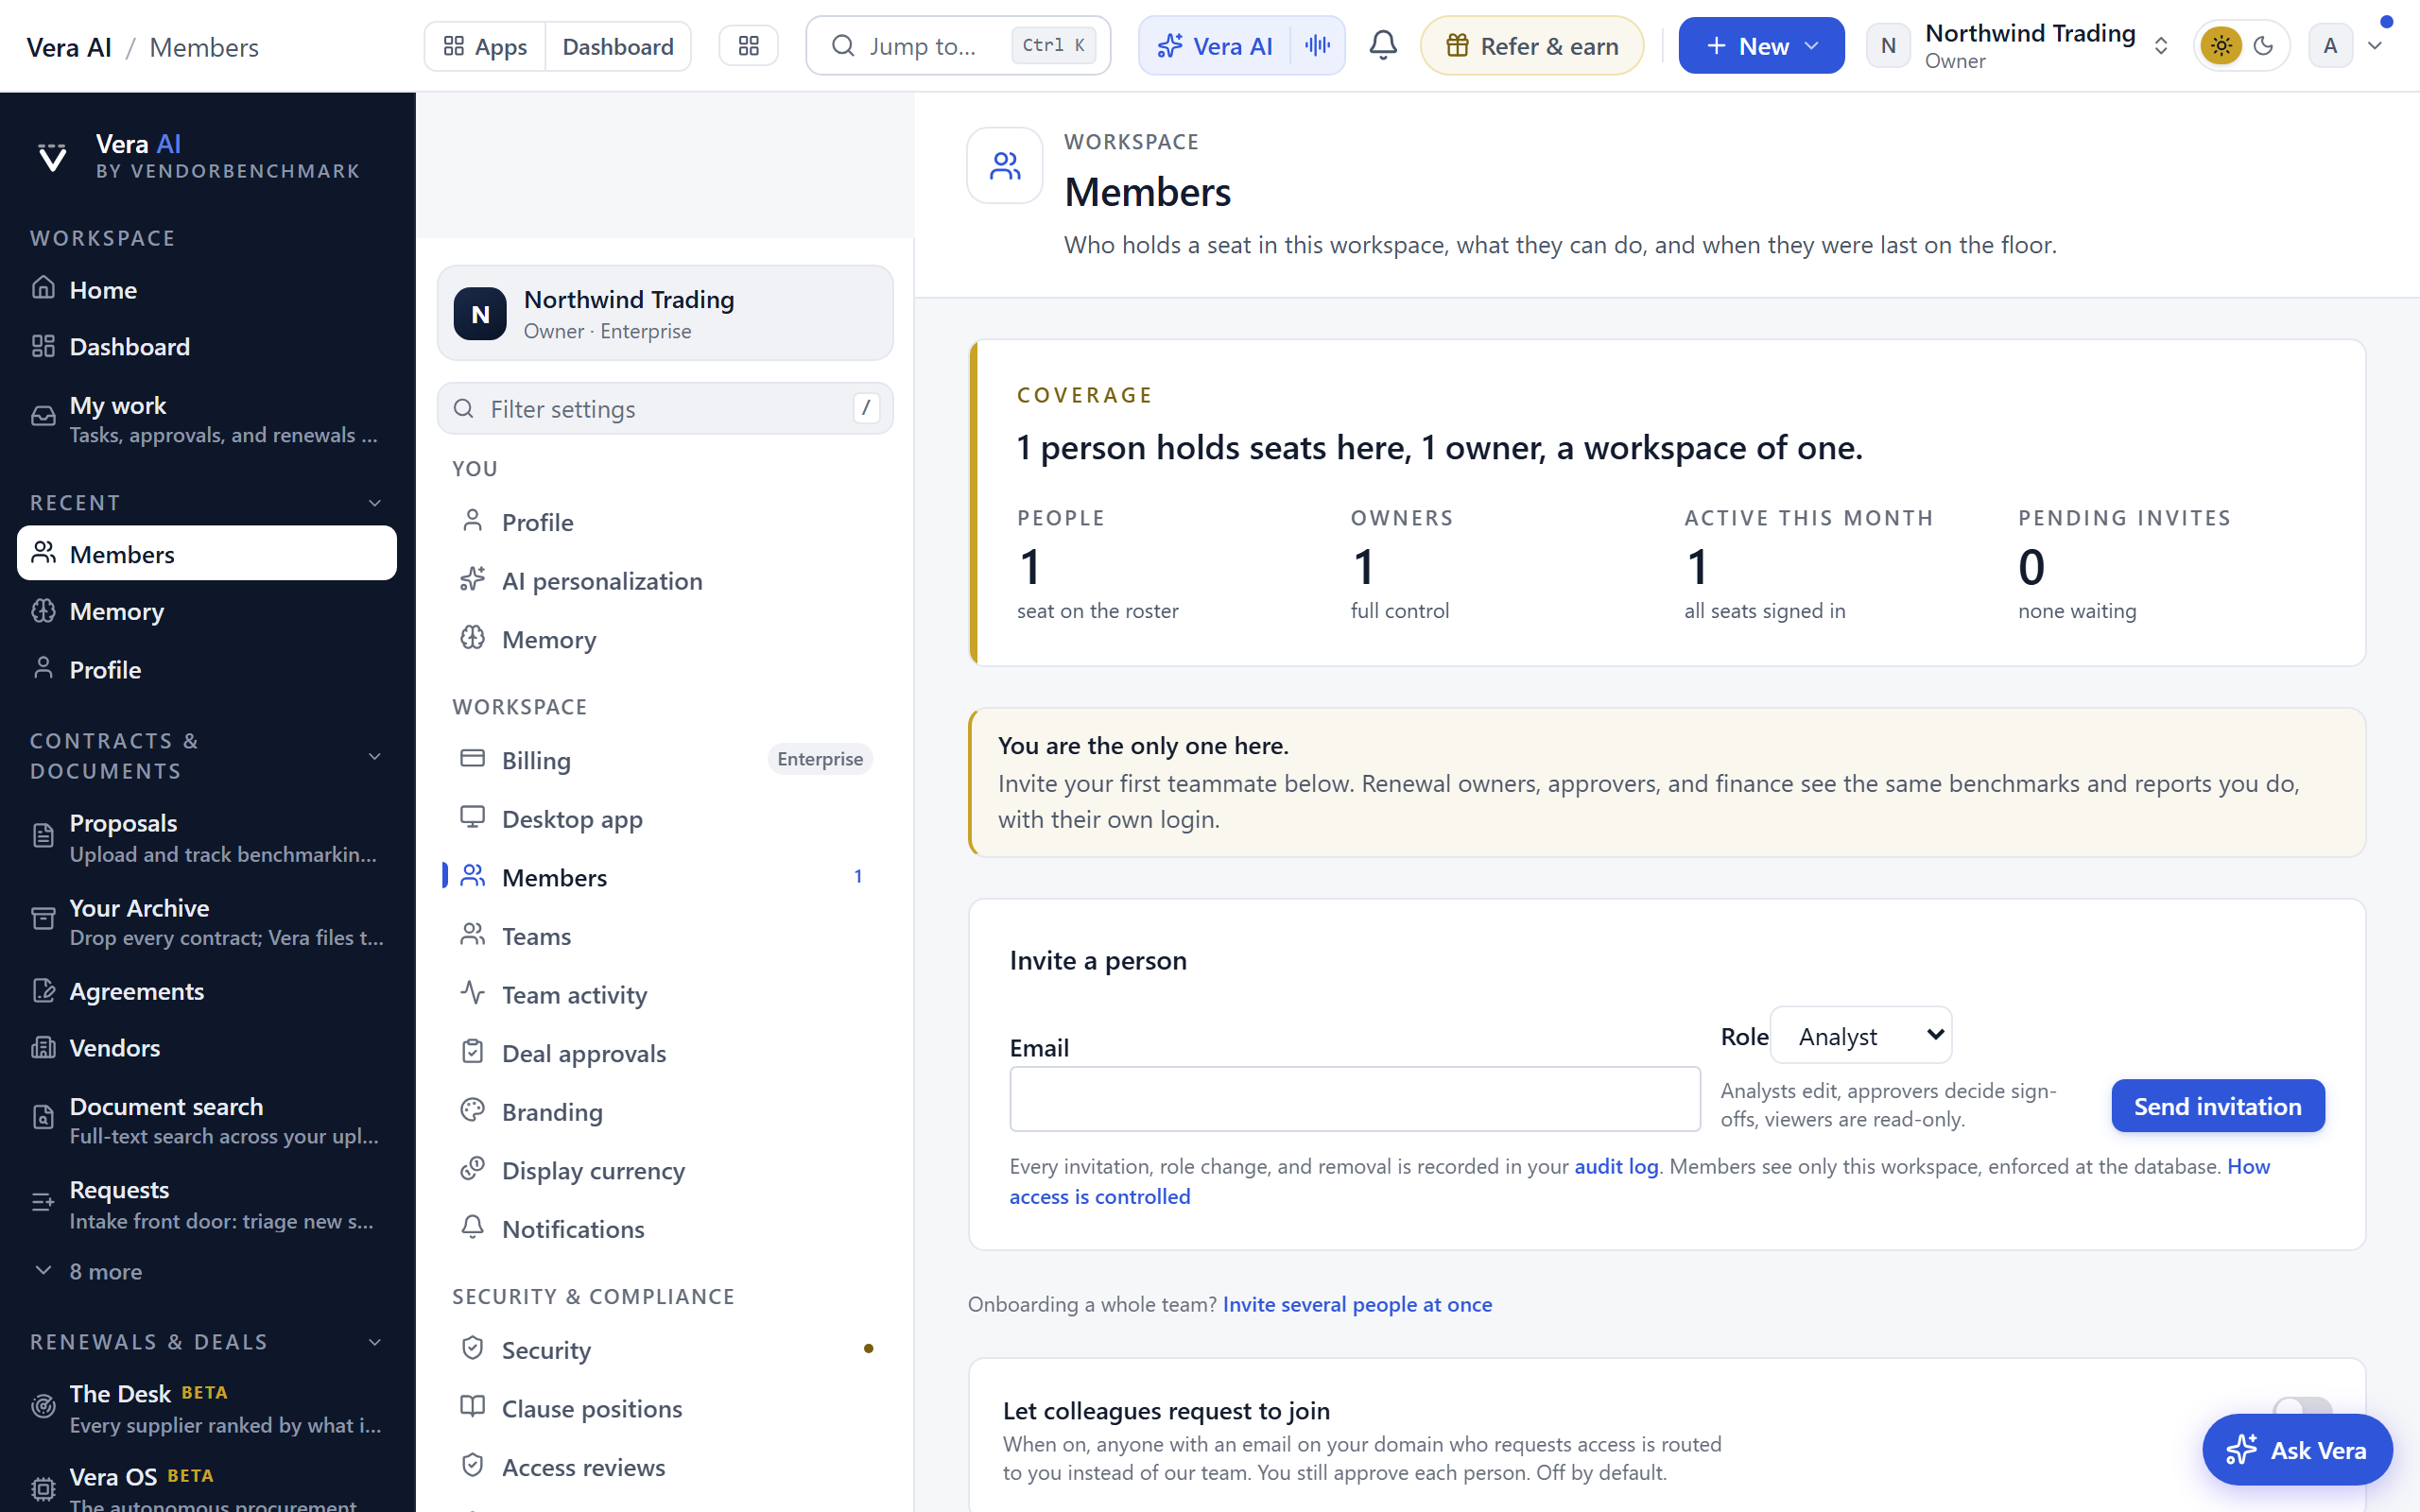
Invite teammates, set their role, and manage everyone in your organization. Owners also see pending invitations, seat usage against the plan, and any join requests waiting for them. A non-owner who opens the page sees a locked plate naming the workspace owners to ask, not a bare access line.
*In plain words: who is in, what they can do, and the clean way in and out.*
When to reach for this
- Bringing people in (the onboarding recipe) and, just as importantly, out (when someone leaves).
- The monthly hygiene glance: stale invitations and unaccounted seats.
On the screen
- Seats — the verdict leads with seats in use against your plan's cap: 2 on Free, 5 on Trial, 2 on Growth, 5 on Professional, unlimited on Enterprise (the full table is in Plans & limits). The cap is a hard limit on the roster, checked when someone is added by invite, domain join, or SCIM: pending invites and blocked members hold seats too, and nobody already on the roster is ever removed by it. When the cap is full, remove a member, revoke a pending invite, or upgrade.
- Member list — everyone in the organization with their role, last sign-in, and recent activity trail. Export the whole roster to CSV for access reviews from the link above the grid.
- Invite — send an email invitation and set the new person's role. Invitations expire after 7 days; resending restarts the clock and refreshes the sign-in details.
- Invite several at once — paste up to 50 addresses (commas, spaces, or new lines) and give them all one role in a single batch.
- Pending invitations — invites not yet accepted, with the days until expiry and a delivery status when an email bounced or was delayed. Revoking a pending invite removes the reserved seat entirely.
- Roles — change a member's role inline, or block a member from the workspace. Blocking or removing someone signs them out everywhere immediately. The workspace always keeps at least one active owner: promote a second owner before demoting or removing the last one.
- Sign out — end every session a member holds without blocking or removing them, for a lost laptop or a departed contractor whose seat stays. They sign back in with their password (and MFA) next time.
- Join requests and domain capture — approve people who asked to join, pick their role at approval, and optionally let anyone on your email domain request to join.
How to use it
- Click Invite, enter the person's email, choose their role, and send. For a whole team, use Invite several people at once instead.
- Watch pending invitations for delivery problems and resend if needed; an expired invite just needs a resend.
- Adjust roles as responsibilities change; block anyone who should no longer have access.
- Before an owner leaves the company, promote their replacement to owner first; the platform refuses changes that would leave no active owner.
Tips
- If an invite shows as bounced, check the address; the person never received the email.
- Any member can leave a workspace themselves from the bottom of Settings › Profile, no owner action needed.
Related: Team activity · Deal approvals
Teams
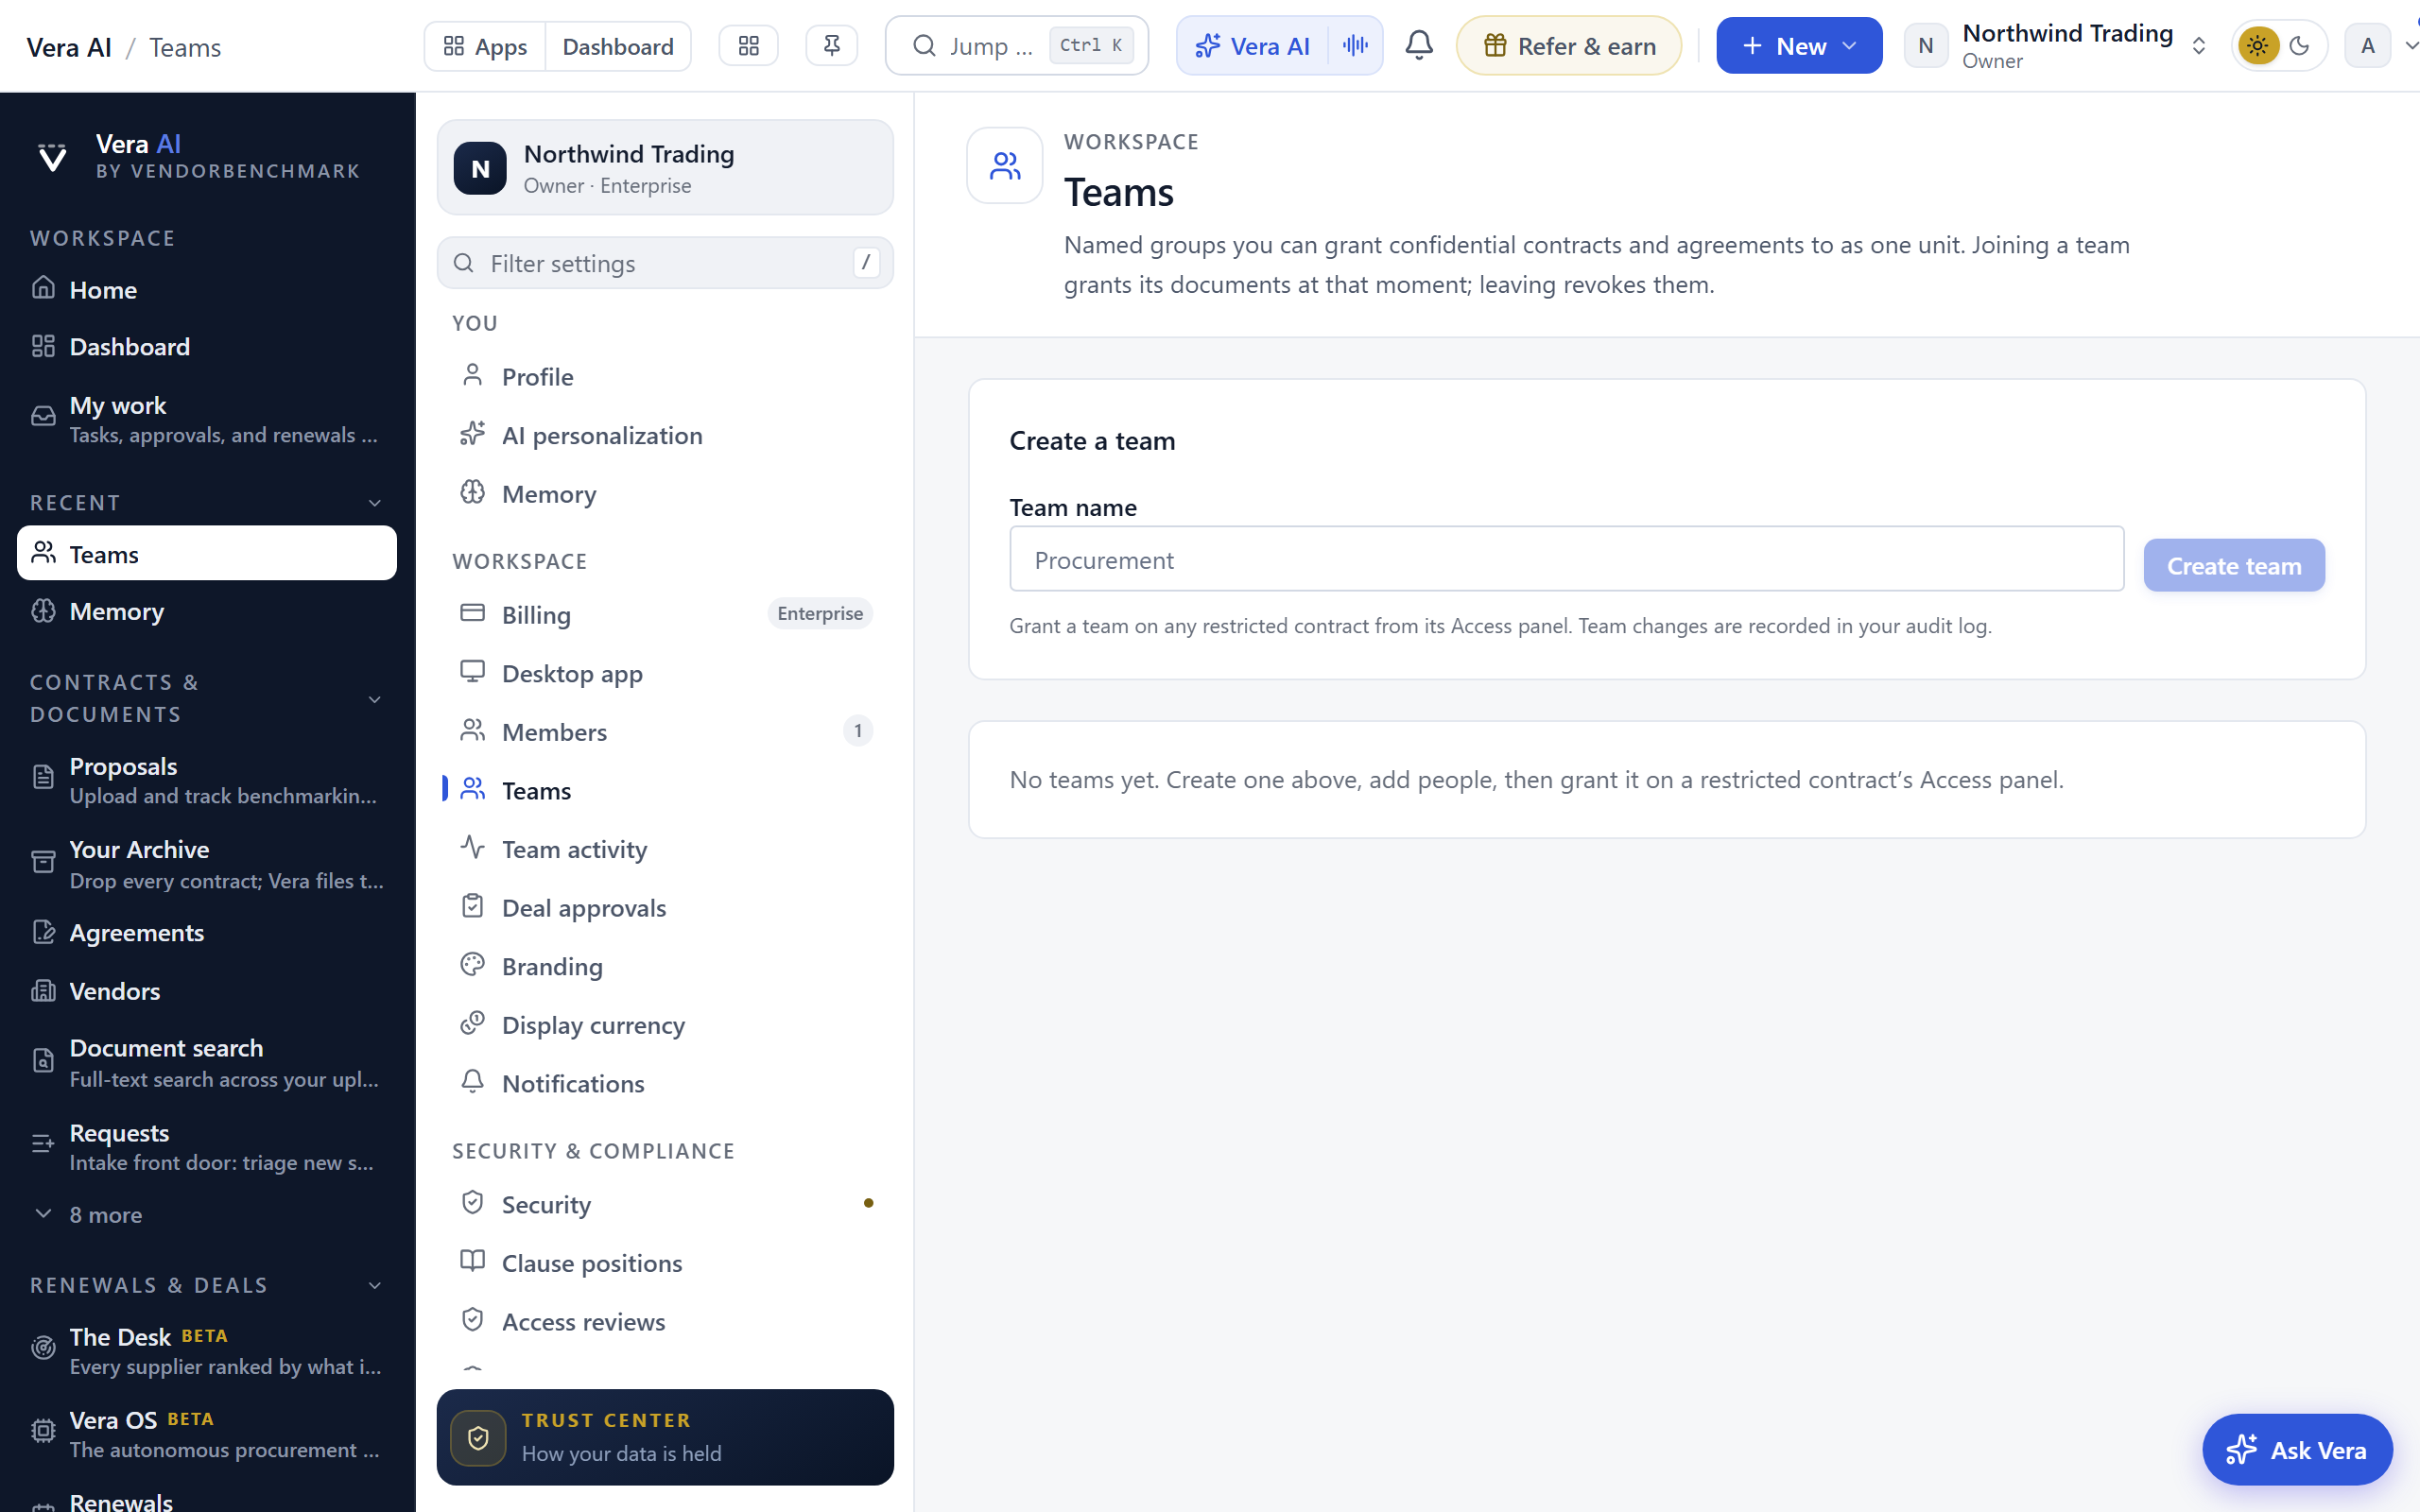
Named groups you can grant confidential contracts and agreements to as one unit. Membership in a granted team is the access itself: joining the team grants its documents at that moment, leaving revokes them, with nothing to clean up per document. A non-owner who opens the page sees a locked plate naming the workspace owners to ask.
*In plain words: grant a group once, and joining or leaving the group is the access change.*
When to reach for this
- Before the first sensitive document arrives, not after: create the teams the org chart implies.
- Restricted work (a Vault project, a diligence) where offboarding must be one removal, not a document sweep.
On the screen
- Create a team — name it after how your company actually organizes: Procurement, Finance, Legal.
- Team cards — each team with its people and how many confidential grants it currently holds. Add or remove people inline; removal takes effect immediately.
- Delete — deleting a team revokes every grant it holds for its members in the same stroke.
How to use it
- Create a team and add the people who share an access need.
- Open a restricted contract and grant the team from its Access panel, next to individual grants.
- When someone changes roles, move them between teams; their document visibility follows automatically.
Tips
- Prefer team grants over long lists of individual names: the grant list stays readable and offboarding is one removal, not a document sweep.
Related: Members
Team activity
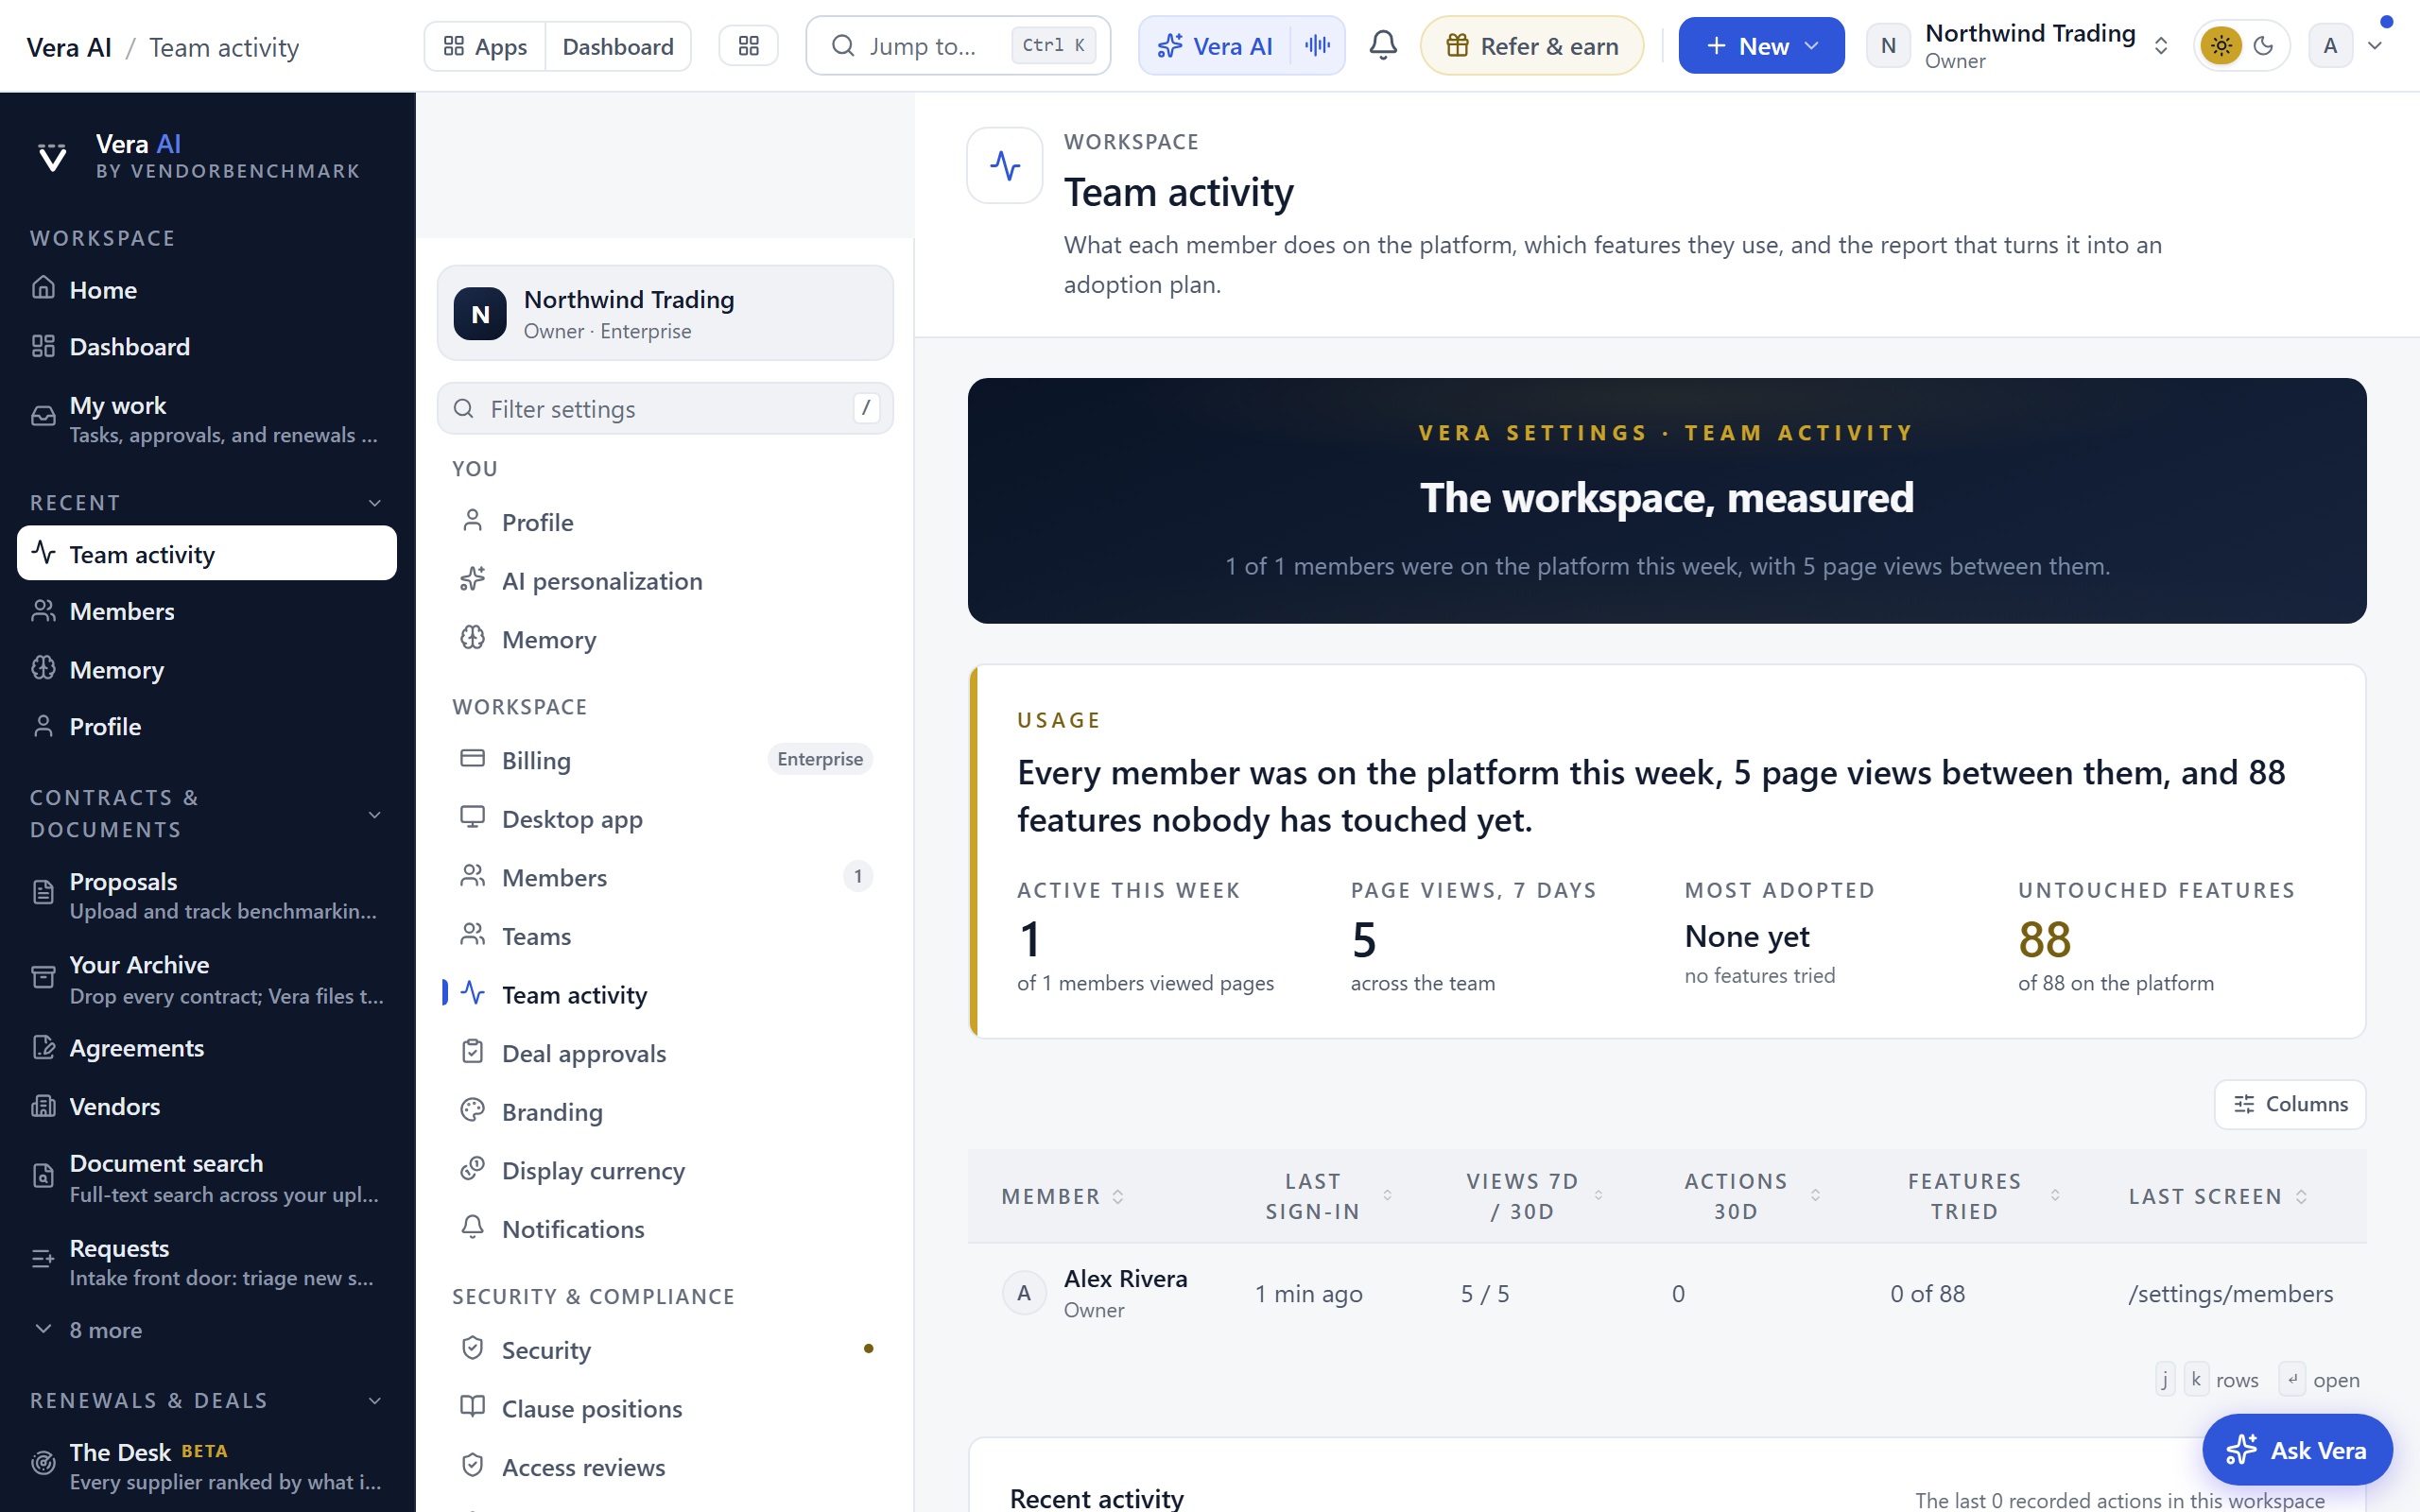
What each member actually does on the platform, which features they use, and an on-demand report that turns the numbers into an adoption plan. A non-owner who opens the page sees a locked plate naming the workspace owners to ask.
On the screen
- Usage verdict — how alive the workspace is this week: active members, page views, most-adopted feature, and features nobody has touched.
- Per-member table — each member's last sign-in, page views over 7 and 30 days, recorded actions, features tried, and last screen.
- Recent activity — the last recorded actions across the workspace, named, newest first.
- The usage report — an analyst read of the numbers that you can generate on demand.
How to use it
- Scan the verdict to gauge overall adoption.
- Use the per-member table to spot who has not started and which features go unused.
- Generate the usage report when you want a written adoption plan to act on.
Deal approvals
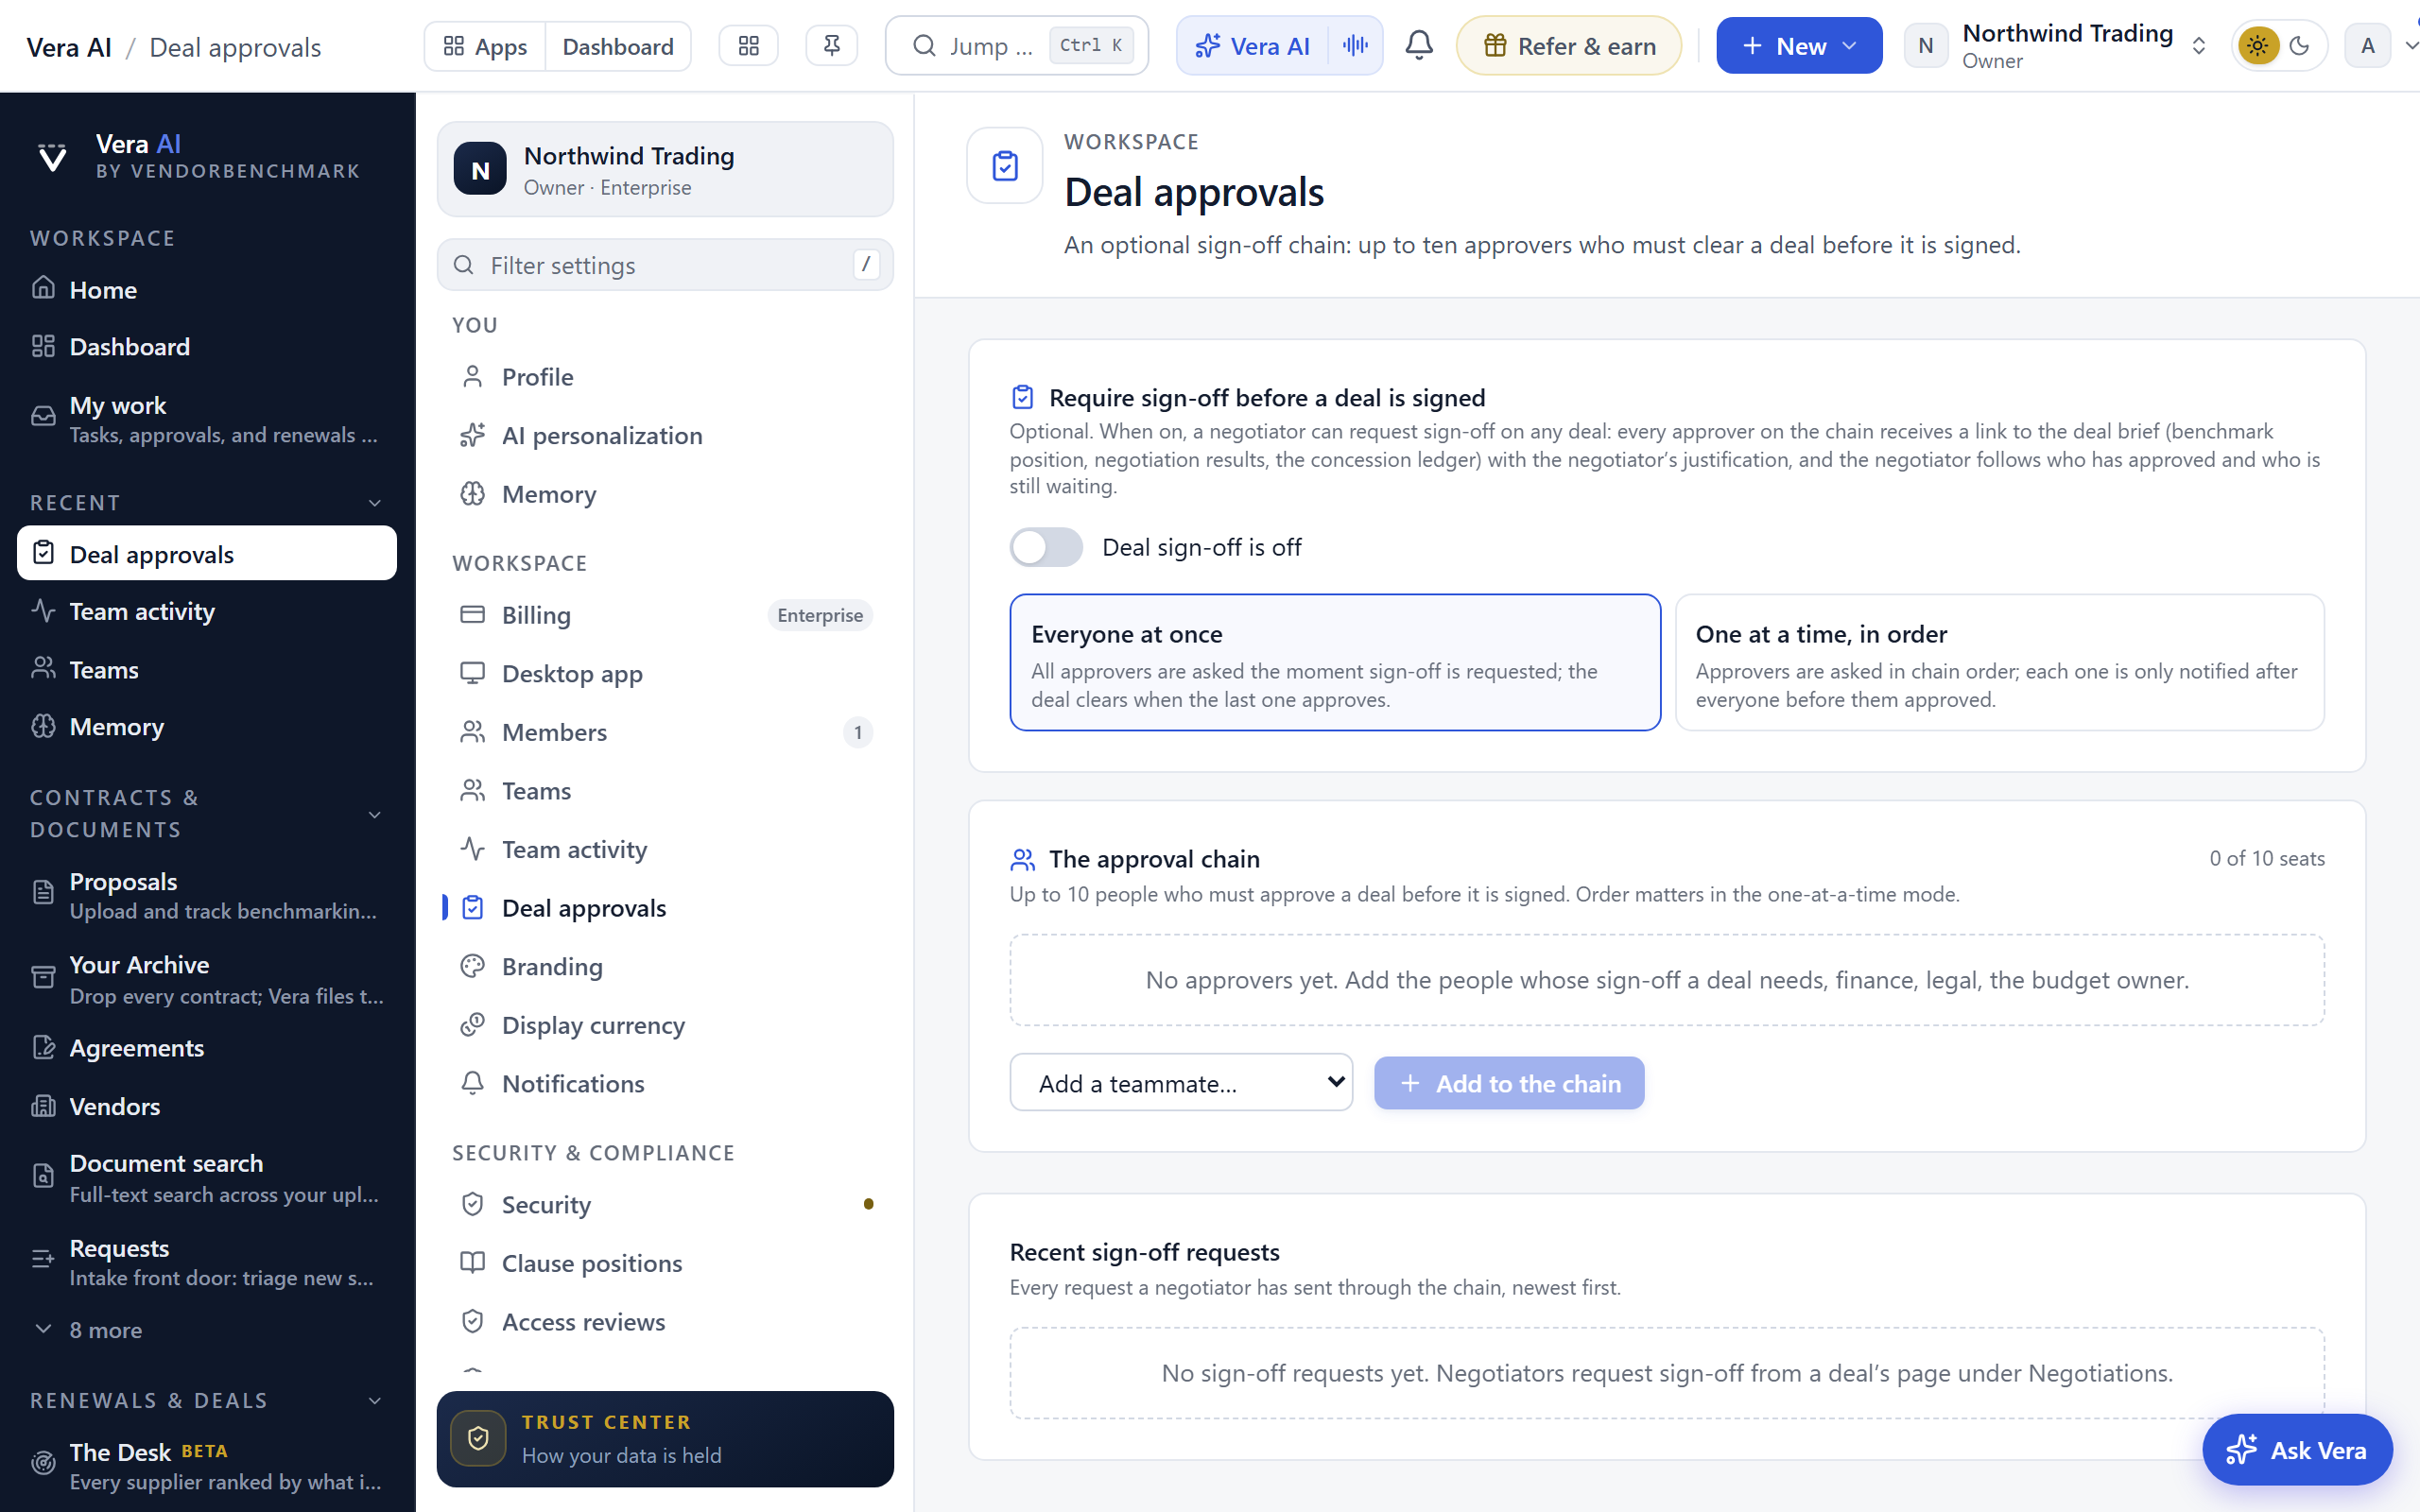
An optional sign-off chain: up to ten approvers who must clear a deal before it is signed. Off by default; turn it on when your organization needs a documented approval step. A non-owner who opens the page sees a locked plate naming the workspace owners to ask.
On the screen
- Enable and mode — turn the chain on and choose how sign-off works.
- Approvers — add up to ten people from your organization as the required approvers.
- Recent sign-off requests — every request negotiators have sent through the chain, with how many approvers have cleared it.
How to use it
- Turn on deal approvals and pick your approvers.
- Negotiators request sign-off from a deal's page under Major renewals; approvers vote from their queue.
- Track progress in the recent requests list.
Related: Approvals
Branding
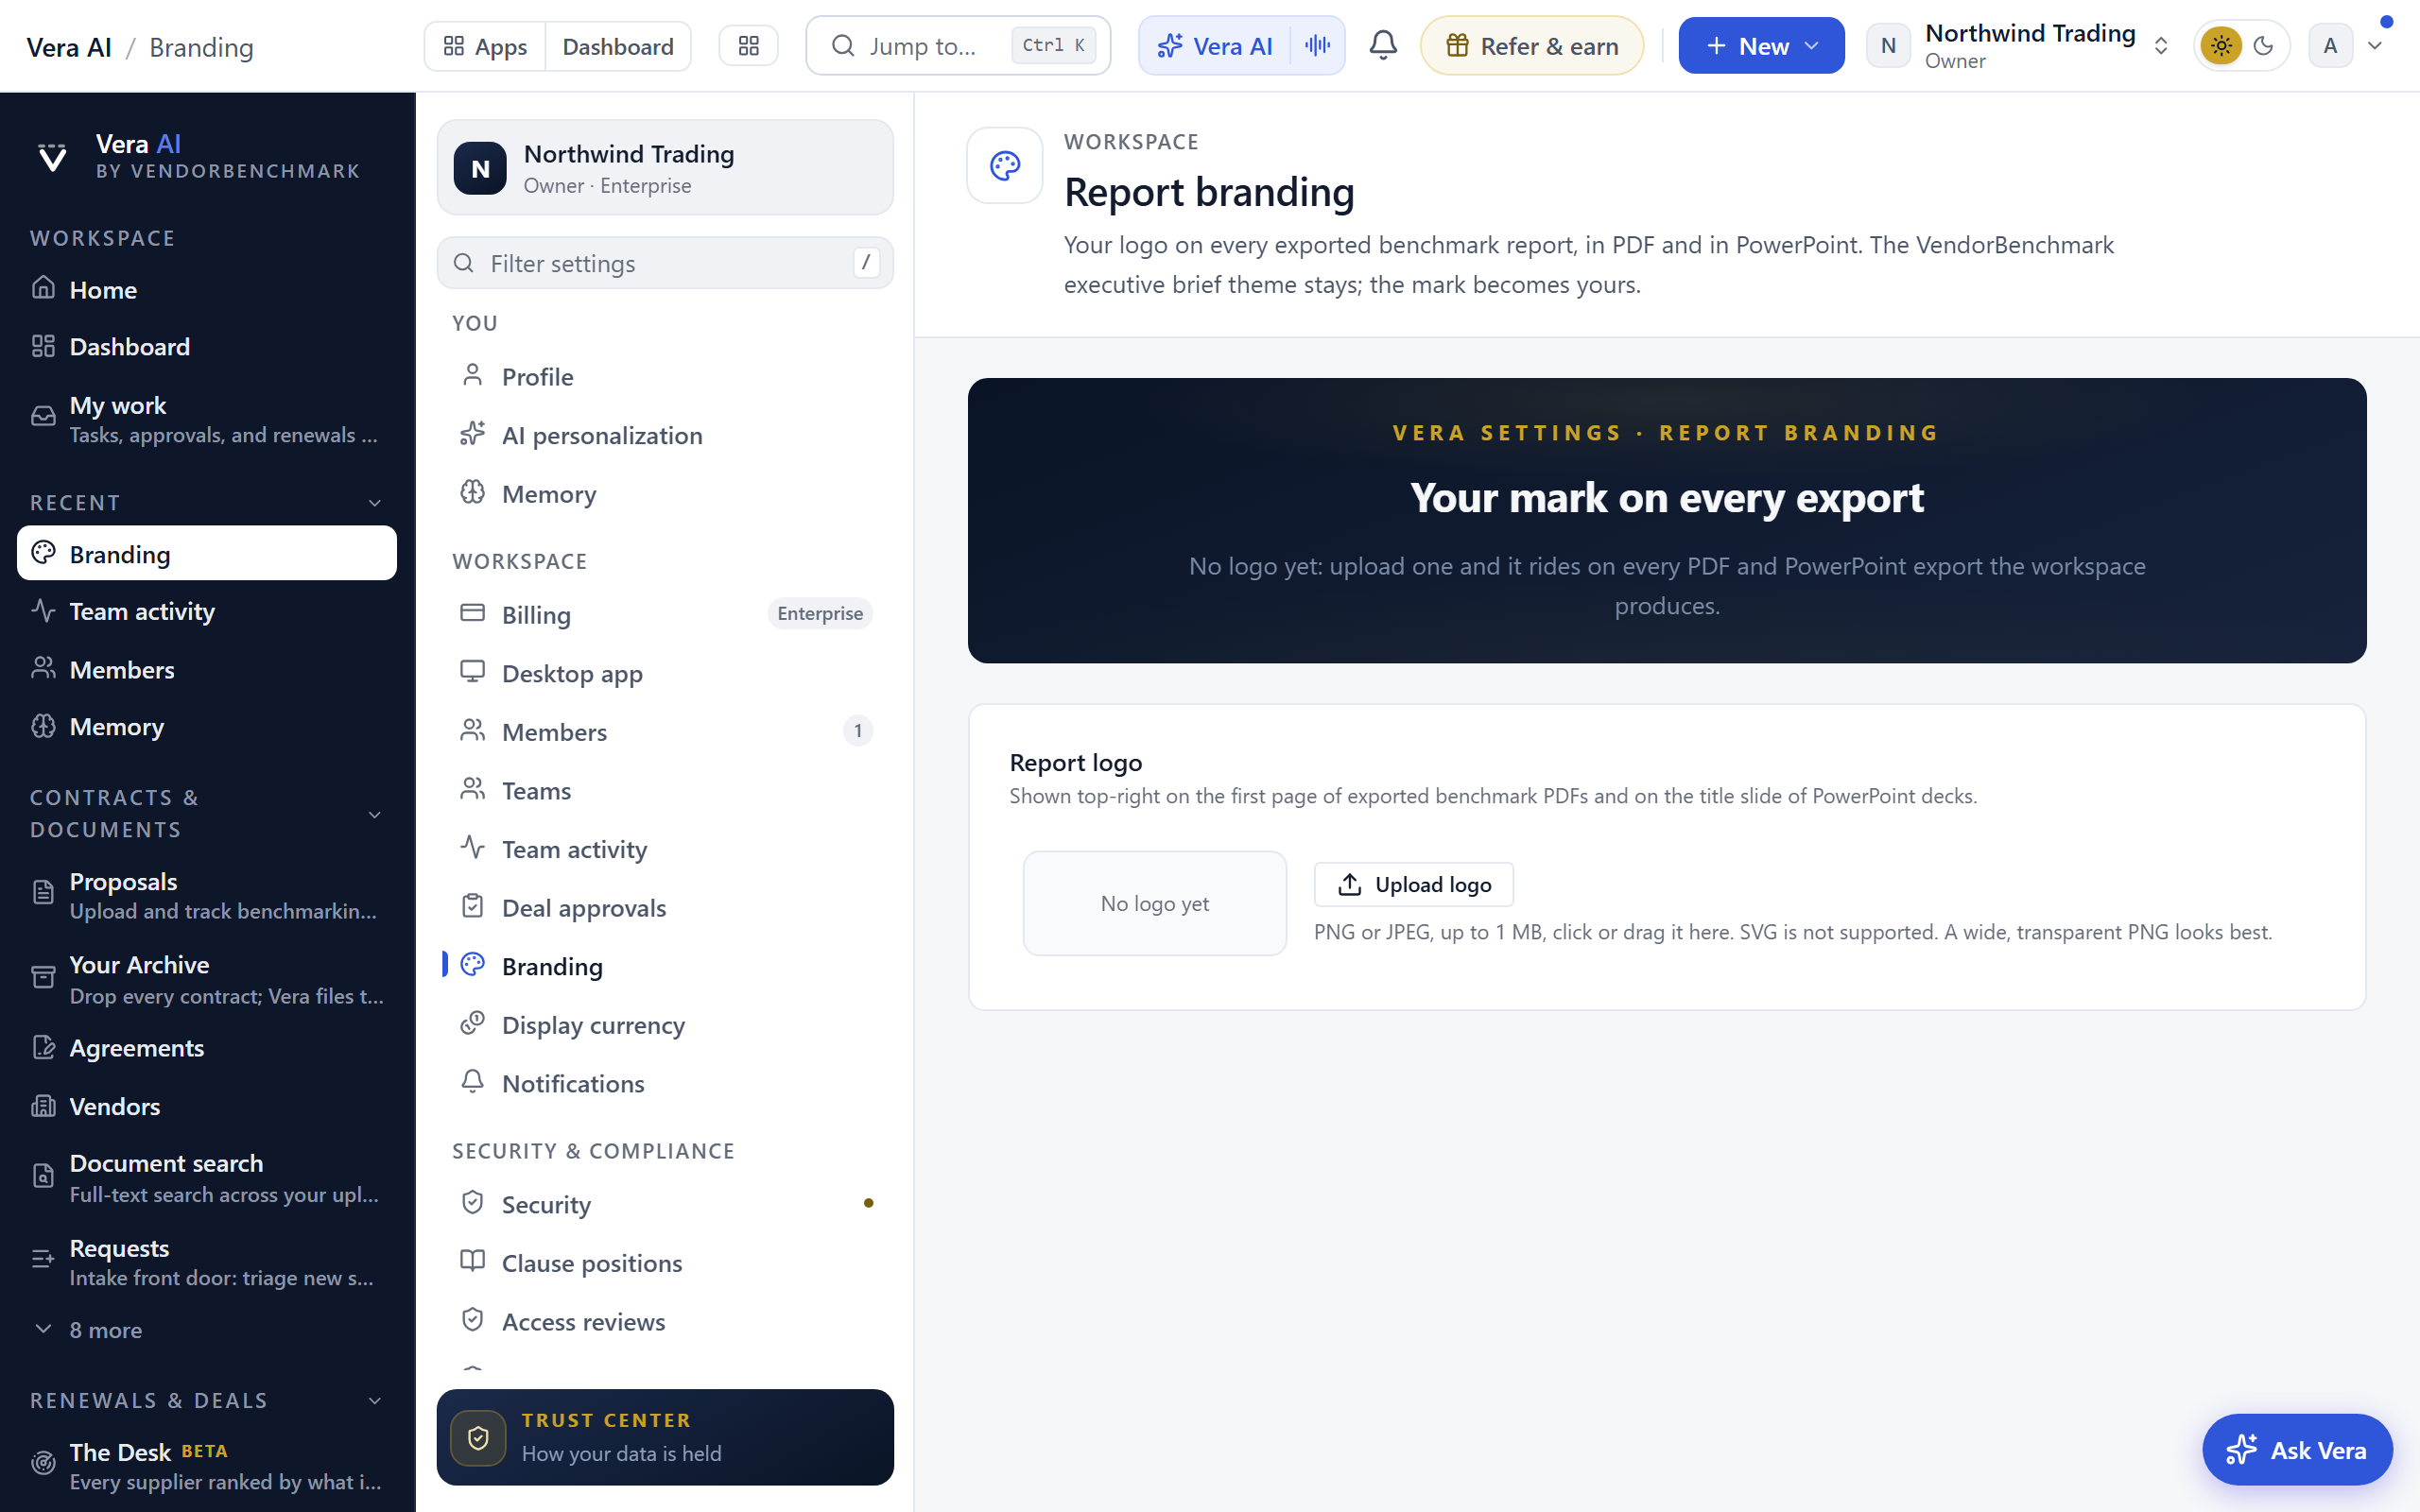
Put your organization's logo on the documents you export. Once a logo is set it co-brands the exported CFO executive brief and the boardroom deck and brief alongside the Vera AI brand. With no logo set, exports are unchanged.
On the screen
- Logo upload — upload your logo; a preview shows how it will appear on an exported document.
How to use it
- Upload a logo image.
- Export a CFO brief or a boardroom deck to see it applied, alongside the Vera AI brand.
Display currency
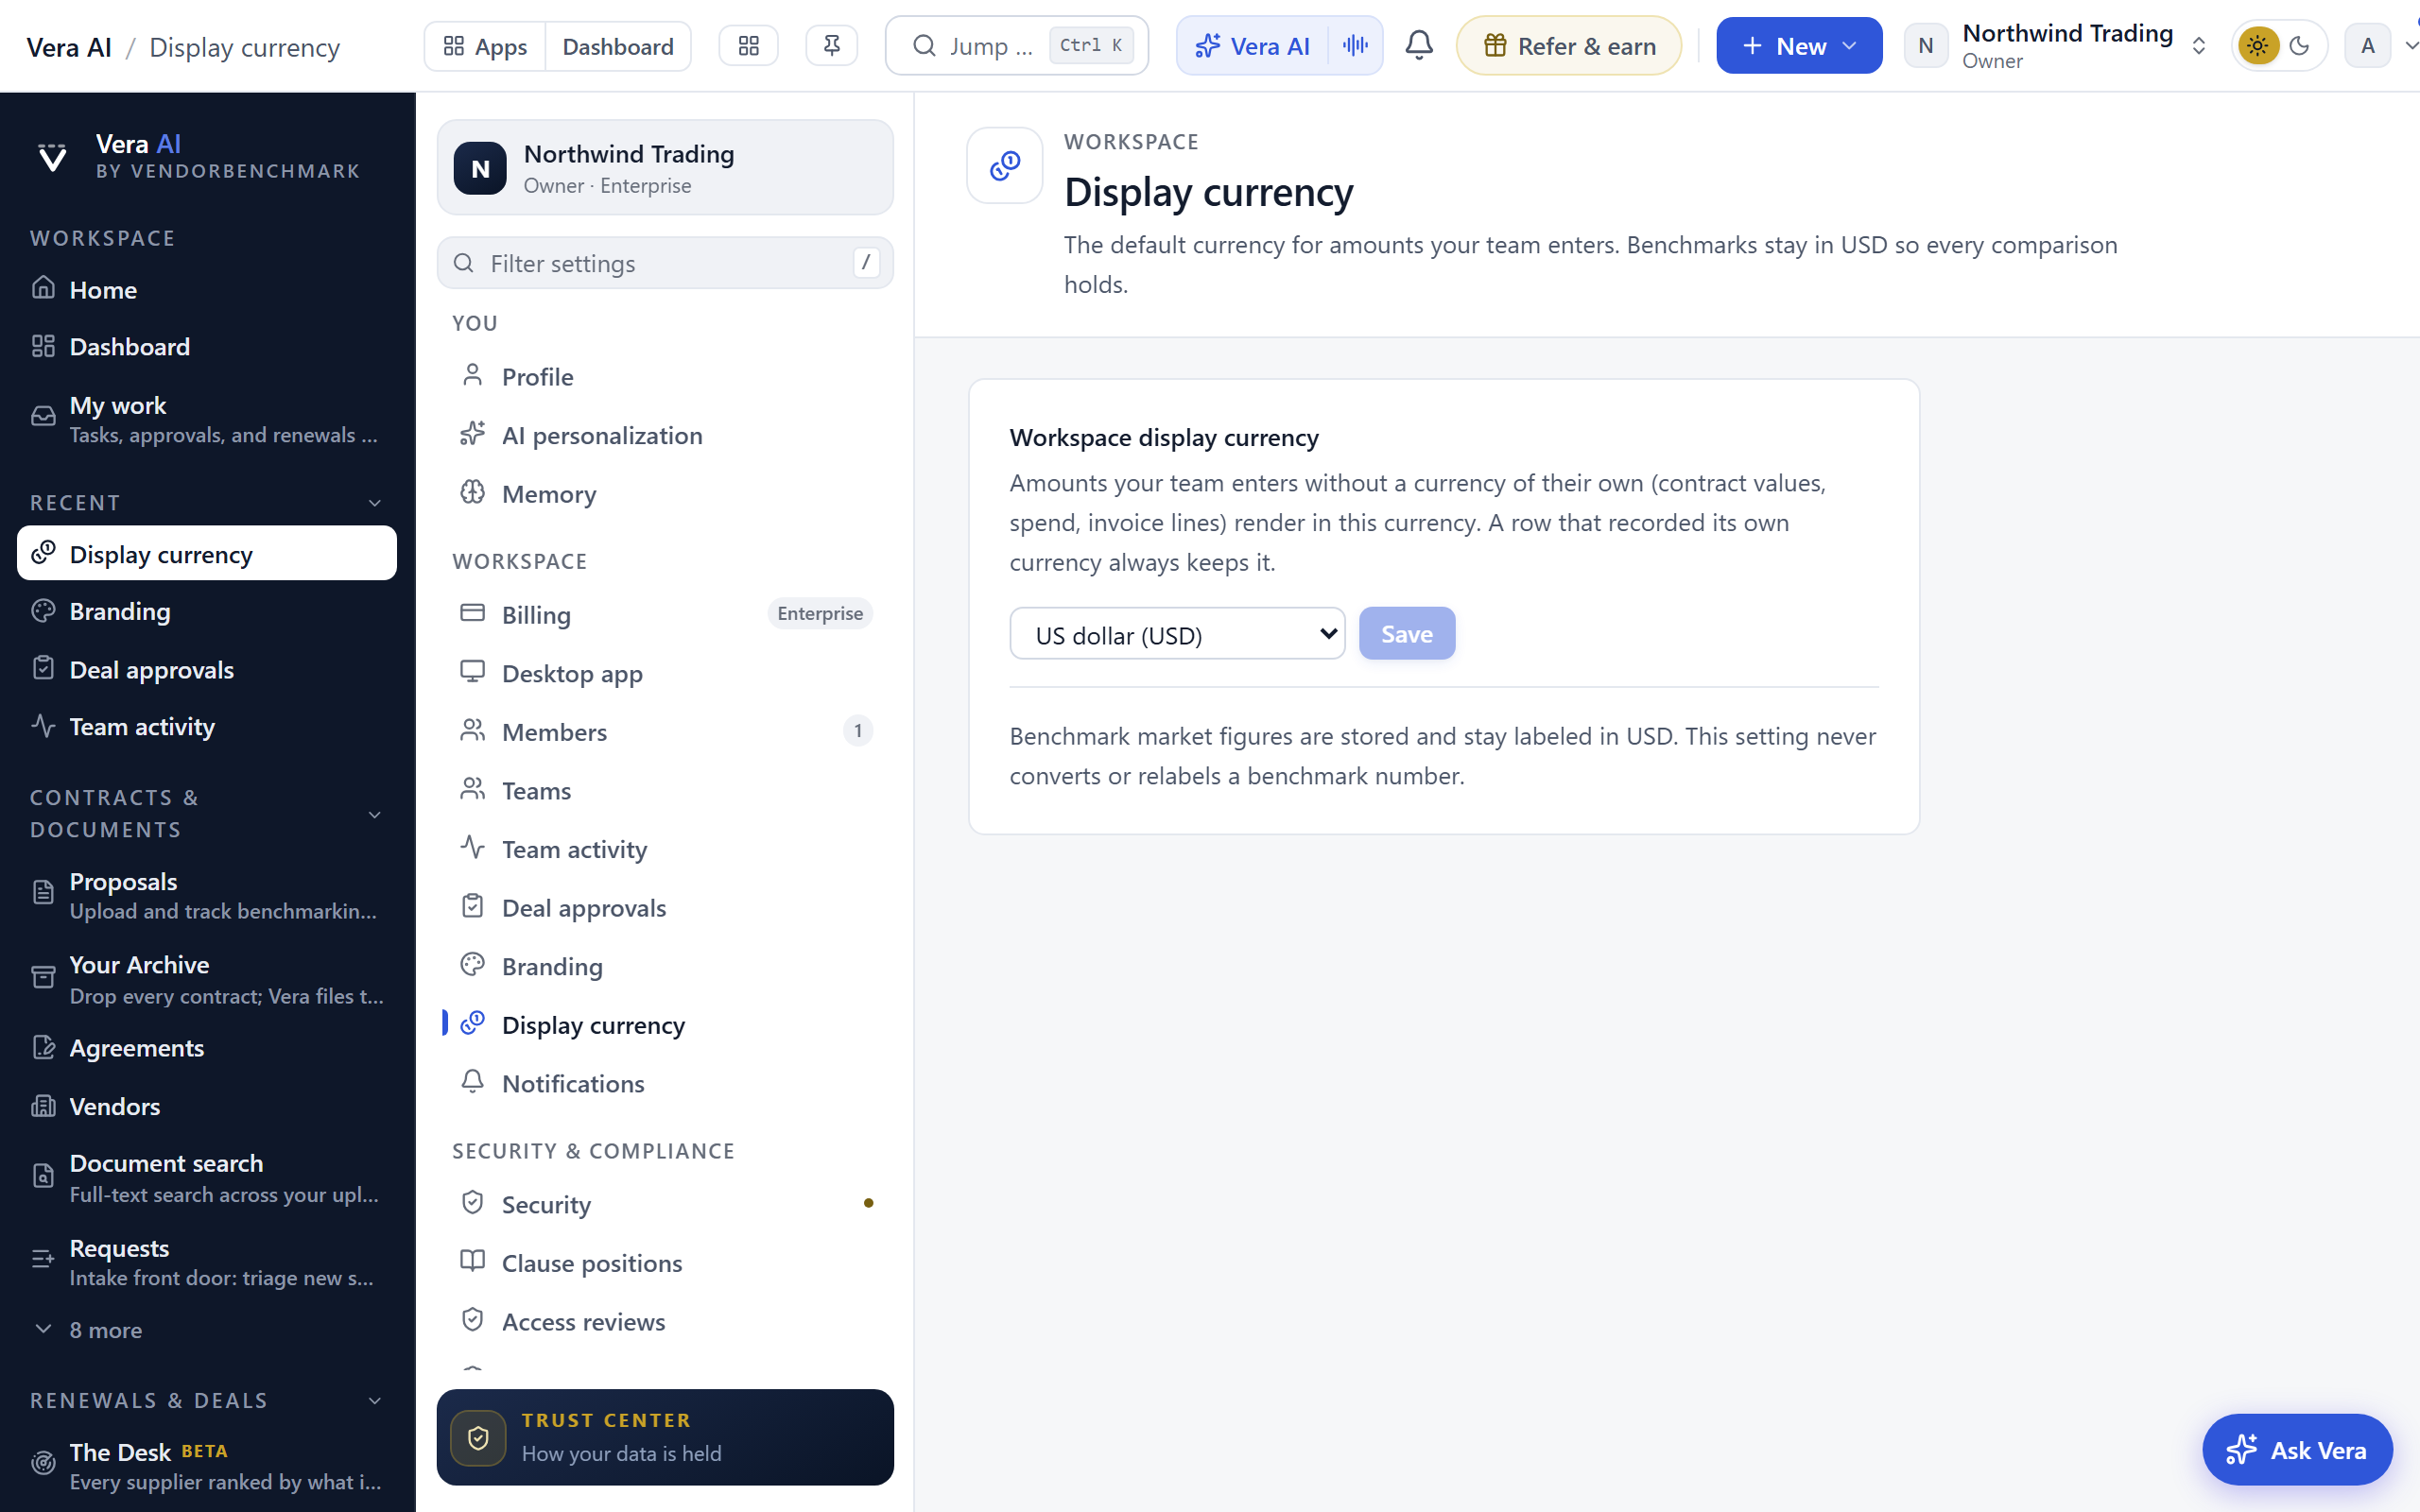
The default currency for amounts your team enters. Benchmarks stay in USD so every market comparison holds.
On the screen
- Workspace display currency — the currency amounts render in when the row that holds them did not record one of its own. Contract values, spend, and invoice lines follow this setting.
- Save — applies to the whole workspace, not just to you.
How to use it
- Pick your currency and press Save.
- Leave rows that already carry their own currency alone; they keep it, whatever this is set to.
Tips
- This setting never converts a number and never relabels a benchmark. Market figures are stored in USD and stay labeled USD.
Date format
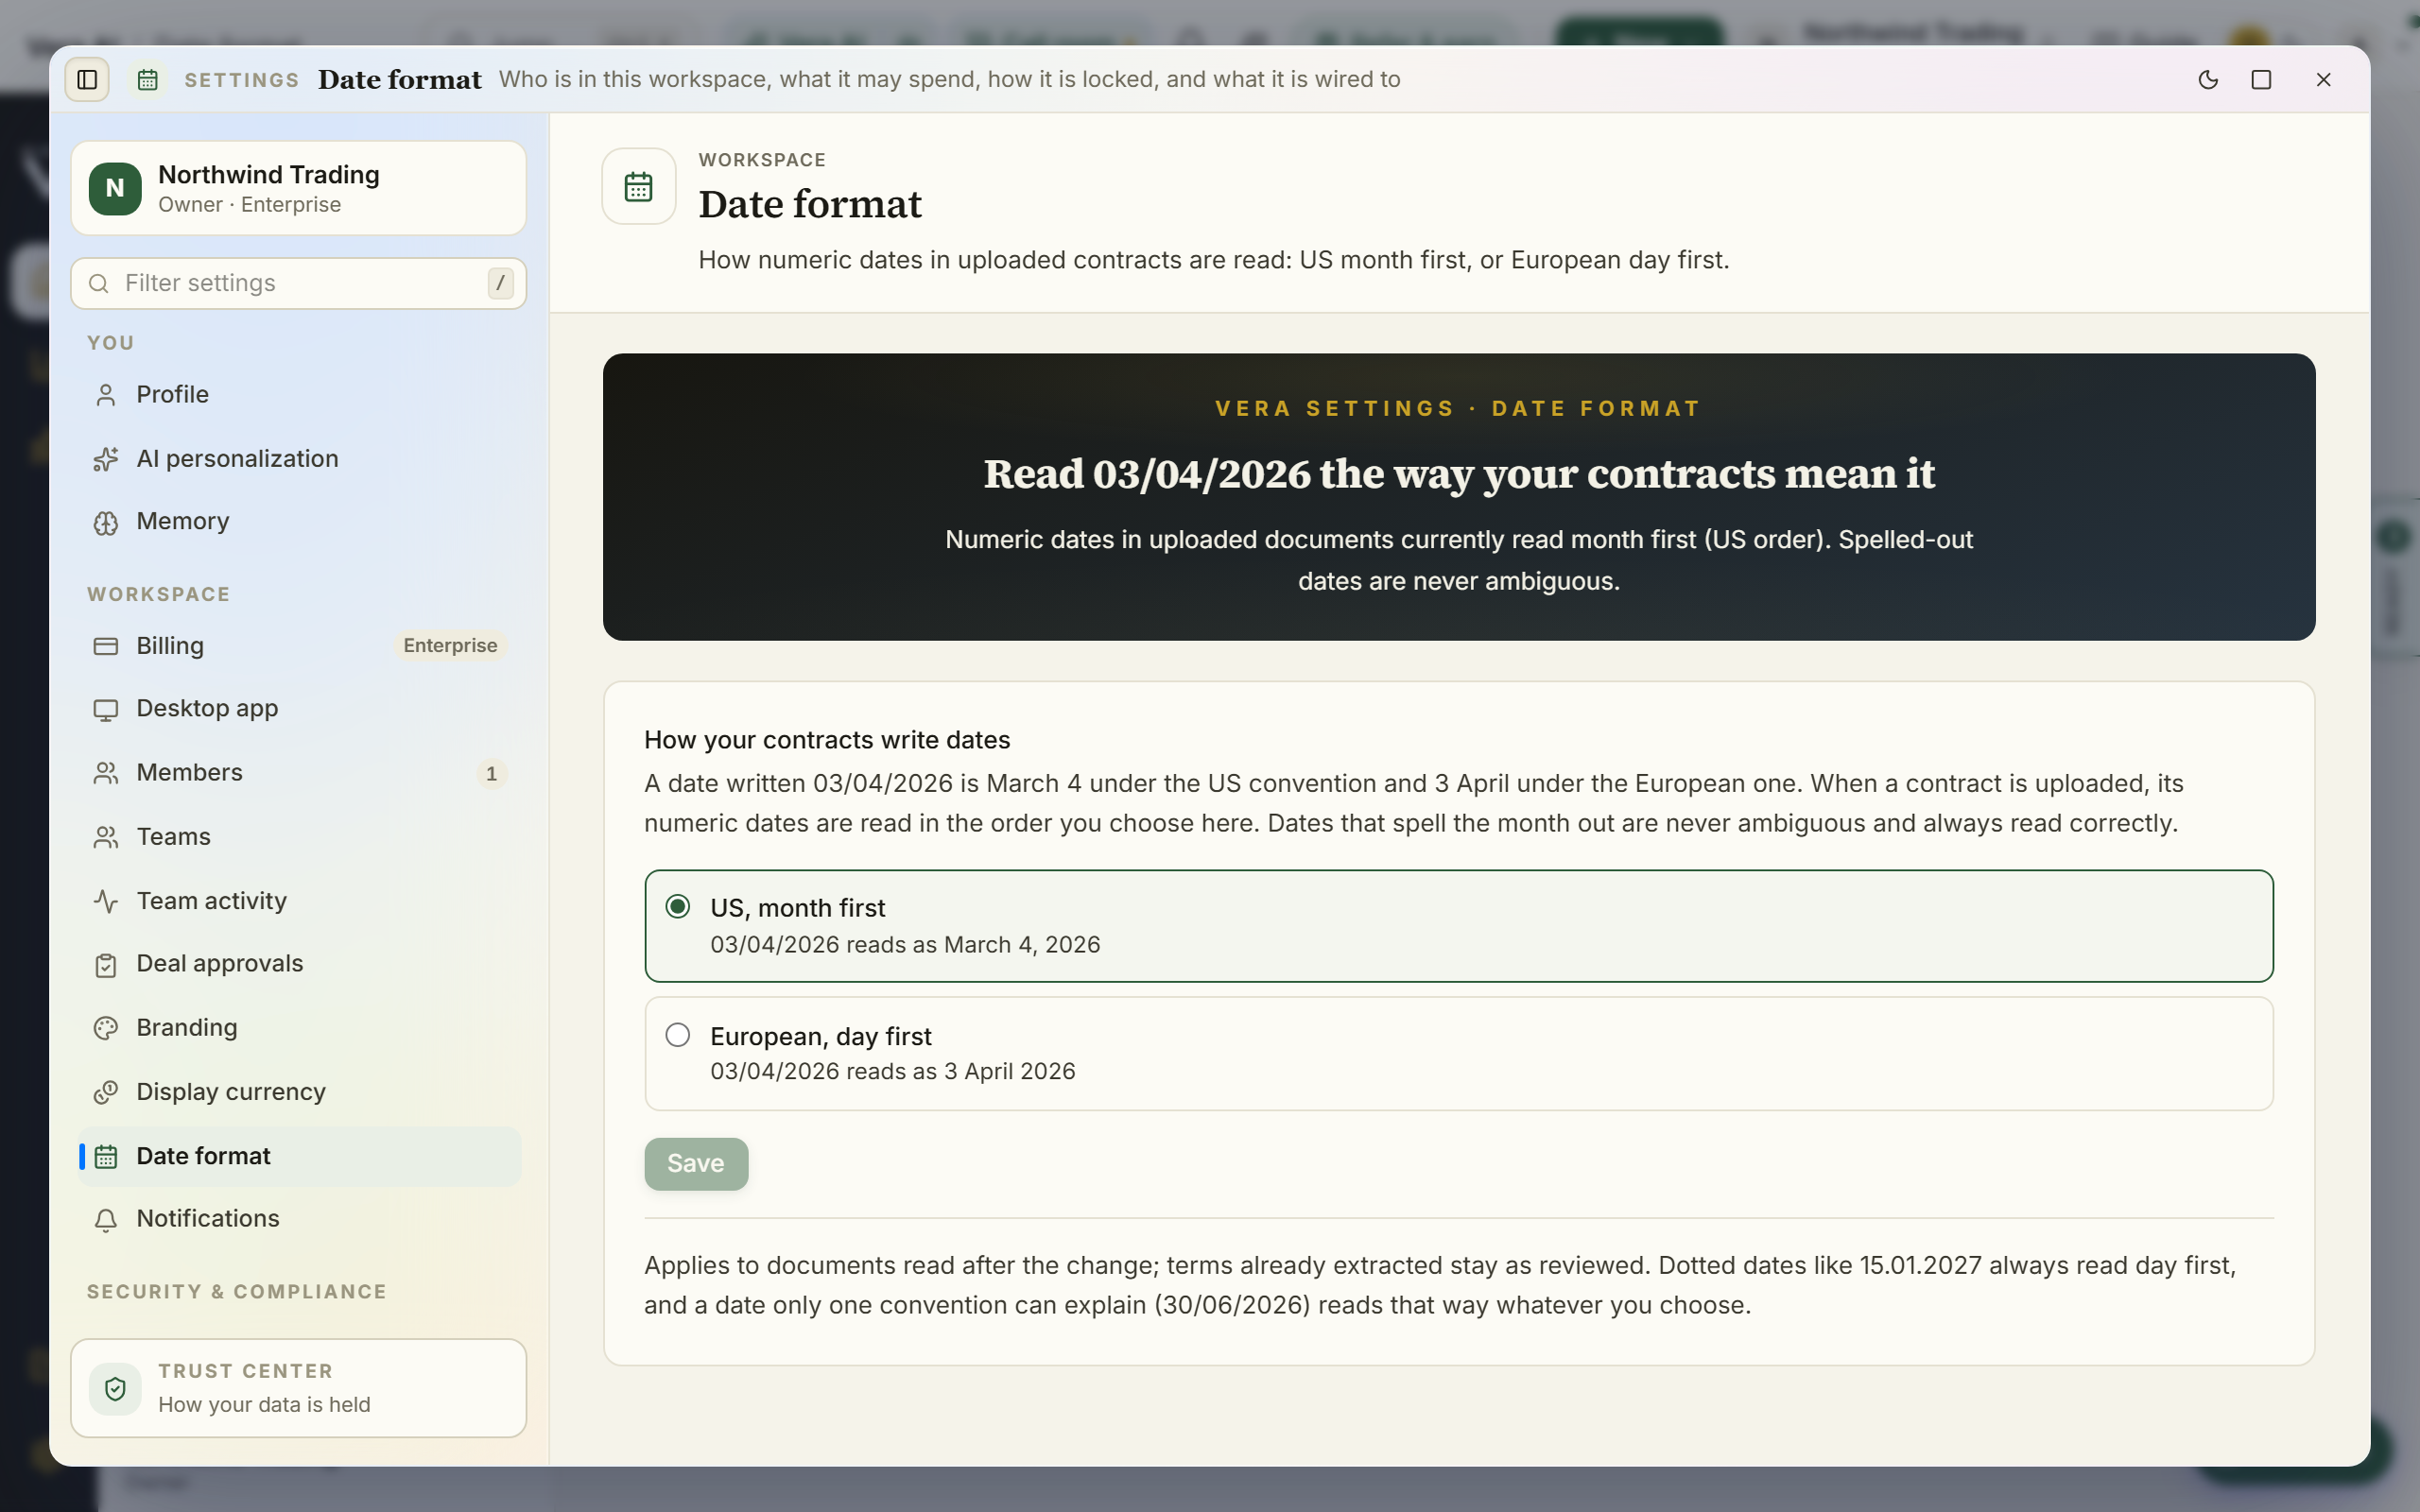
How numeric dates in uploaded contracts are read. A date written 03/04/2026 is March 4 under the US convention and 3 April under the European one; only you know which convention your contracts follow, so the platform asks once instead of guessing. Every extraction pass, the instant pre-fill in the upload wizard, the background enrichment after a file is attached, and the bulk import, reads numeric dates in the order set here.
On the screen
- US, month first — 03/04/2026 reads as March 4, 2026. The default.
- European, day first — 03/04/2026 reads as 3 April 2026.
- Save — applies to the whole workspace, not just to you.
How to use it
- Pick the convention your contracts are written in and press Save.
- Upload as usual; the wizard pre-fills term dates in the chosen order.
Tips
- Dates that spell the month out ("July 1, 2026", "15 January 2027") and ISO dates (2026-07-01) are never ambiguous and read correctly under either setting.
- Dotted dates (15.01.2027) always read day first; no US document writes them.
- A numeric date only one convention can explain (30/06/2026) reads that way whatever you chose.
- The setting applies to documents read after the change. Terms already extracted and reviewed stay as they are.
Related: Display currency · Upload a proposal
Notifications
*In plain words: what may interrupt you, on which channel; everything renewal-shaped starts silent until you ask.*
When to reach for this
- Week two of the ramp: Turn on money-critical alerts is the one press that makes the calendar audible.
- An email you expected never came, or one you did not want keeps coming: this page is the truth for both.
- Wiring alerts into Slack or Teams DMs (the chat recipe).
The page opens with What reaches you now: a summary computed from your saved switches listing every email, briefing, and chat DM that will currently reach you, each naming its trigger, with renewal notices showing your organization's lead days. When nothing is on it says so plainly: everything is opt in until you turn it on.
Tune which alerts reach you, on which channel, and when. One preference model governs every channel: a setting made here (or a mute made from the inbox bell) applies to the in-app inbox, push, and email together, so nothing silences you on one surface while interrupting you on another. Renewal alerts are opt in: nothing about a renewal reaches you, on any channel, until you switch it on. Owners can also post alerts to Slack or Teams and set the AI copilot's alert rules.
On the screen
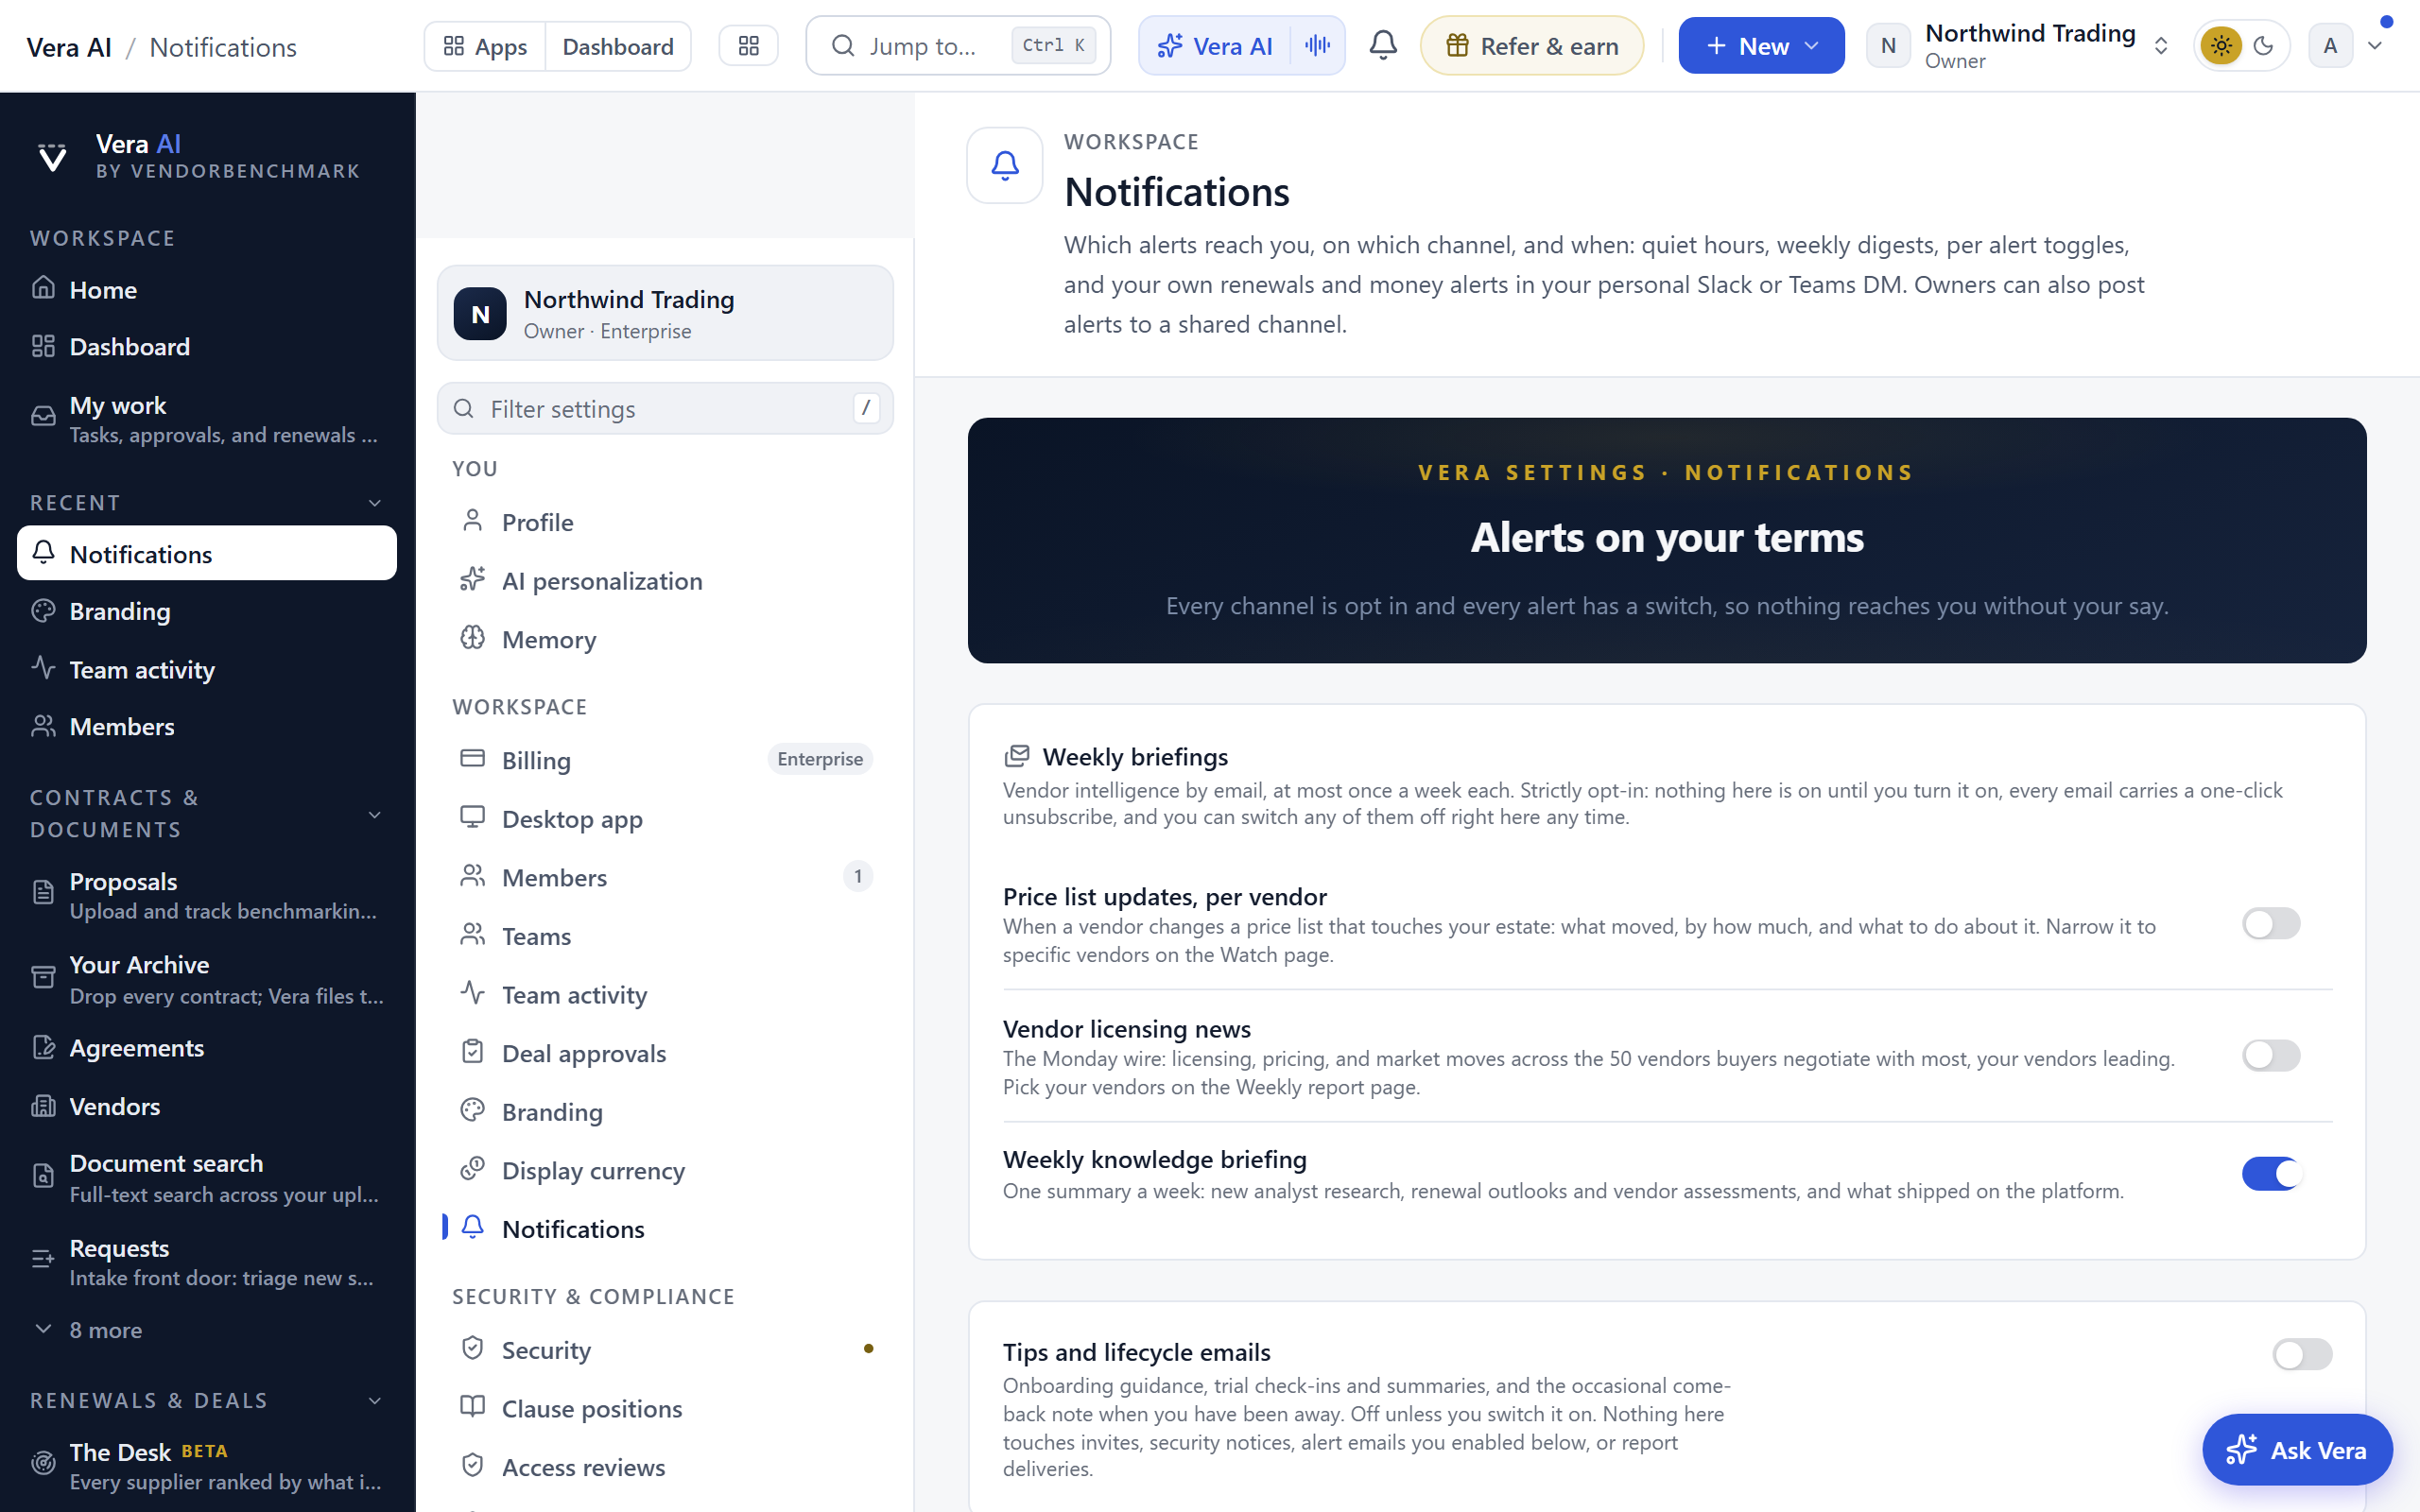
- Weekly briefings — three vendor-intelligence emails, each at most once a week, each strictly opt-in: price list updates per vendor (what moved, by how much, what to do), vendor licensing news (the Monday wire across the 50 most-negotiated vendors, your vendors leading), and the weekly knowledge briefing (new analyst research and what shipped). Every one of these emails carries a one-click unsubscribe that works without signing in, and this card is the standing in-platform switch. When a briefing is on, a link under it leads to its vendor picker (Watch for price lists, the Research Agent page for the wire).
- Tips and lifecycle emails — one switch over the onboarding guidance, trial check-ins, and come-back notes. It is off until you switch it on, so nobody receives these unasked. Nothing here touches invites, security notices, alert emails you enabled, or report deliveries.
- Quiet hours — pick a window (say 10:00 pm to 7:00 am, in your local timezone) and inside it phones stay silent while non critical alert emails wait until the window ends. Money critical alerts (renewal deadlines, deadline escalations, policy checks, above-market warnings, uplift breaches, anomalies) always come through immediately.
- Every alert type is listed — anything that can reach your bell has a row here, so there is always somewhere to switch it off. Six types that nobody addressed to anyone (commitment tracking, invoice findings, vendor health warnings, ecosystem shifts, sourcing events, and renewal engine events) start off until you turn them on, the same way the renewal family does.
- Channel posts — a Slack or Teams channel an owner wires up is the organization consenting for that channel, because the people in it cannot each be asked. What an owner chooses is which alerts belong there; a channel subscribes to the kinds you pick rather than to everything. Workflow agents posting to that channel have to clear the same switch.
- Workflow agent output — the memo a workflow agent mails when a run finishes. Off until you switch it on, because any colleague with edit rights can build a workflow that emails the whole organization, so the person receiving it decides rather than the person who wrote it. Approval requests addressed to you are the deliberate exception and always reach you, because the run waits on your answer.
- Alert preferences — for each kind of alert, up to four toggles: in-app, email, weekly digest, and Chat DM. Email is off until you switch it on, with four exceptions that start on because silence would be a failure: the report delivery email, benchmark status updates, the one-time outcome follow-up 30 days after a delivered benchmark, and @mentions. Every renewal alert that fires on its own goes further and starts off on every channel, in-app included: renewal notice alerts, deadline escalations, policy compliance checks, the AI copilot digest, above-market warnings, stale benchmark reminders, uplift cap breaches, auto-drafted briefs, renewal opening moves, and renewal prep packages say nothing until you turn them on here. The Turn on money-critical alerts button switches on the renewal set in one click. AI renewal agent briefs are the exception: switching the renewal agent on for a contract is itself the opt in, so those briefs send, and this toggle stops them across every contract at once. Weekly digest bundles that alert type into one Monday roll-up email instead of individual sends; money critical kinds cannot be bundled. Alert types you muted from the inbox bell appear here with a Muted chip and are one click to unmute; a mute silences that type on every channel unless you split channels with these toggles.
- Chat DM — send your own renewals and money alerts (renewal notices, deadline escalations, price drift findings, buyer window alerts, and above-market warnings) to your personal Slack or Teams direct messages. Link once by sending the Vera bot a direct message in your company Slack or Teams (an owner connects the bot under Settings › Integrations); the account link happens automatically and the note above the table confirms it. The DM lane is strictly opt in per alert type, only these five types can use it, a bell mute silences it like every other channel, and quiet hours hold the non critical pings. The shared org channel owners configure below is separate and unchanged.
- The daily leverage note — one email a morning covering everything that moved under your deals, in place of each watchdog mailing you separately. It is ranked on a single measure: how much the thing that happened changed your position. Money at stake and days left to act are what move that ranking, because between them they decide whether you can still do anything about it, so a price list change on an agreement that renews in two years sits below a notice deadline nine days out even when the price change is the larger number. Findings that scored below the line are counted at the foot of the note rather than dropped silently, so you can see what was judged and set aside. On a day when nothing moved, nothing is sent. This rides on your renewal alert setting above: switch renewal alerts on and the note starts arriving, and every note carries the same one-click Turn it off link.
- Monday brief sections — your weekly emails arrive as one Monday brief with four sections: the vendor market wire, renewals coming up, watchtower changes, and savings and wins. Turn any section off here while keeping the rest.
- AI copilot preferences (owners) — the digest, anomaly watch, board report, community and outcome network sharing, and dispute alert thresholds.
- Webhooks (owners) — post alerts to a Slack or Teams channel.
How to use it
- Pick your weekly briefings: price lists, licensing news, knowledge, any mix. Off is always one toggle (or one email click) away.
- Set quiet hours if you carry the mobile app: nights stay silent and nothing important is lost, it waits for morning.
- Turn on the renewal alerts you want. They start off, so a workspace stays silent about renewal dates until someone here asks for them, and the standard renewal checklist tasks are not filed either; Turn on money-critical alerts switches the whole set on at once. Renewal notice alerts also switch on the Monday renewal radar, one roll-up email covering everything entering or inside its notice window over the next 60 days, and the daily leverage note described above.
- Turn off any alert kind you do not want, move it to a single channel, or send it to the weekly digest. Every renewal alert email also carries a one-click Turn it off link that works without signing in.
- Want your renewals in Slack or Teams? DM the Vera bot once in your company workspace, then flip the Chat DM toggle on the alert types you care about.
- Review the Muted chips: anything you muted from the bell in passing is listed here, so no alert type stays silenced invisibly.
- Choose which Monday brief sections you receive; the others still land in the app.
- Owners: set the copilot alert rules and connect a chat channel if the team wants alerts there.
Security posture
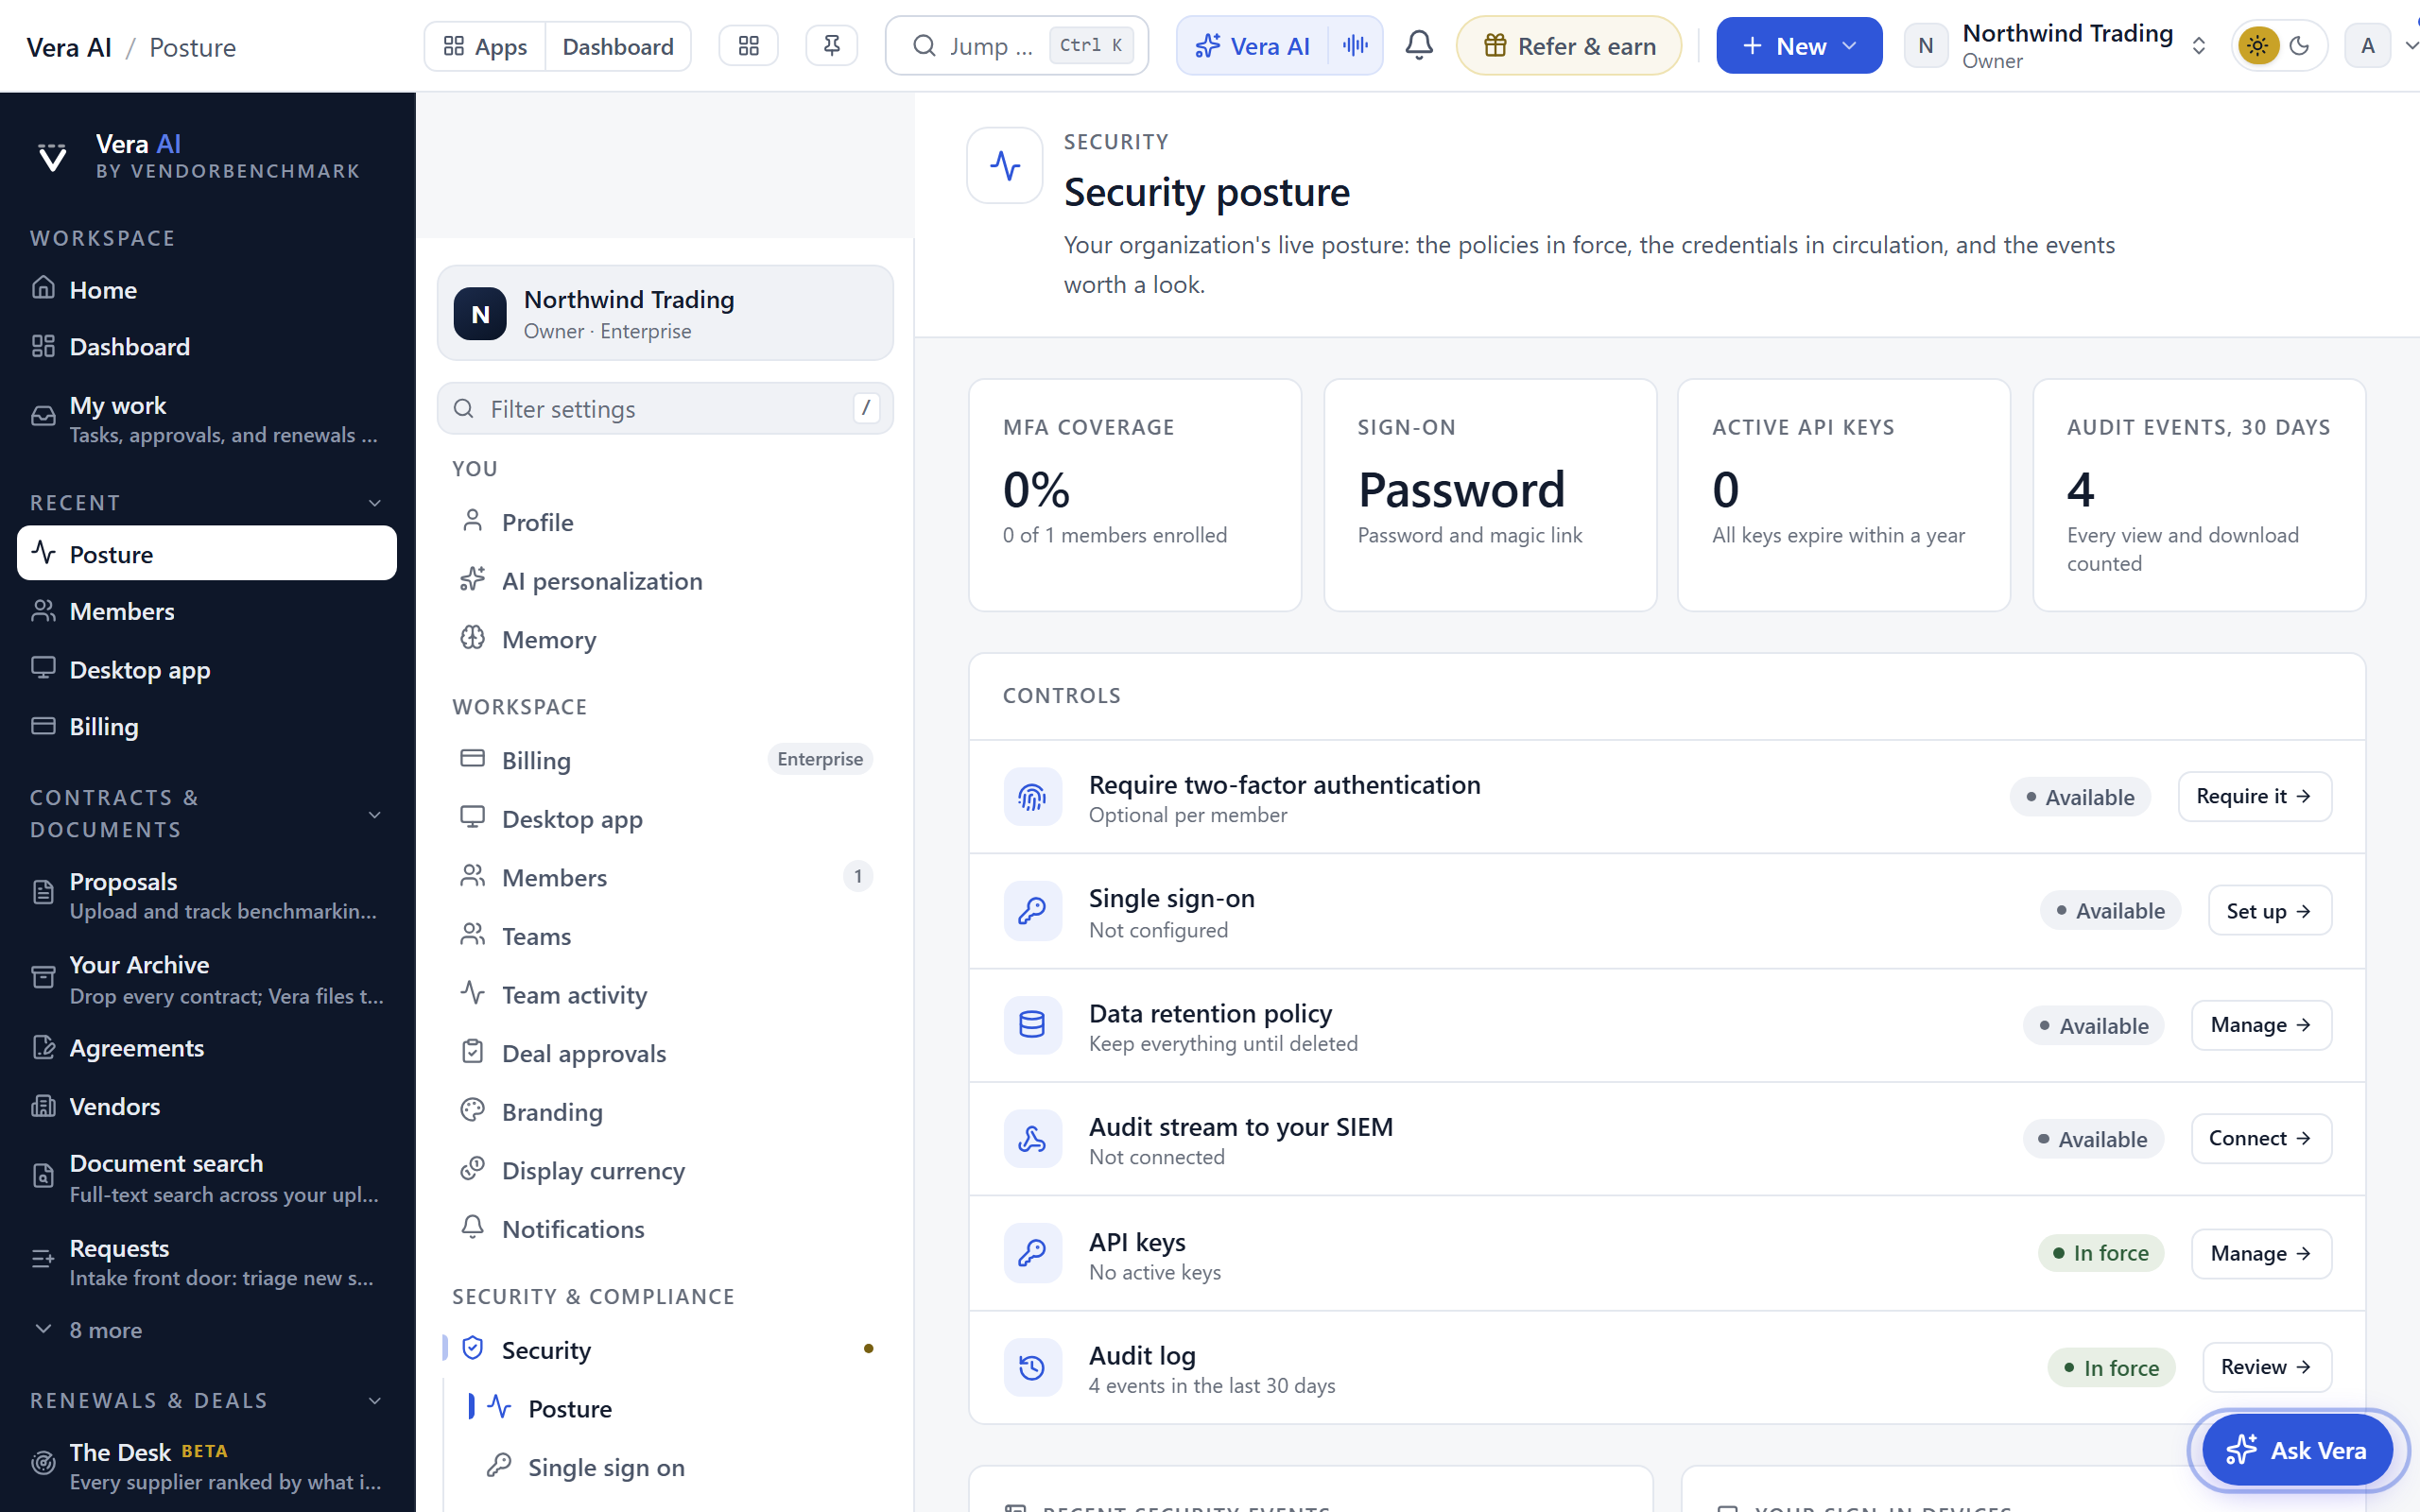
The Posture section of the Security page (formerly the standalone Security Center, whose old address redirects here). Your organization's live security posture on one view: two-factor coverage, single sign-on, retention, API credentials, the audit stream, recent security events, and your sign-in devices. Live state, not marketing.
On the screen
- Posture tiles — two-factor coverage across members, sign-on method, active API keys, and audit events in the last 30 days.
- Controls — each security control with its current state and, for owners, a link to manage it.
- Recent security events — sign-ins, permission changes, and credential events.
- Your sign-in devices — the devices seen on your account, with a link to manage active sessions.
How to use it
- Read the posture tiles for a one-glance health check.
- Owners: work down the controls list and tighten anything that reads as merely "Available" rather than "In force."
- Check your devices and sign out anything unfamiliar from the Account security section.
Related: Security · Trust center · Audit log
Clause positions
The summary of your negotiation playbook: the positions, pre-approved language, and walk-away lines that every AI review holds your contracts to. There used to be two editors for the same library, one here and one on the desk. There is now one. Editing lives in the Clause library desk, next to the comparison and redline tools that read the positions; this page is the summary.
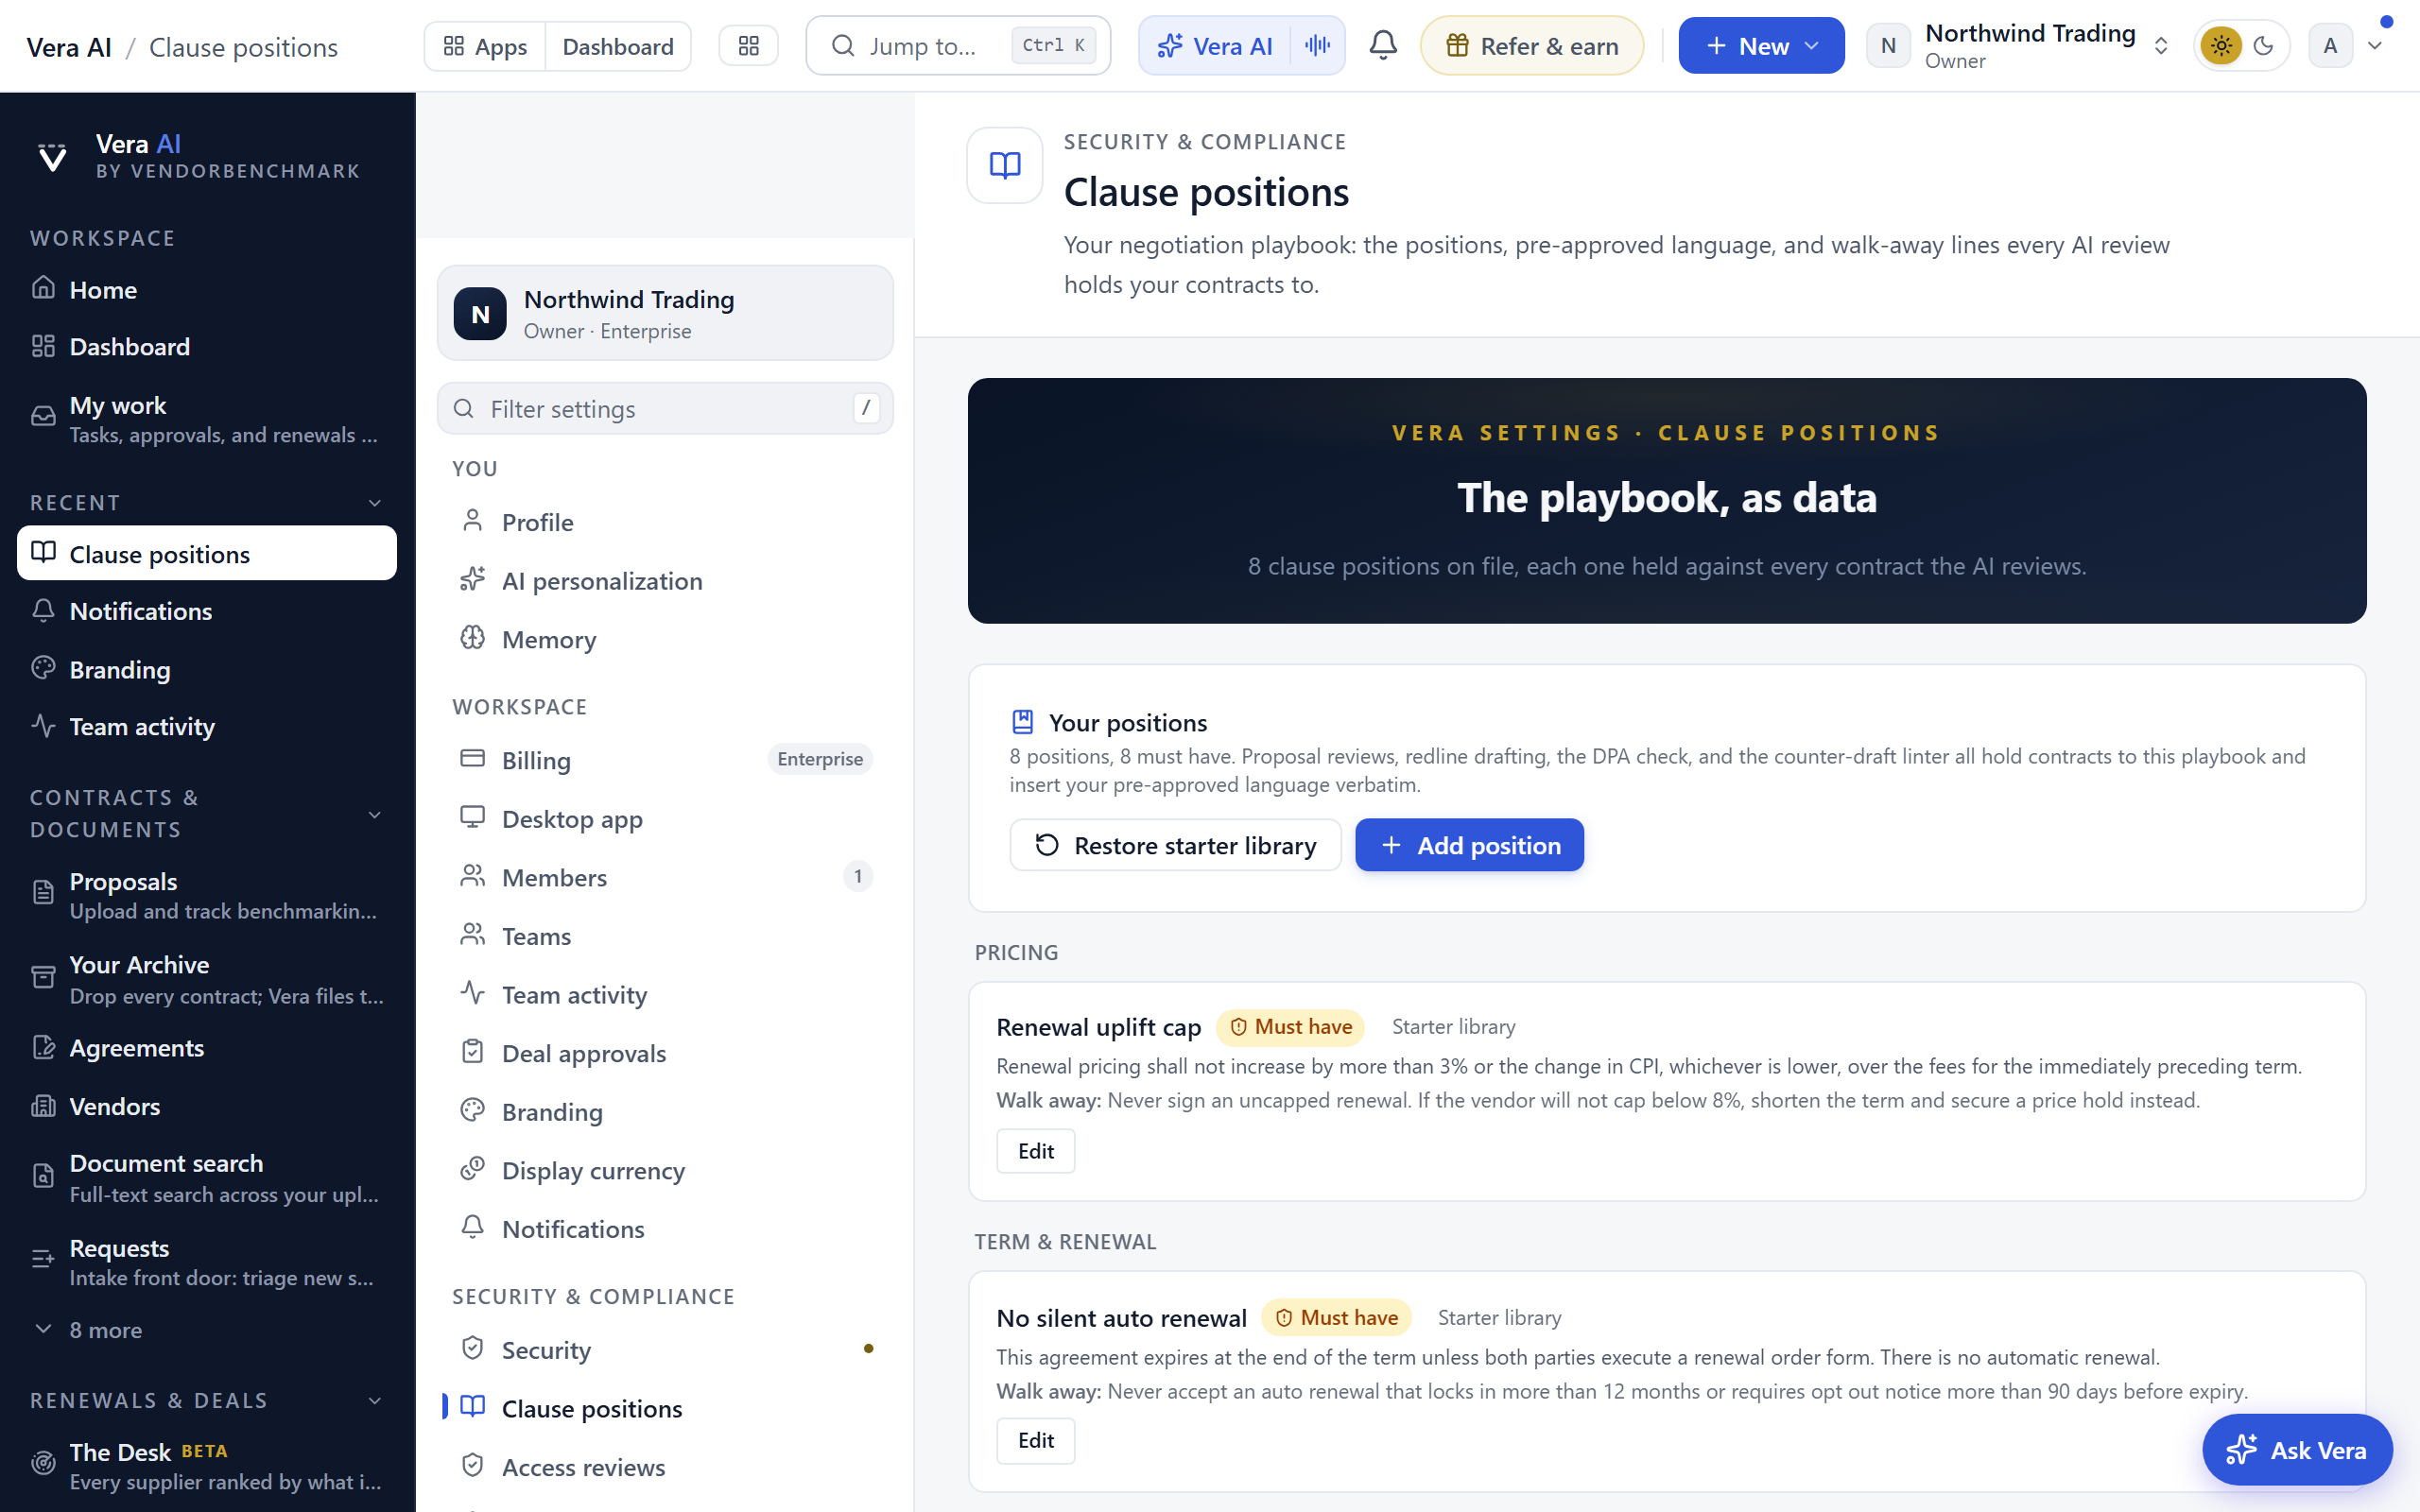
On the screen
- Positions — how many clause positions are on file. Each one is held against every contract the AI reviews.
- Must have — how many of them your organization will not sign without. These form the template the Coverage check sweeps across every contract.
- Last edited — when the library last changed. It reads Never until a position has been saved.
- What reads it — proposal reviews, redline drafting, the DPA check, and the counter-draft linter all hold contracts to these positions and insert your pre-approved language verbatim.
- Starter library — 22 proven positions to begin from. Restoring adds only the ones your library is missing: it never overwrites an edit and never duplicates.
How to use it
- Read the three figures to see where the library stands.
- With nothing on file yet, press Restore starter library to begin with the 22 starter positions. It takes effect immediately, with no confirmation step, and reports how many it added.
- Press Open the Clause library desk to add, edit, or delete positions and to set the must-have flags.
Tips
- Restoring is safe on a library you have already shaped: it fills gaps only, so you can run it again after adding a position type you had skipped.
Related: Clause library · Security baseline
Security baseline
The Baseline section of the Security page. The data-protection and security requirements every vendor contract should meet. These are the rules the DPA check enforces when it reviews a contract.
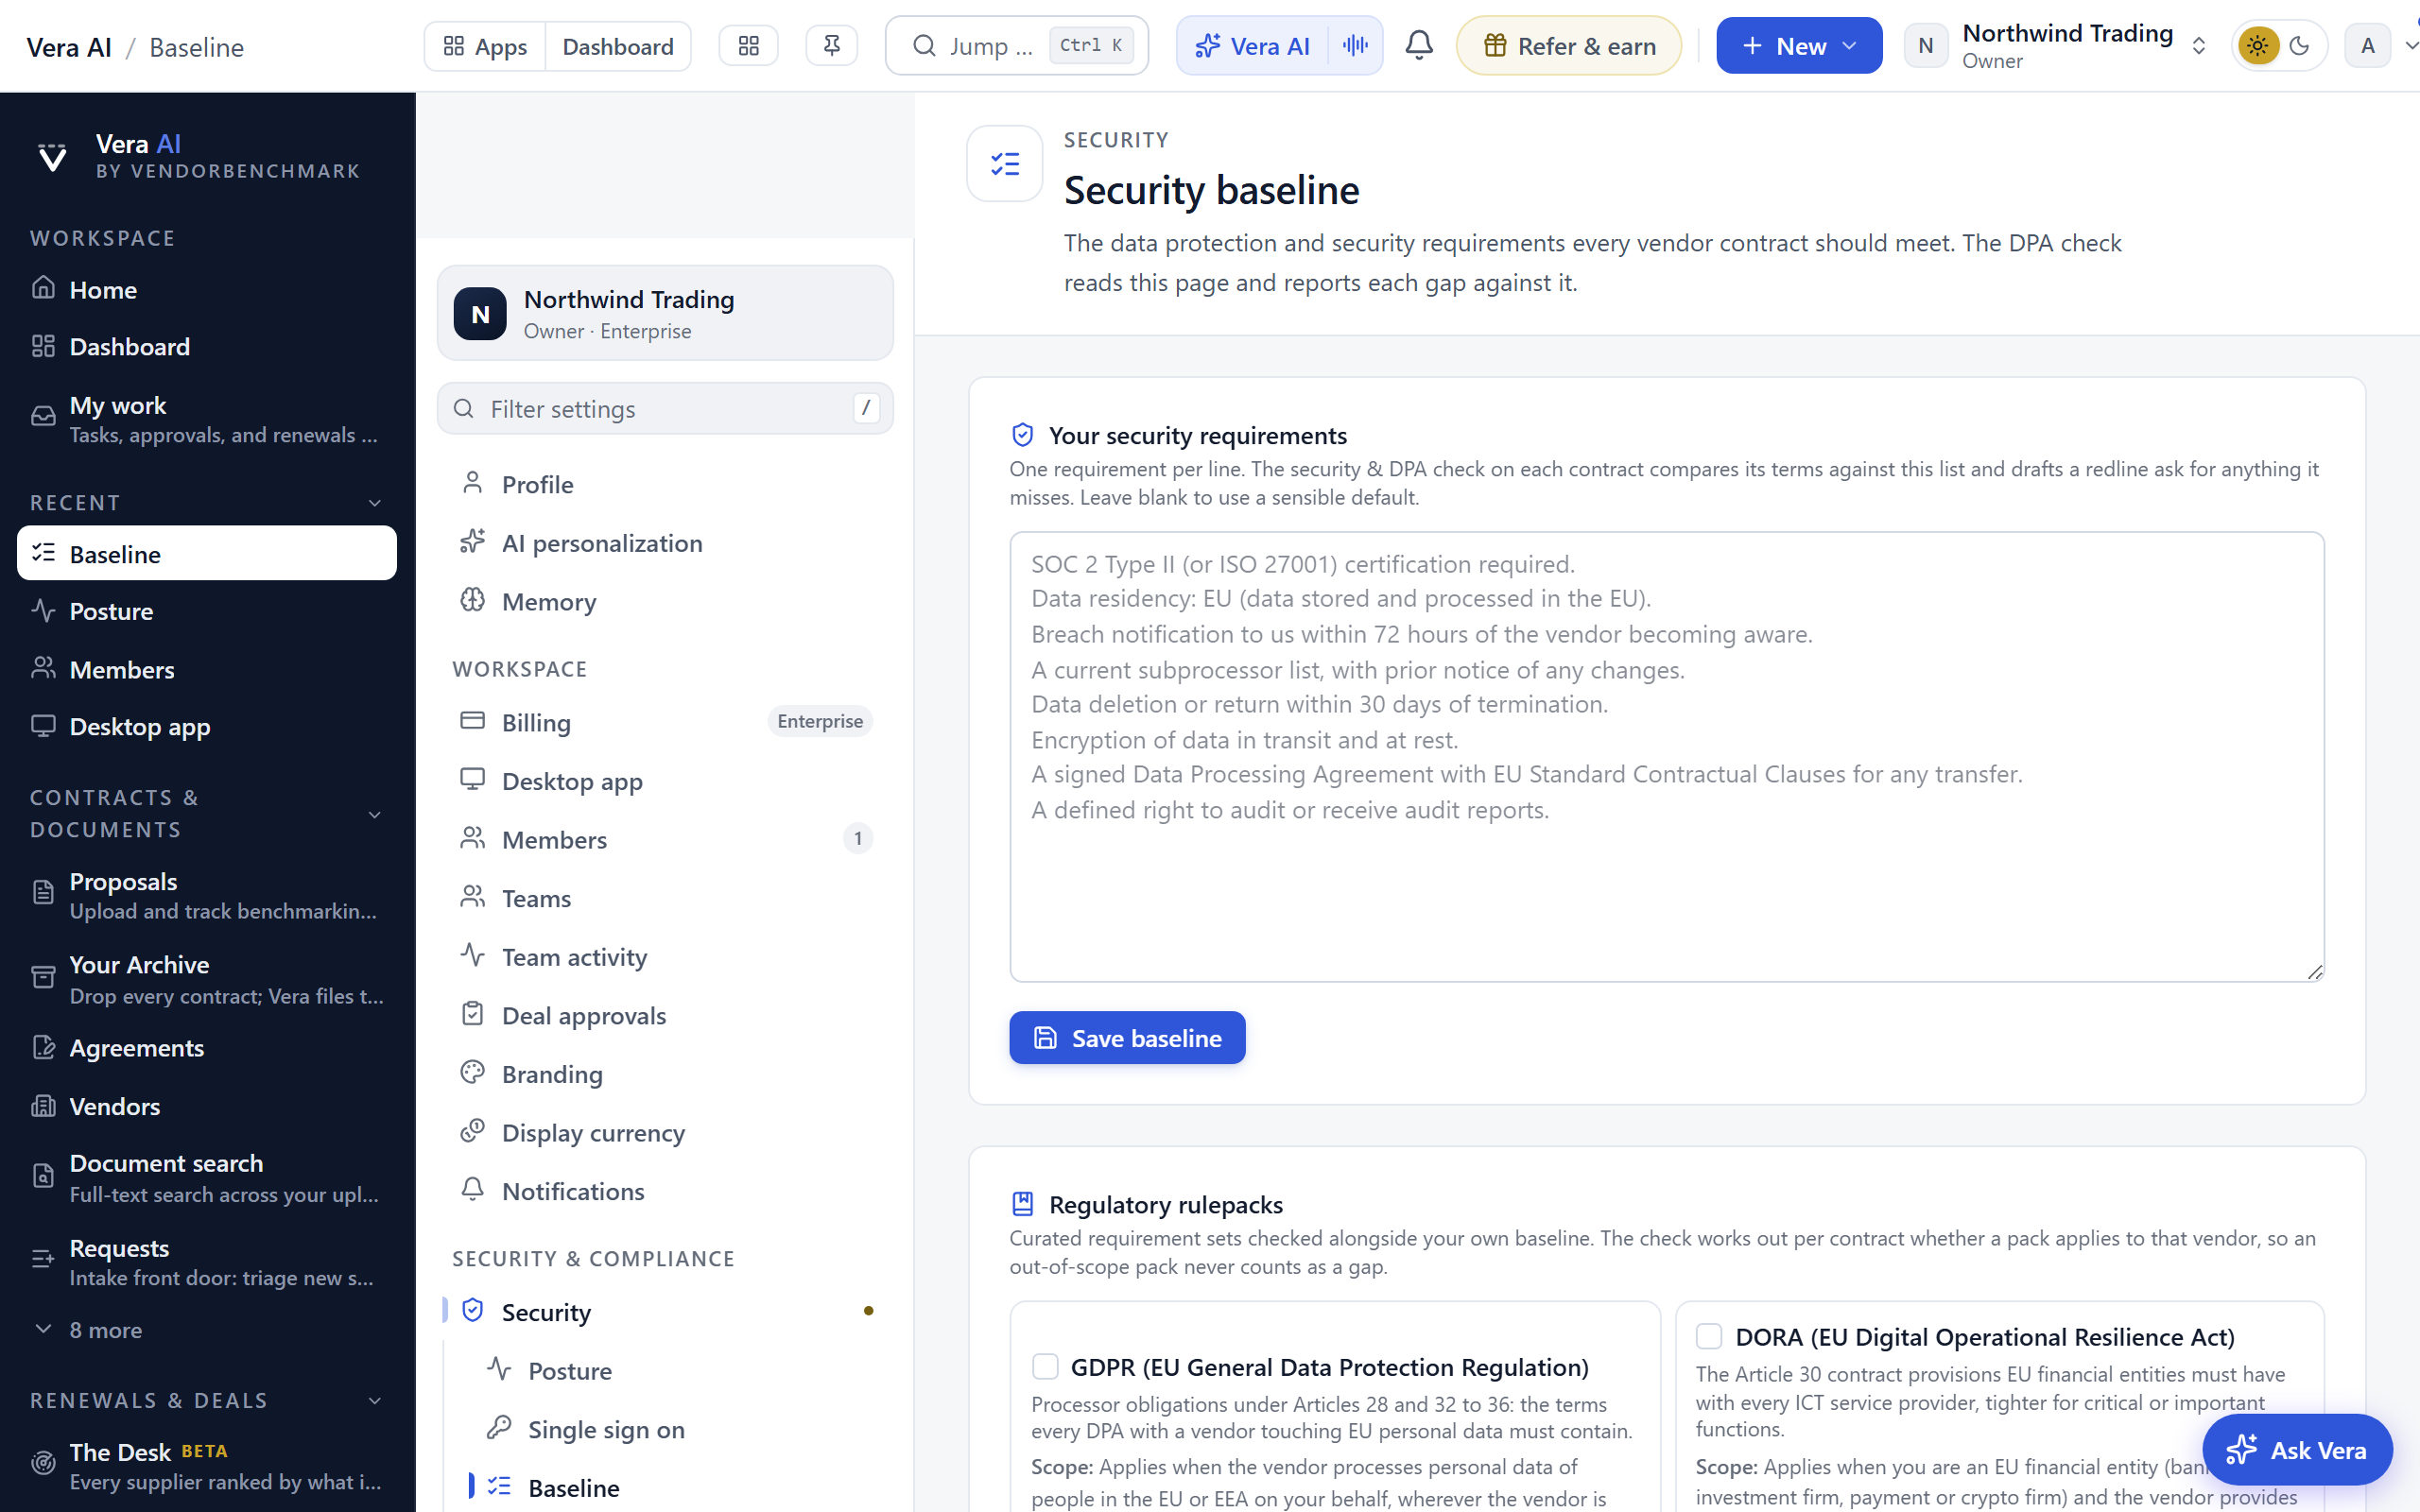
On the screen
- Baseline requirements — your written data-protection and security requirements; a default is offered as a starting point.
- Rulepacks — pre-built requirement sets you can switch on.
- Network and session policy (owners only) — pin the workspace to known networks and bound session lifetimes: an IP allowlist that takes exact addresses and CIDR ranges, a maximum session age in hours, and an idle timeout in minutes.
How to use it
- Edit the baseline to match what your organization requires of vendors.
- Turn on any rulepacks that apply.
- The DPA check then measures each contract against this baseline.
- Owners setting a network policy: the card shows your current IP with one click to add it, and the allowlist refuses to switch on unless your own address is covered, so you cannot lock yourself out at enable time. Every denial lands in your audit log, and a policy change takes up to a minute to reach every server.
Note: if your office IP later changes, everyone including owners is blocked until the policy is updated from an allowed network; prefer ranges over single addresses if your egress IP rotates.
Related: Clause positions
Single sign on
The Single sign on section of the Security page. SAML single sign-on and SCIM provisioning for your organization, for teams that manage access through an identity provider.
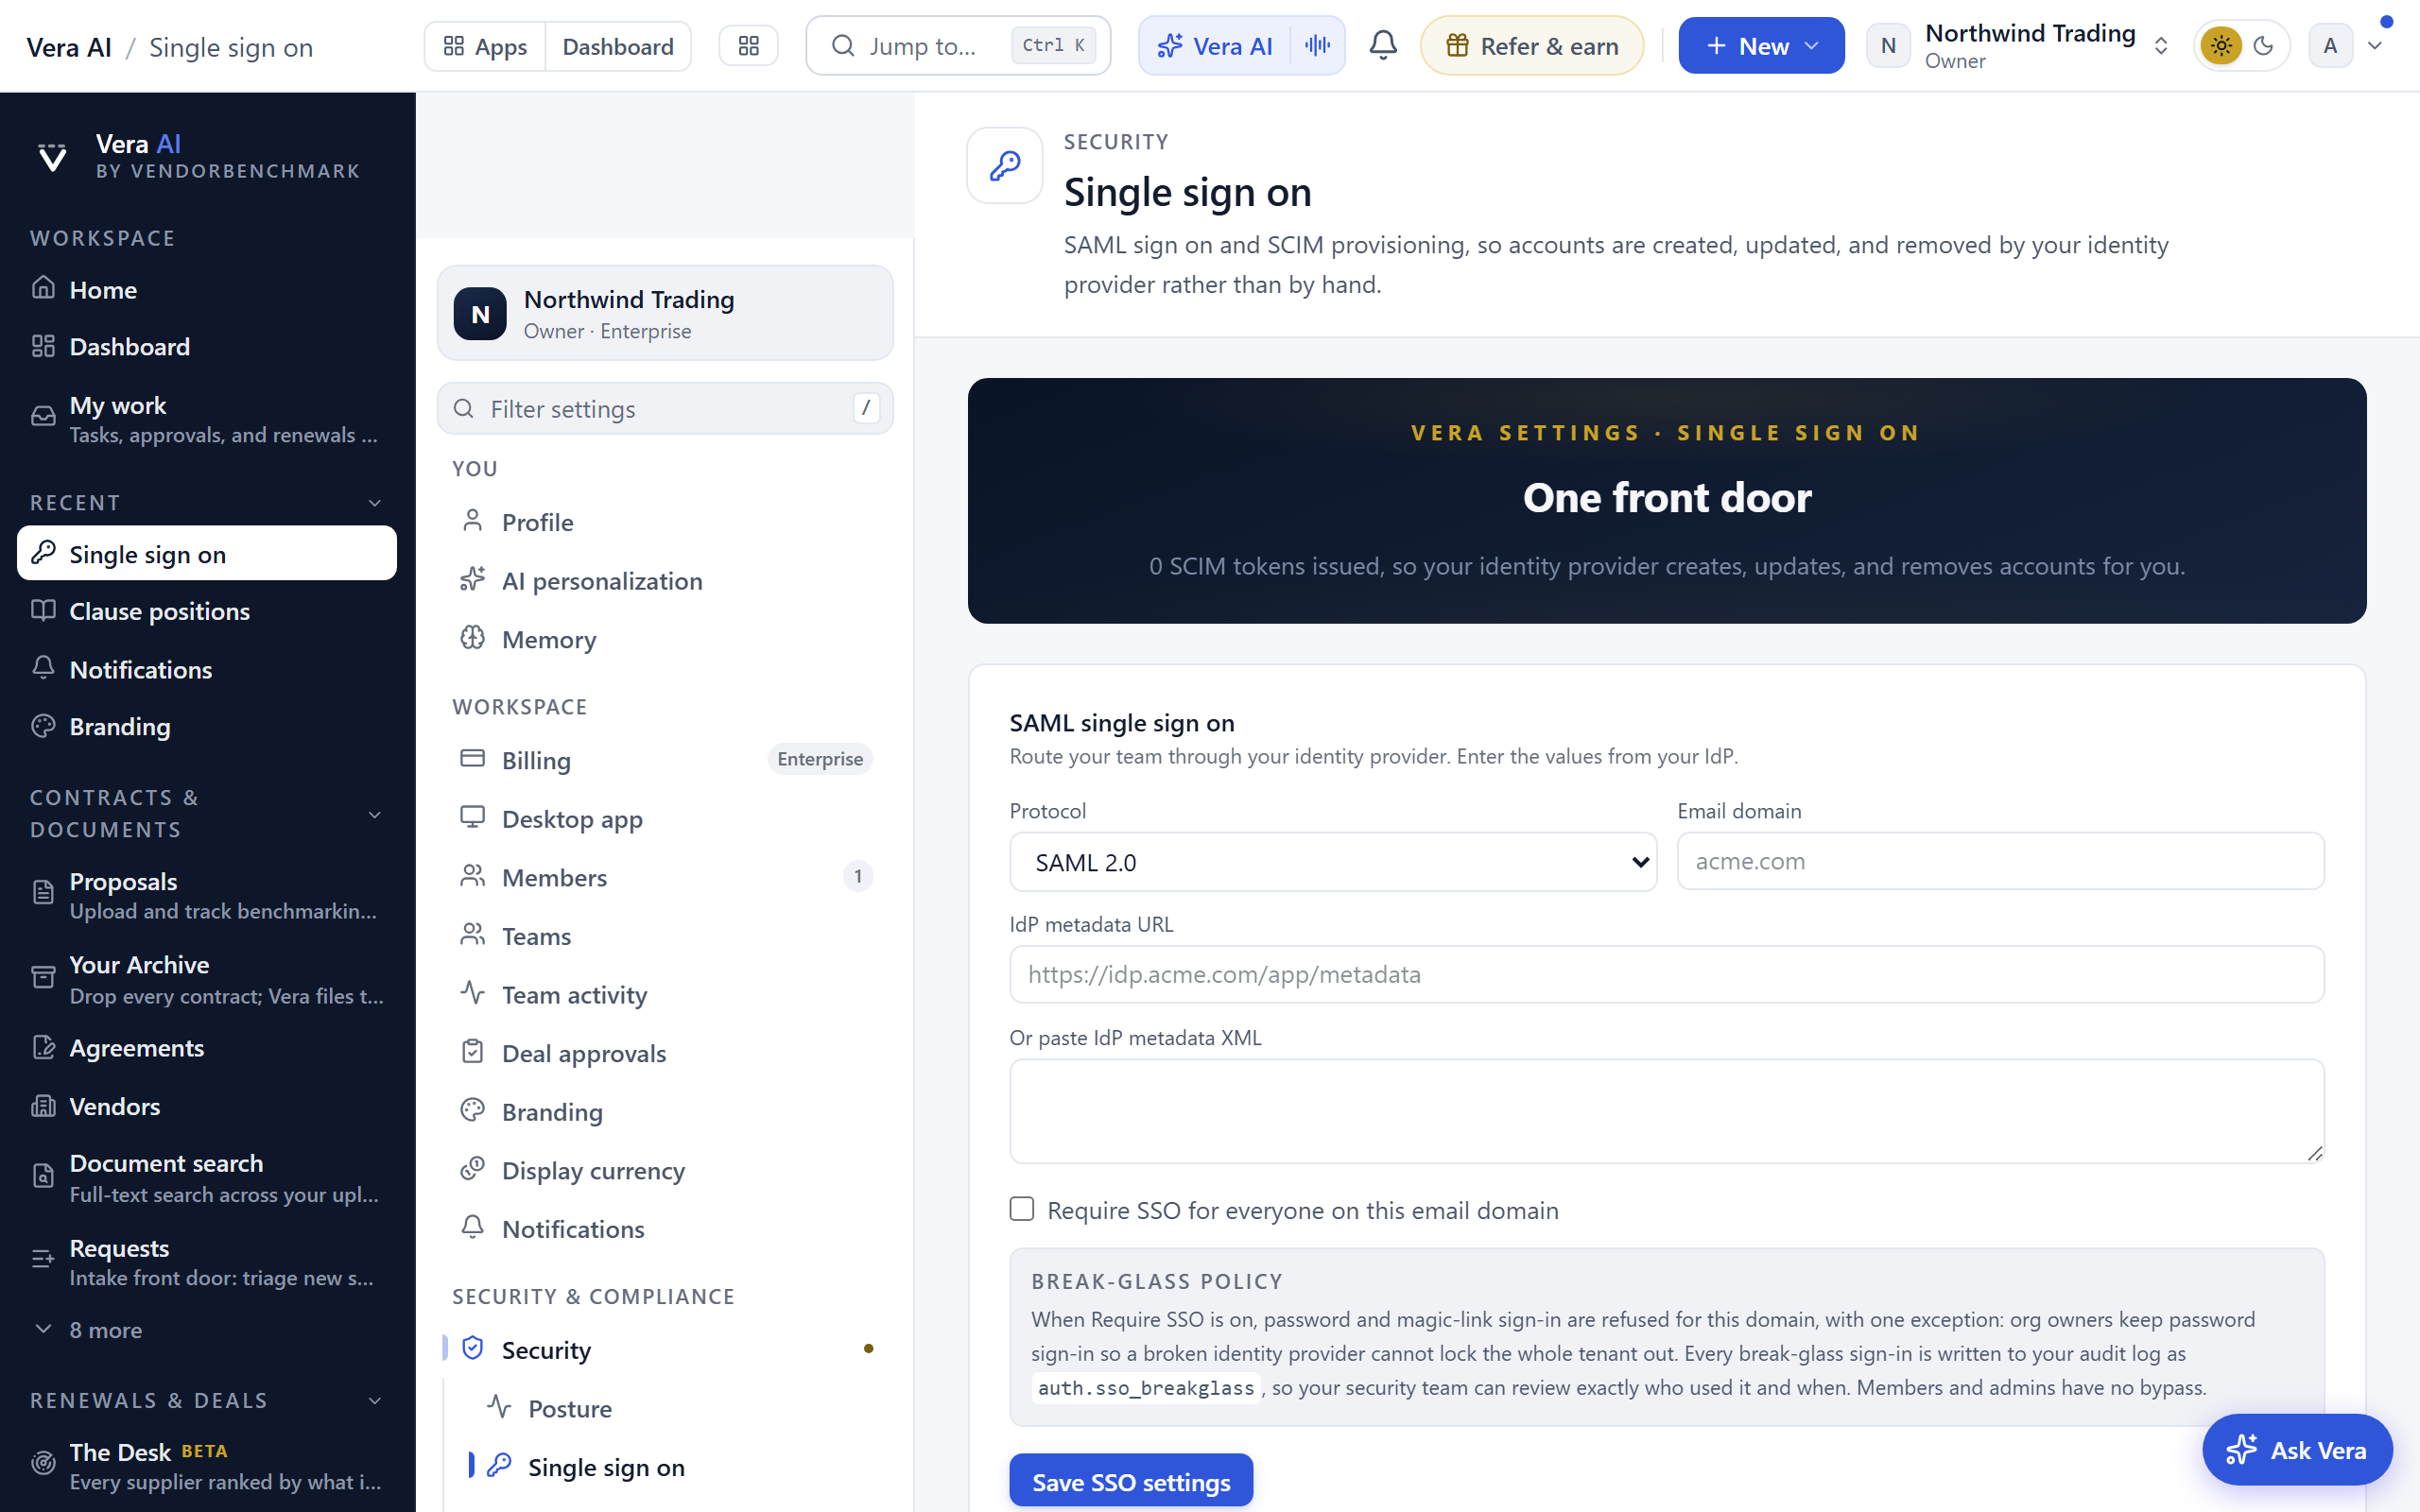
On the screen
- SSO configuration — connect your SAML identity provider and choose whether sign-on is enforced for your domain.
- Break-glass policy — a plain statement of the one exception when Require SSO is on: org owners keep password sign-in so a broken identity provider cannot lock the whole tenant out. Every break-glass sign-in is written to your audit log as
auth.sso_breakglass. Members and admins have no bypass. - SCIM tokens — provisioning tokens so your identity provider can create and deactivate accounts automatically.
How to use it
- Enter your identity provider's SAML details.
- Decide whether to enforce single sign-on for everyone on your email domain.
- Issue a SCIM token if you want automatic user provisioning.
- If your identity provider supports group push, push the groups that should map to teams; members must be provisioned as users first.
- Optionally map groups to roles: members of a mapped group get that role on every push (approver, analyst, member, or viewer; ownership is never assigned this way), and leaving the group takes the role with it.
Related: Security posture
Data controls
The Data controls section of the Security page. Retention, export, and deletion for your organization's data, the document retention switch for the analysis tools, plus your consent choices for the community and outcome network. Every hard deletion writes a deletion certificate you can hand to an auditor.
*In plain words: how long data lives, where it lives, how it leaves, and the certificates that prove deletion.*
When to reach for this
- The two policy decisions of week one: retention and community consent (the handbook).
- A security questionnaire's data-location and deletion questions (the recipe).
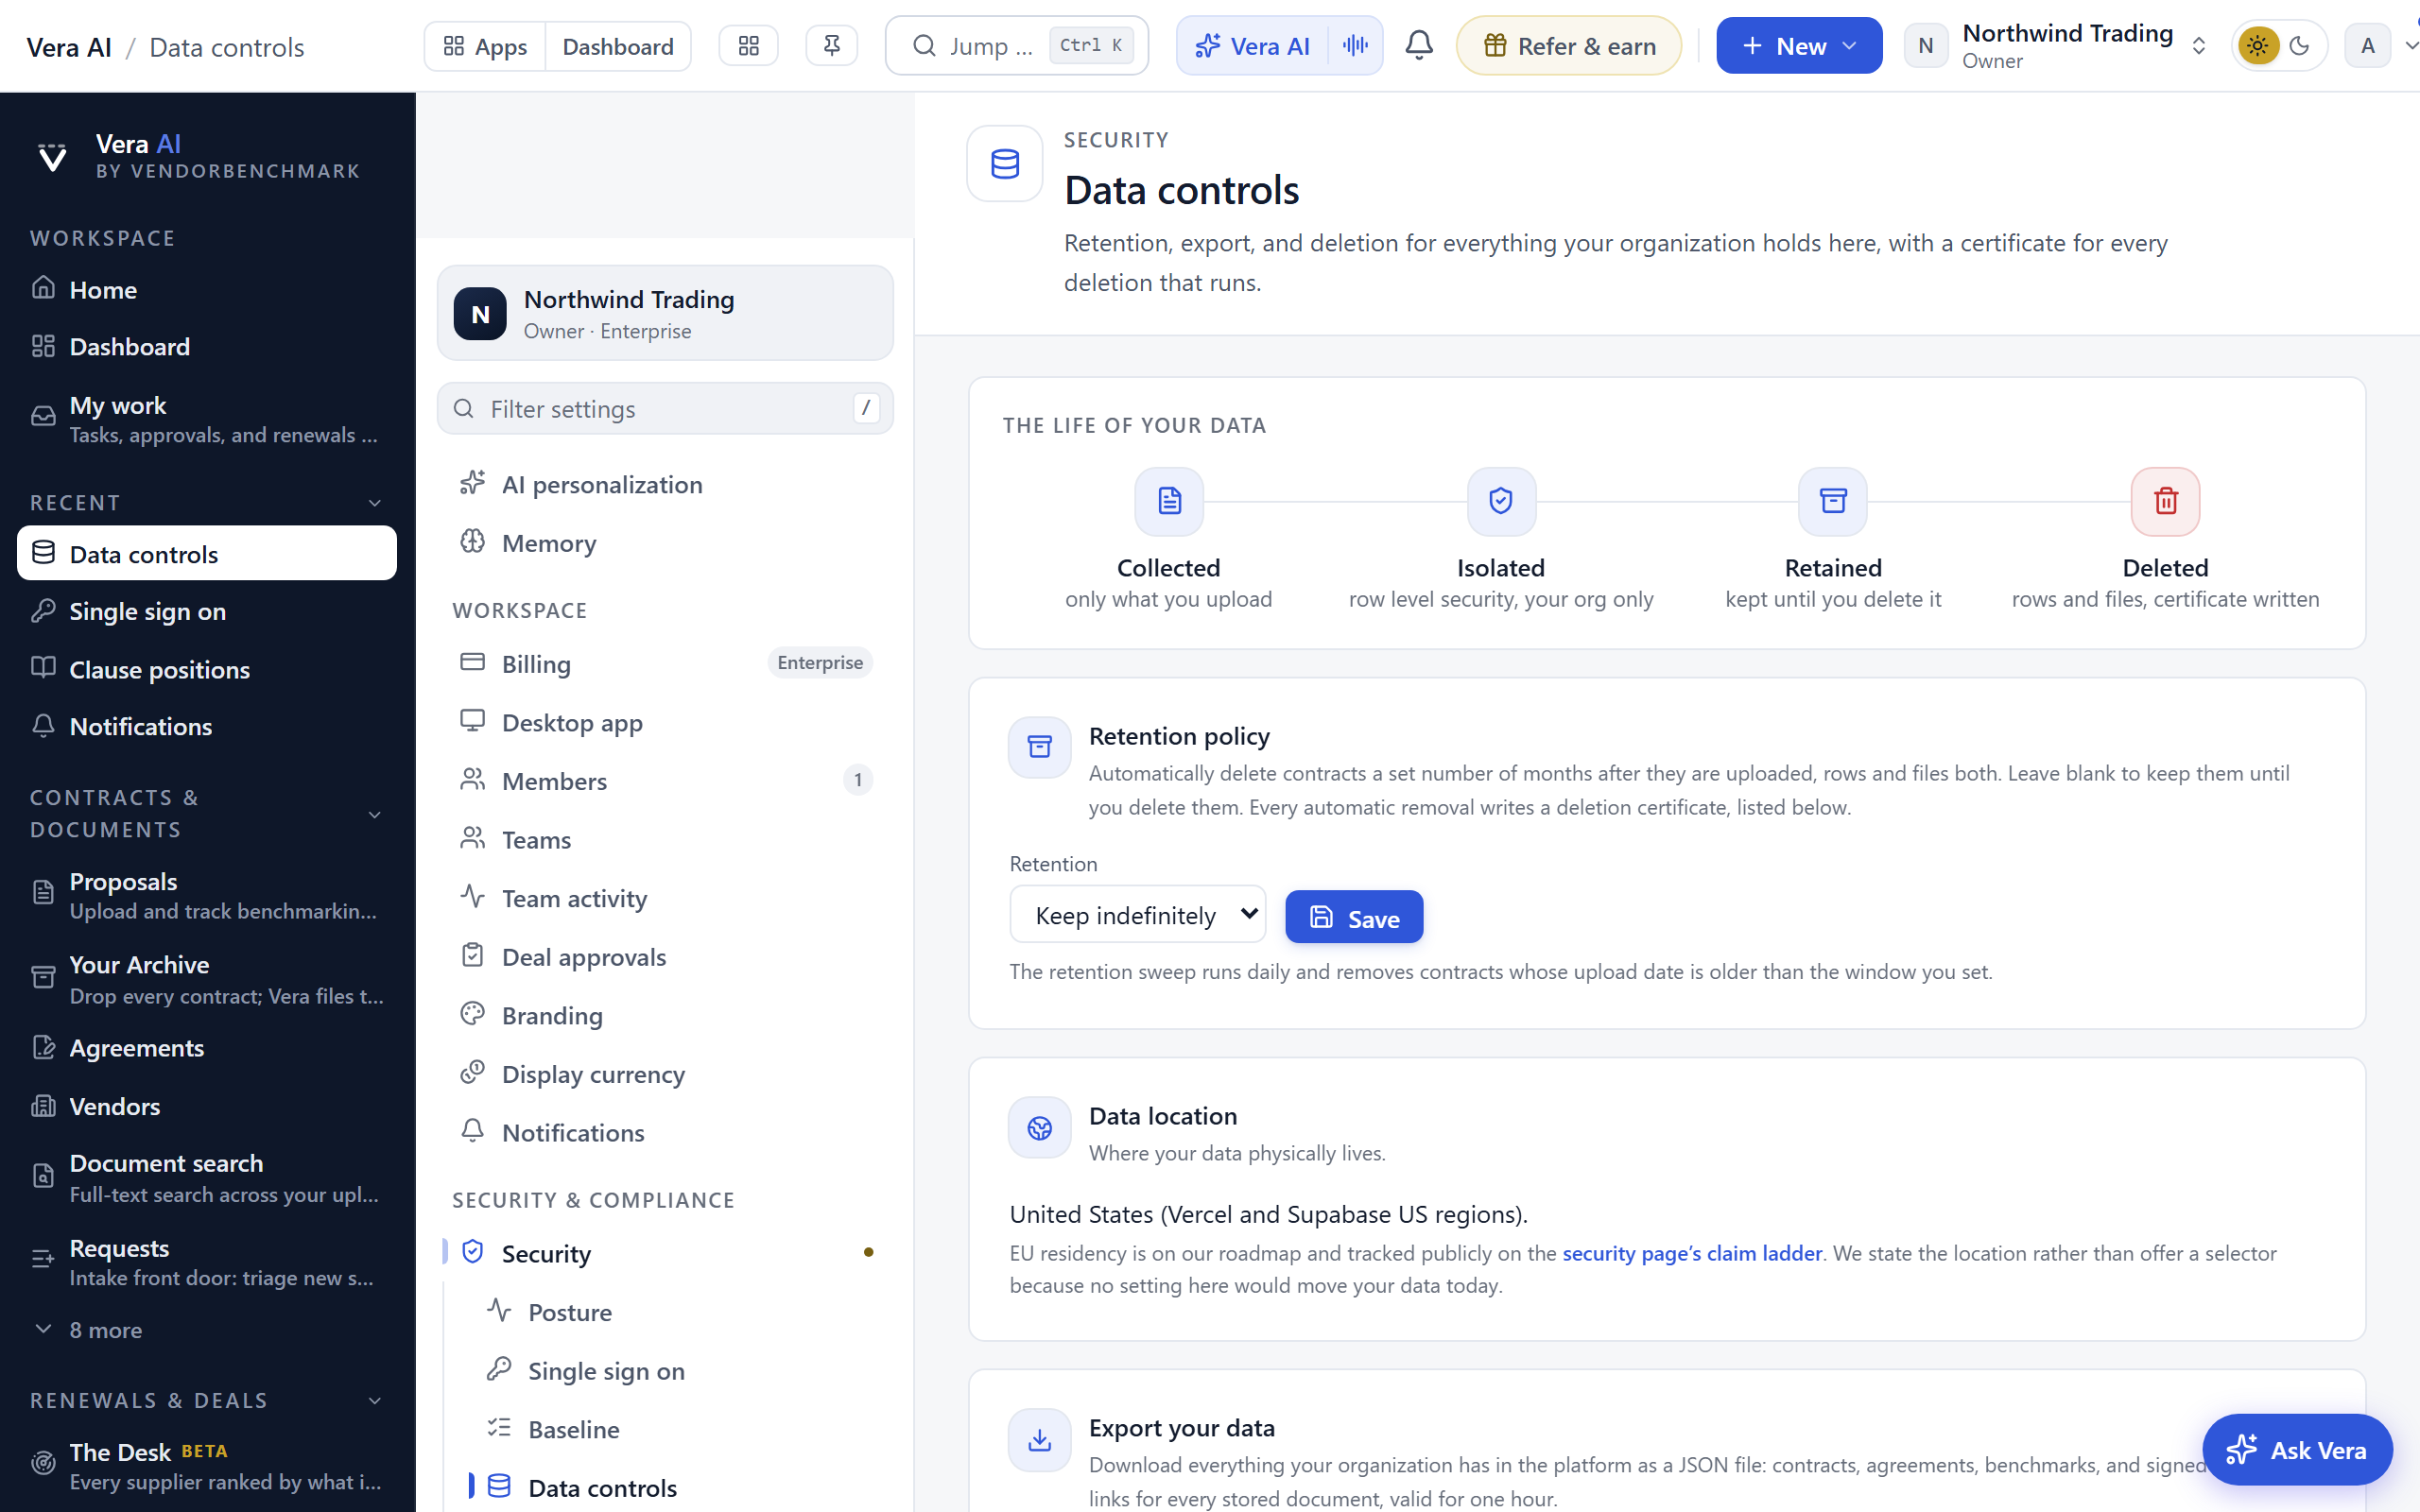
On the screen
- Retention policy — automatically delete contracts a set number of months after they are uploaded, rows and files both. Leave it blank to keep contracts until you delete them. The sweep runs daily, and each automatic removal writes a deletion certificate.
- Call recordings — the same sweep, on a separate and shorter dial in days, for what the call room keeps: the audio, the transcript and the memo go together when a call passes the window. It is set apart from contract retention on purpose, because a recording of a live negotiation is more sensitive than the contract it discusses and stops being useful sooner. Left blank, calls are kept until somebody deletes them, and anyone can delete their own call from its close screen at any time.
- Documents from analysis tools — on by default: files handed to the decoders, Second opinion, the Vera Deal-Room, Proposal comparison, the vendor playbook intakes, and now the Time machine (both documents), Quote Face-Off (PDF quotes only) and the Rate Card Benchmark (PDF and DOCX only) are saved to your workspace as contracts, private to your organization, and each joins your benchmarking queue. Photo captures and XLSX rate cards are never stored whatever this switch says. Benchmarking extracts only high level data points (the vendor, the price, the term, the key commercial terms); the document itself never leaves your organization, and every saved document can be deleted from its contract record. Turn the switch off and those tools read files in memory and keep nothing; documents already saved stay until you delete them.
- Document reading depth — how much reasoning the AI spends when it reads your documents: extracting terms, transcribing scans, and asking the follow-up fee question. Deepest is the default and the platform policy. Balanced is noticeably faster on big archives with nearly the same accuracy on ordinary paper, and Quick suits large backfills of routine documents. The dial covers reading only; briefs, playbooks, and reports always run at full depth, and you can re-read any contract at full depth after changing it back. New reads pick up a change within a minute.
- What Vera captures from each agreement — every scan always reads the vendor, the customer entity of record, the document title and type, the term dates, the annual value, and the currency, each backed by a verbatim quote from the paper. The optional families toggle here: seats and licenses, the price increase cap, the termination notice window, auto renewal, and the year by year fee ramp. Below the toggles, add up to 5 capture questions of your own (for example: Who signed for our side? What is the payment term?); Vera answers each one from every document she reads, new uploads and archive scans alike, quotes the passage the answer came from, and files the answers into the archive's Read log, the Document Desk, and the proposal record's document brief. For the 25 largest publishers, Vera also asks that publisher's own questions automatically (a Microsoft EA's enrollment number and true-up terms, an Oracle order's support uplift cap, a Snowflake order's credit rollover); your questions always keep their room and are asked first. Changes apply from the next scan; documents already read keep what they have until re-indexed.
- Data location — a read-only statement of where data physically lives: the United States (Vercel and Supabase US regions). EU residency is on the roadmap and tracked publicly on the security page's claim ladder.
- Deletion certificates — one row per completed hard deletion: date, scope (contract or organization), what was deleted, and how many files were removed. "View certificate" opens a print-ready document listing rows removed by table, the storage paths removed, the actor, and the UTC timestamp; use your browser's print dialog to save it as a PDF.
- Community and outcome network consent — opt in or out of contributing anonymized data to the community benchmarks and outcome network.
- Reseller quotes — recent quotes shared for benchmarking.
- Export and deletion — request an export or a deletion of your organization's data.
- Reset the estate — the last card on the page, and the only one that destroys anything on the spot. It empties the workspace so you can start again: every contract you have uploaded, the stored files themselves, and everything read off them (the answers, the reports, the entitlement register, the scan history, and the agreements ledger). Your organization, its plan, everyone in it with their roles, the audit log and the deletion certificates all stay. Press Count what would go first and the card states exactly how many contracts, files, agreements, register lines and scan runs would be deleted; only then does it ask you to type your organization's name, and only an exact match arms the button. Owners only, and the sweep writes its own deletion certificate.
How to use it
- Set a retention period if your policy requires one; blank keeps contracts until you delete them.
- Choose whether to contribute to the community and outcome network.
- Request an export or deletion when you need it; our team processes deletion requests and confirms by email.
- After any deletion, open its certificate from the Deletion certificates list to verify what was removed.
- To clear the workspace and start again, press Count what would go under Reset the estate, read the numbers, type your organization's name, and confirm. Export first if you might want the data back: this one cannot be undone.
Related: Trust center · Audit log
Audit log
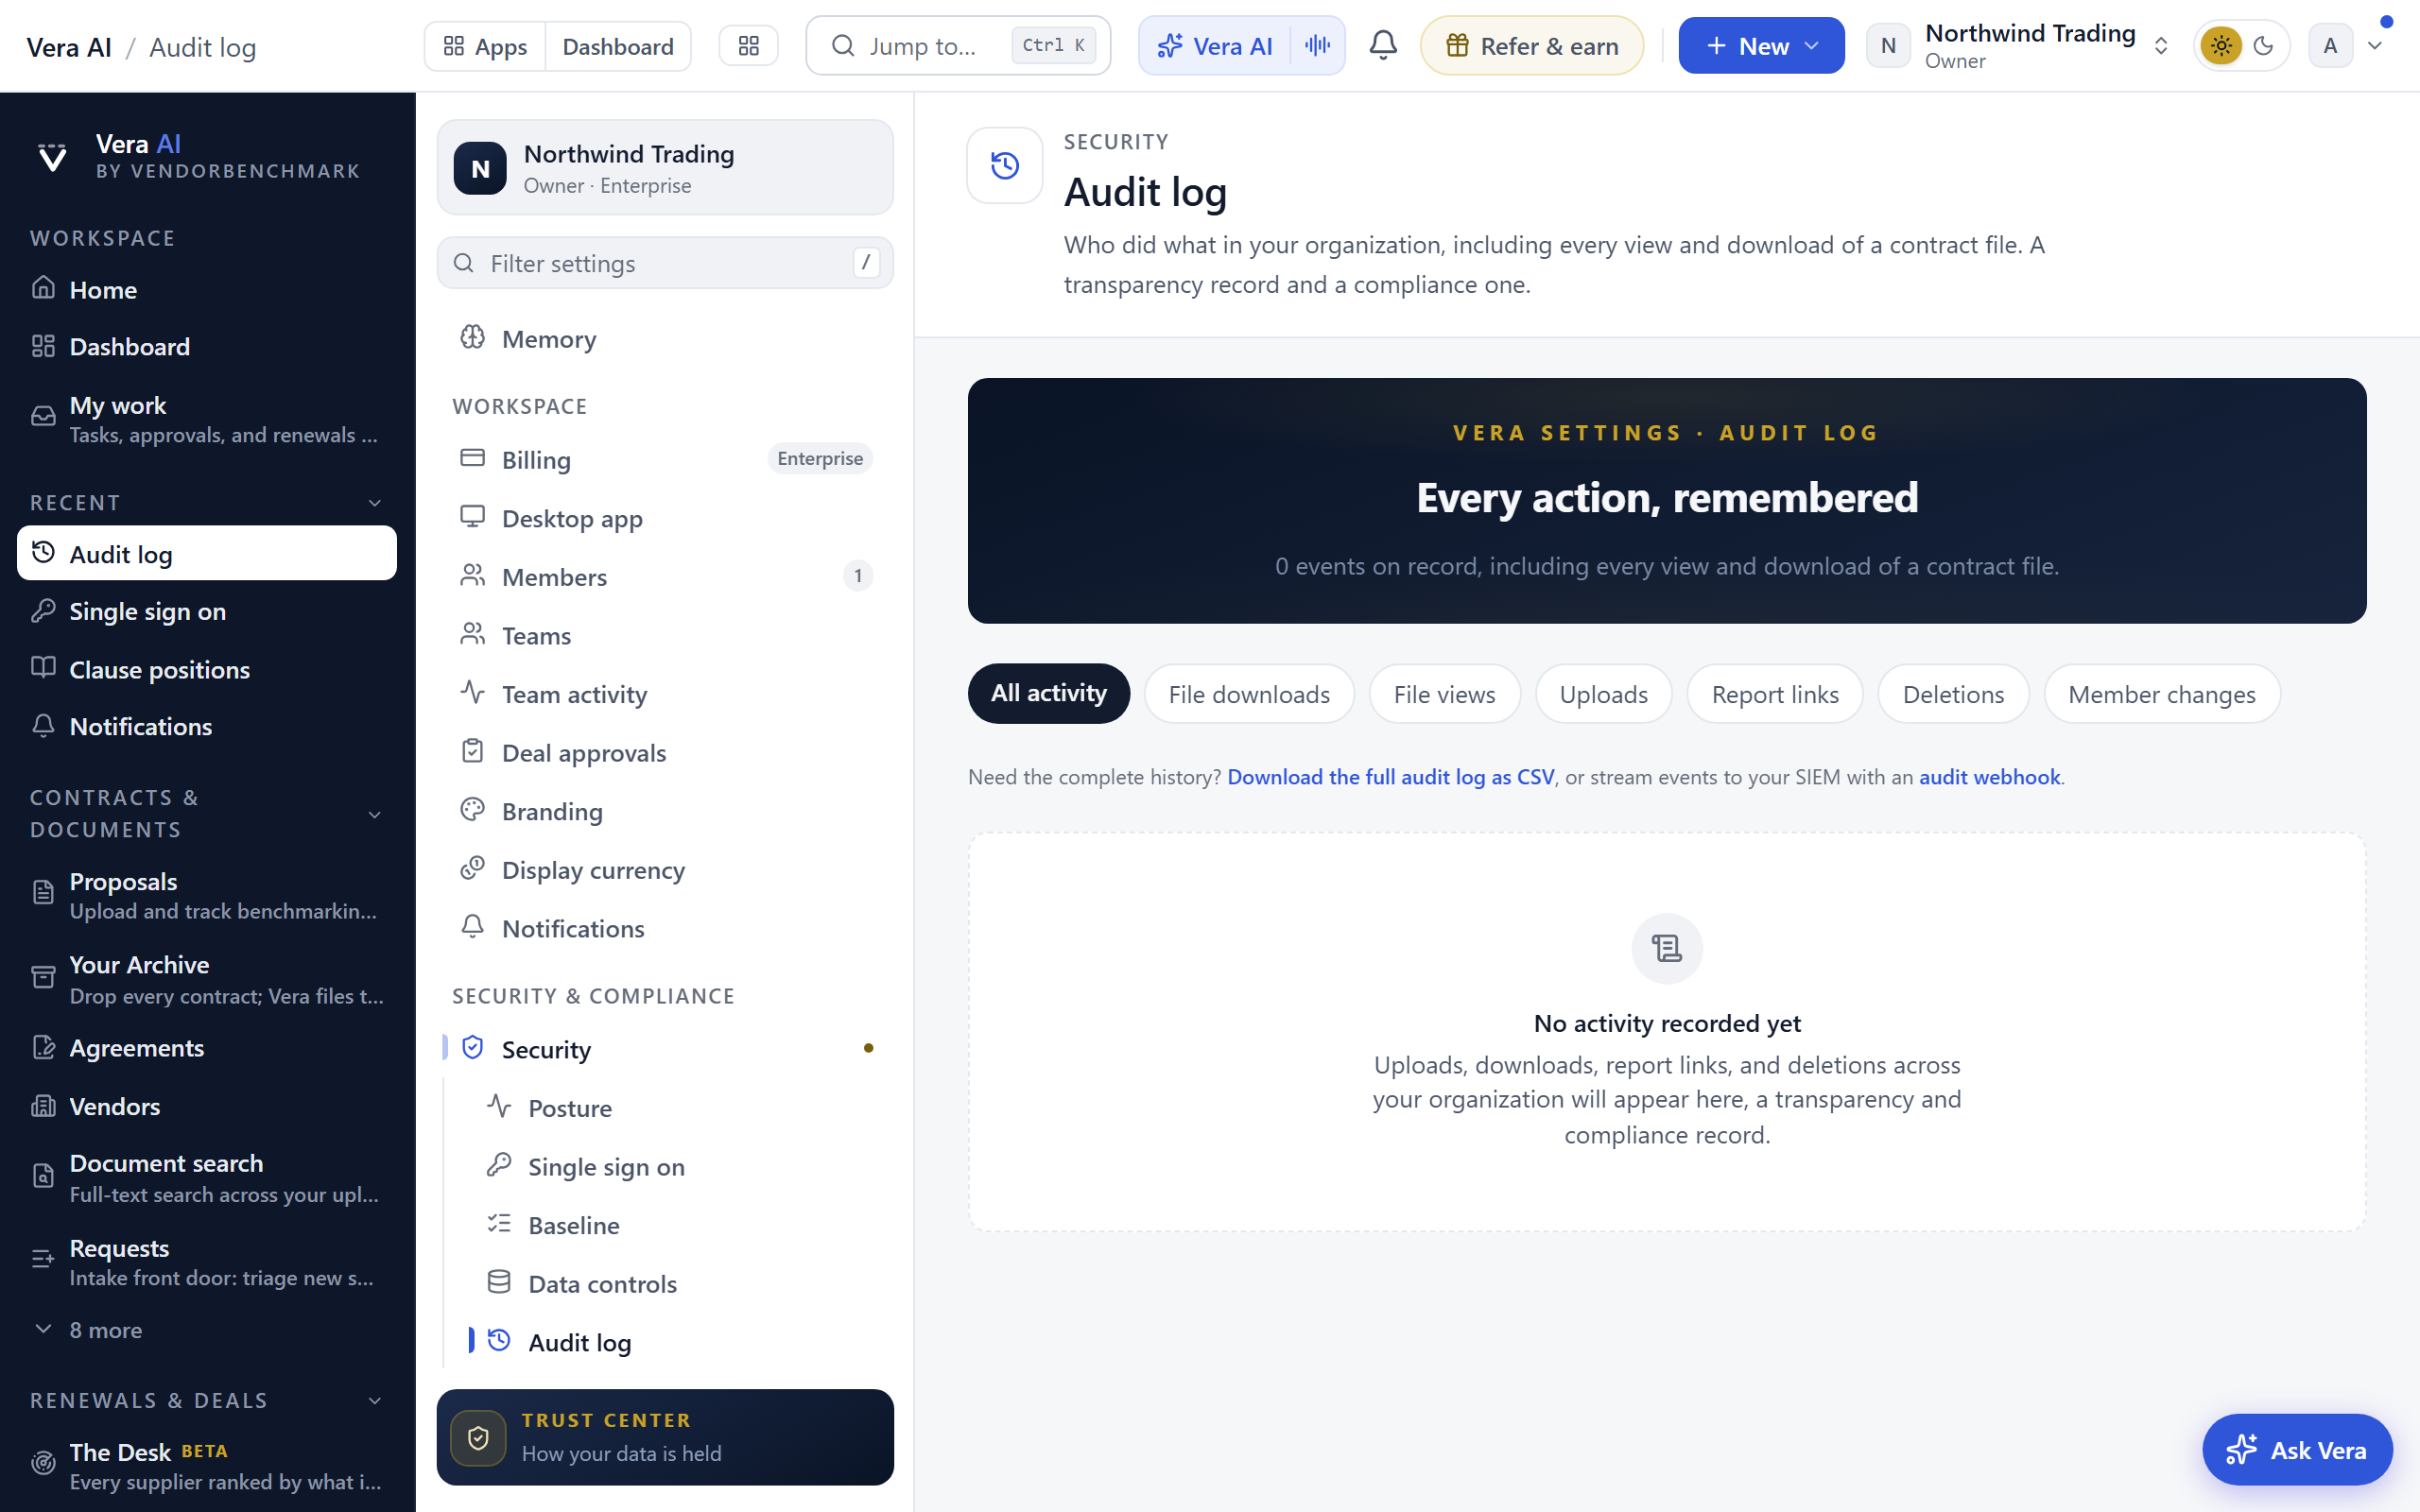
The Audit log section of the Security page. Who did what in your organization, including views and downloads of contract files. A transparency and compliance record you can filter, search, and export. Old links and saved views under the former standalone address redirect here with their filters intact.
On the screen
- Filters — narrow to file downloads, file views, uploads, report links, deletions, or member changes. A file view is a document opened in the in-app viewer; a file download is a copy saved to the reader's machine. The log records both separately.
- Activity table — each event with the actor, the source device and IP, and when it happened.
- Saved views — save a filter you return to often as a named chip in the Views row; the pattern is written up under Saved views.
- Export and stream — download the full log as CSV, or stream events to your SIEM with an audit webhook.
How to use it
- Pick a filter or search for an actor or activity.
- Save a view if you audit the same slice regularly.
- Export to CSV, or set up an audit webhook under Integrations for continuous streaming.
Related: Security posture · Integrations
Access reviews
*In plain words: a quarterly, exportable proof that someone looked at who can reach what.*
When to reach for this
- The quarterly governance clock (the cadence): thirty minutes, four times a year.
- An auditor or customer asks for your access-review process: the completed reviews are the answer.
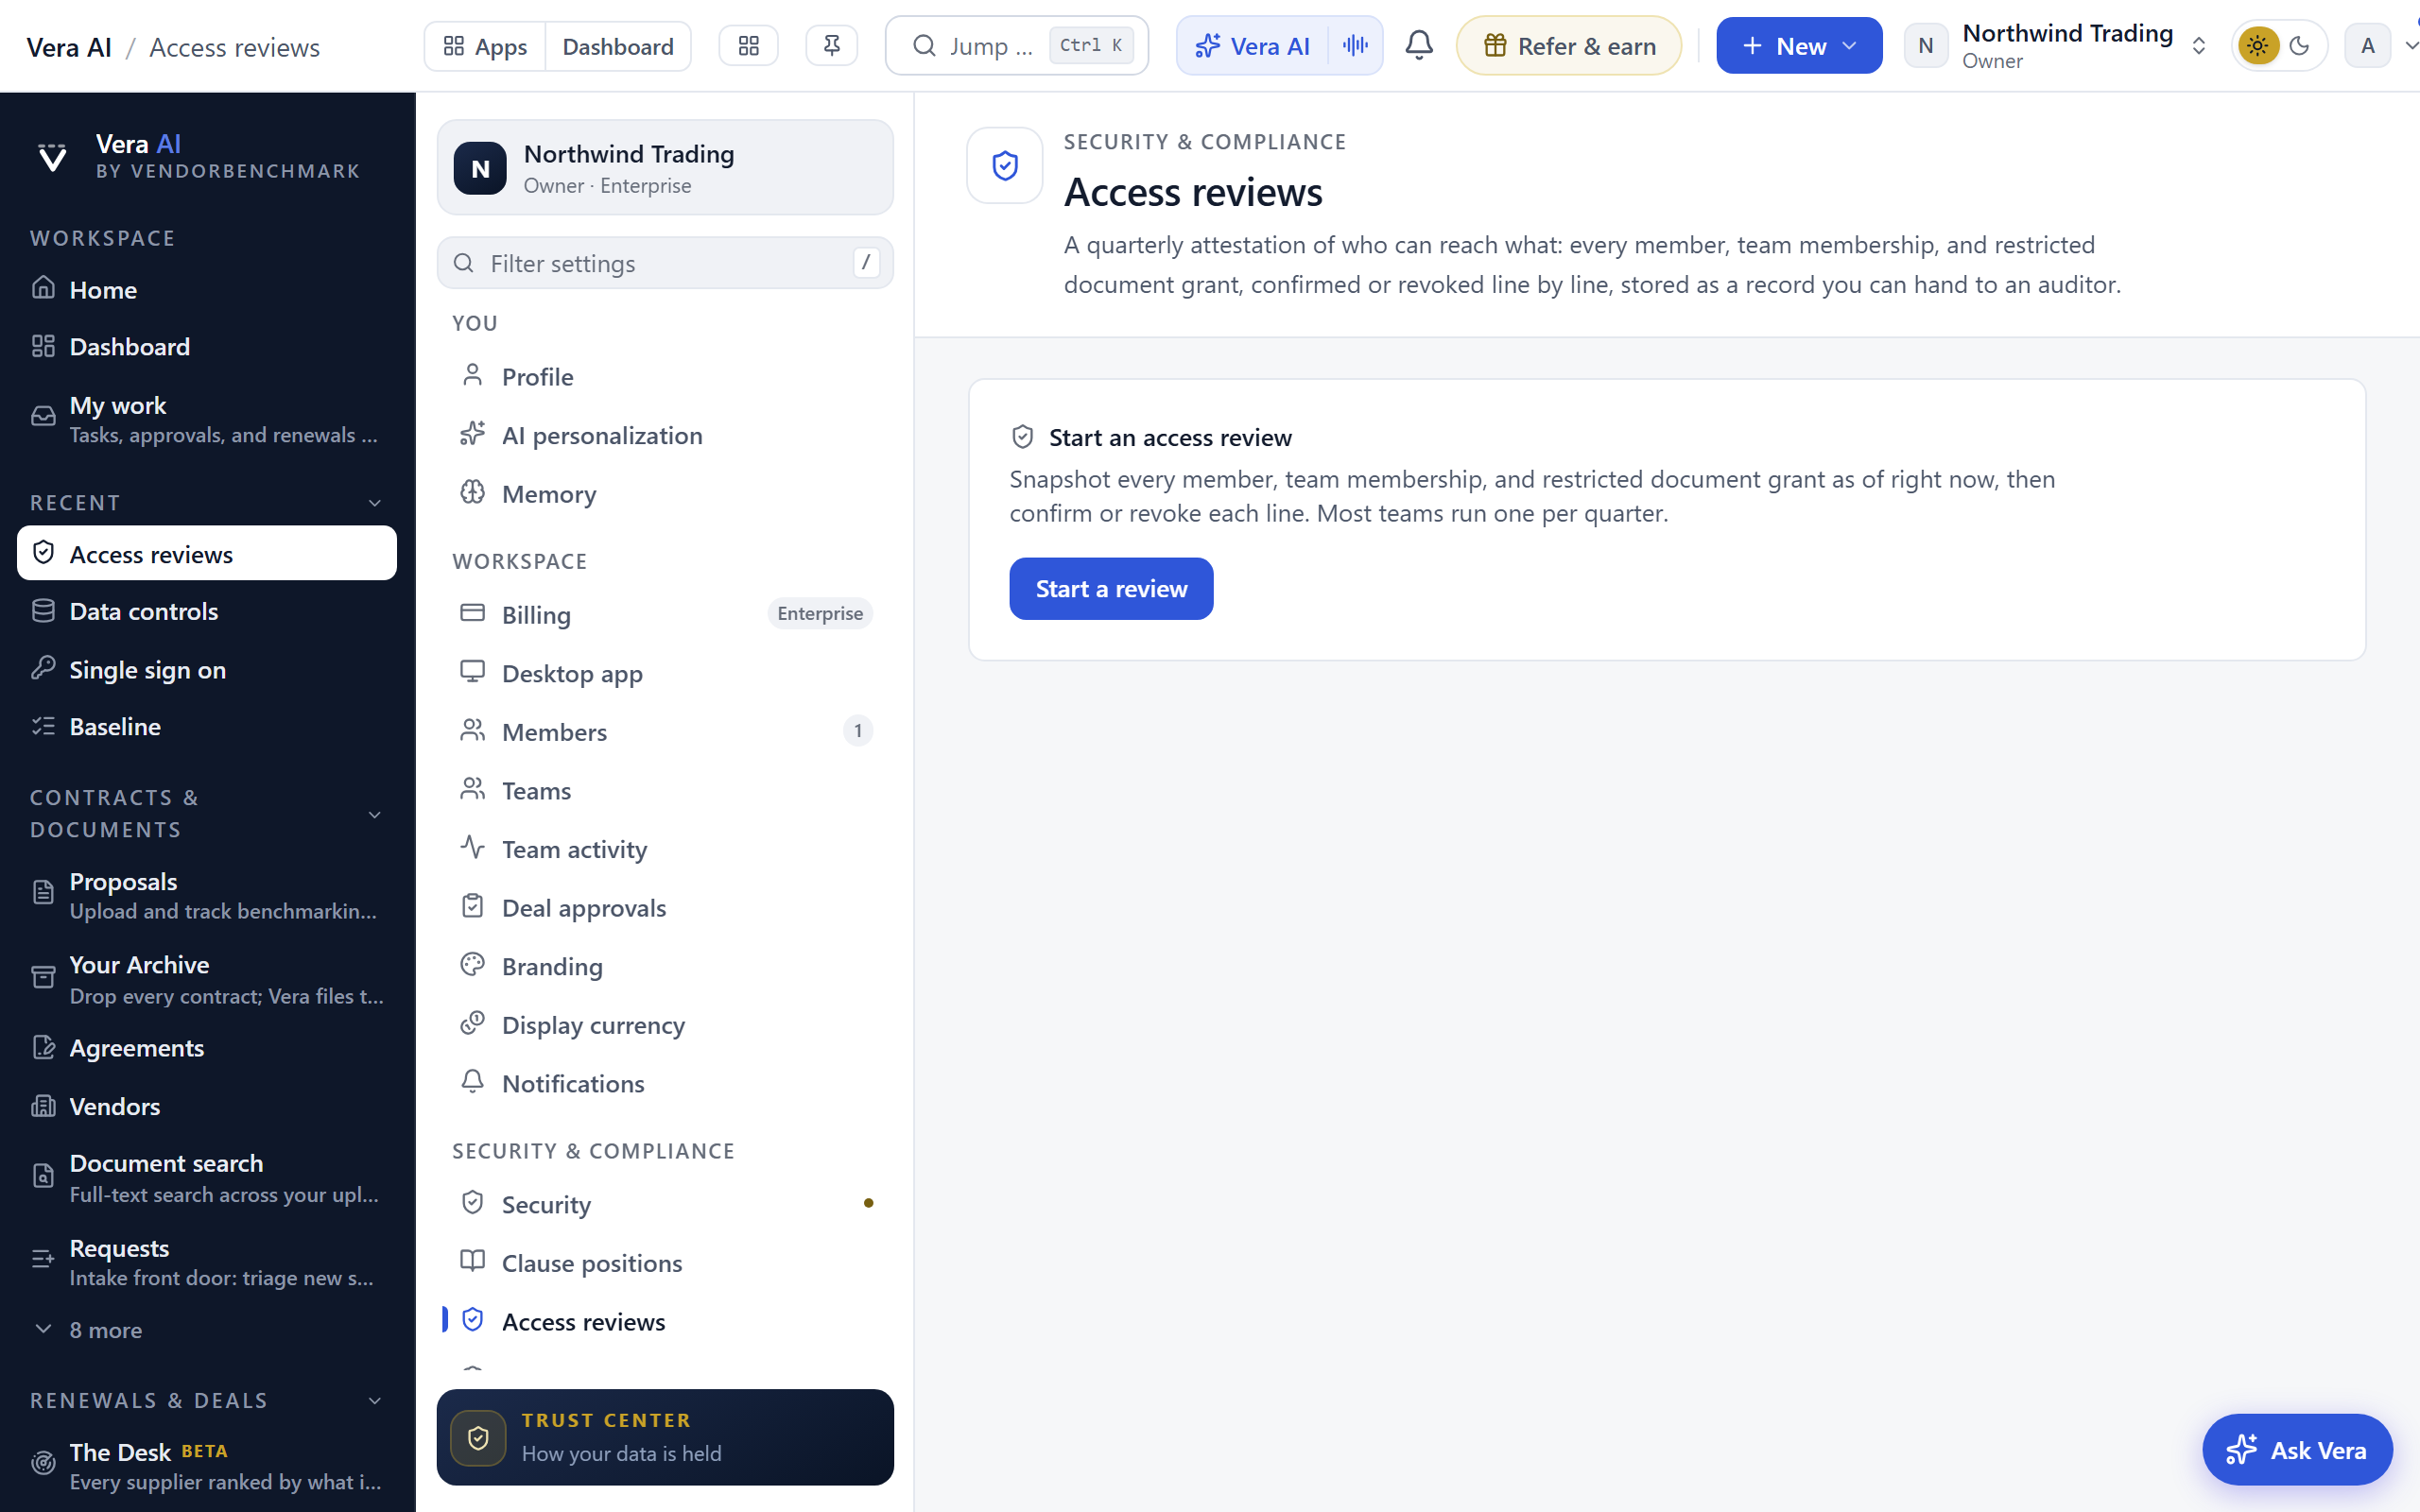
A quarterly attestation of who can reach what. Starting a review snapshots your organization's entire access surface at that moment: every member with their role, every team membership, and every restricted document grant. You then confirm or revoke each line, and the completed review is stored as a durable record you can hand to an auditor.
On the screen
- Start a review — one action that snapshots the access surface. Only one review can be open at a time.
- Review lines — grouped into members and roles, team memberships, and restricted document grants, each with Confirm and Revoke buttons.
- Complete review — enabled only once every line is decided, so a finished review always covers everything.
- Completed reviews — past attestations with line counts and how many grants were revoked or flagged, each exportable as CSV.
How to use it
- Open Settings › Access reviews and choose Start a review.
- Work through each line. Confirm access that is still right; revoke a team membership or document grant that is not. Revocation takes effect immediately.
- A member who should leave the organization is flagged rather than removed here. Finish the removal on the Members page, which protects the last owner and revokes their sessions.
- When nothing is pending, choose Complete review. Every decision is written to the audit log.
- Export any completed review as CSV for an auditor or a security questionnaire.
Related: Members · Teams · Audit log
Trust center
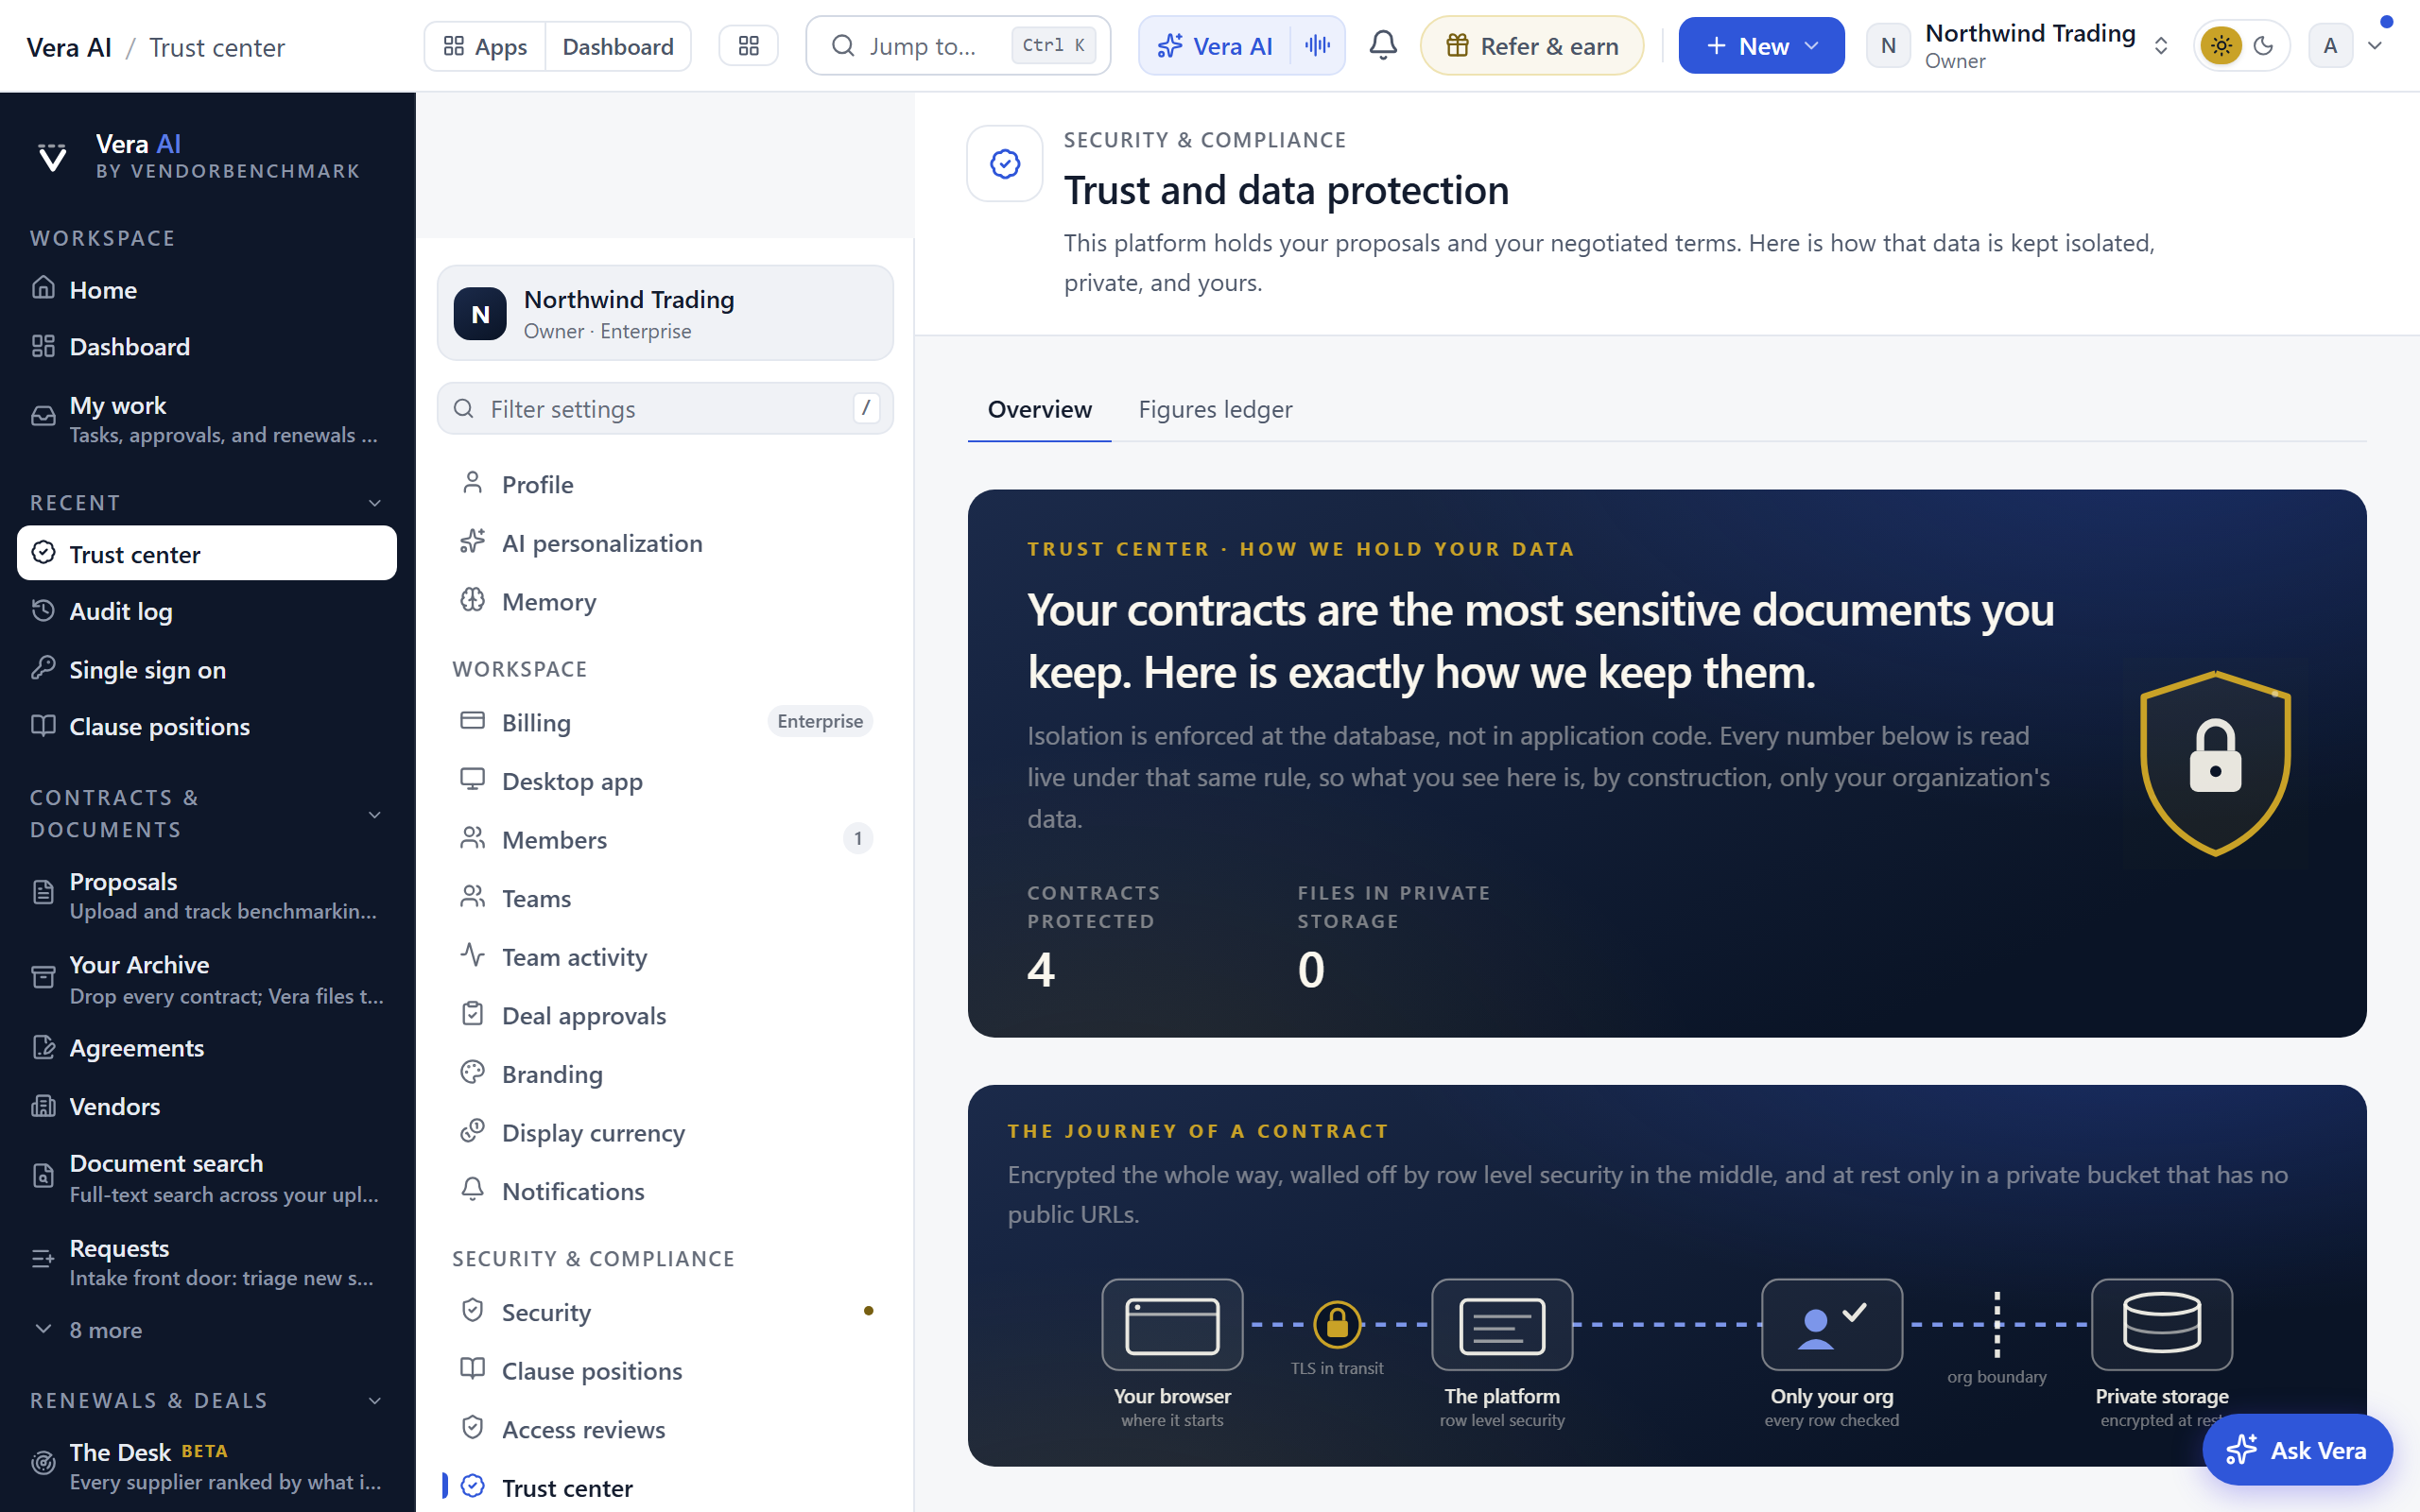
How your data is protected, told in three commitments: kept apart (tenant isolation), kept sealed (encryption and access), and kept yours (audit, deletion, and eyes-off AI). The masthead proves the isolation claim with live numbers. Two underline tabs make this one page: Overview (this view) and the Figures ledger.
On the screen
- Kept apart — tenant isolation at the database, least-privilege access, and roles matched to clearance.
- Kept sealed — private contract storage with short-lived signed links, encryption in transit and at rest, and multifactor authentication.
- Kept yours — the audit record, data deletion, and how the AI handles your data.
- Data journey — a diagram of the path a contract actually takes through the platform.
- Print or save as PDF — prints the page as an executive security overview: a cover carrying your organization name, the month, and the same live figures, then the controls. The animated masthead and the data journey diagram are left off the printed pack, so what a reviewer receives is the record rather than the illustration. The figures on the cover are read under your own access scope at the moment you print, and the footnote on the cover says so.
How to use it
- Read the three chapters to understand the controls applied to your data.
- Share this page with security reviewers who ask how the platform protects information.
- When a reviewer wants a document rather than a link, press Print or save as PDF and send the brief.
Related: Security posture · Data controls · Figures ledger
Figures ledger
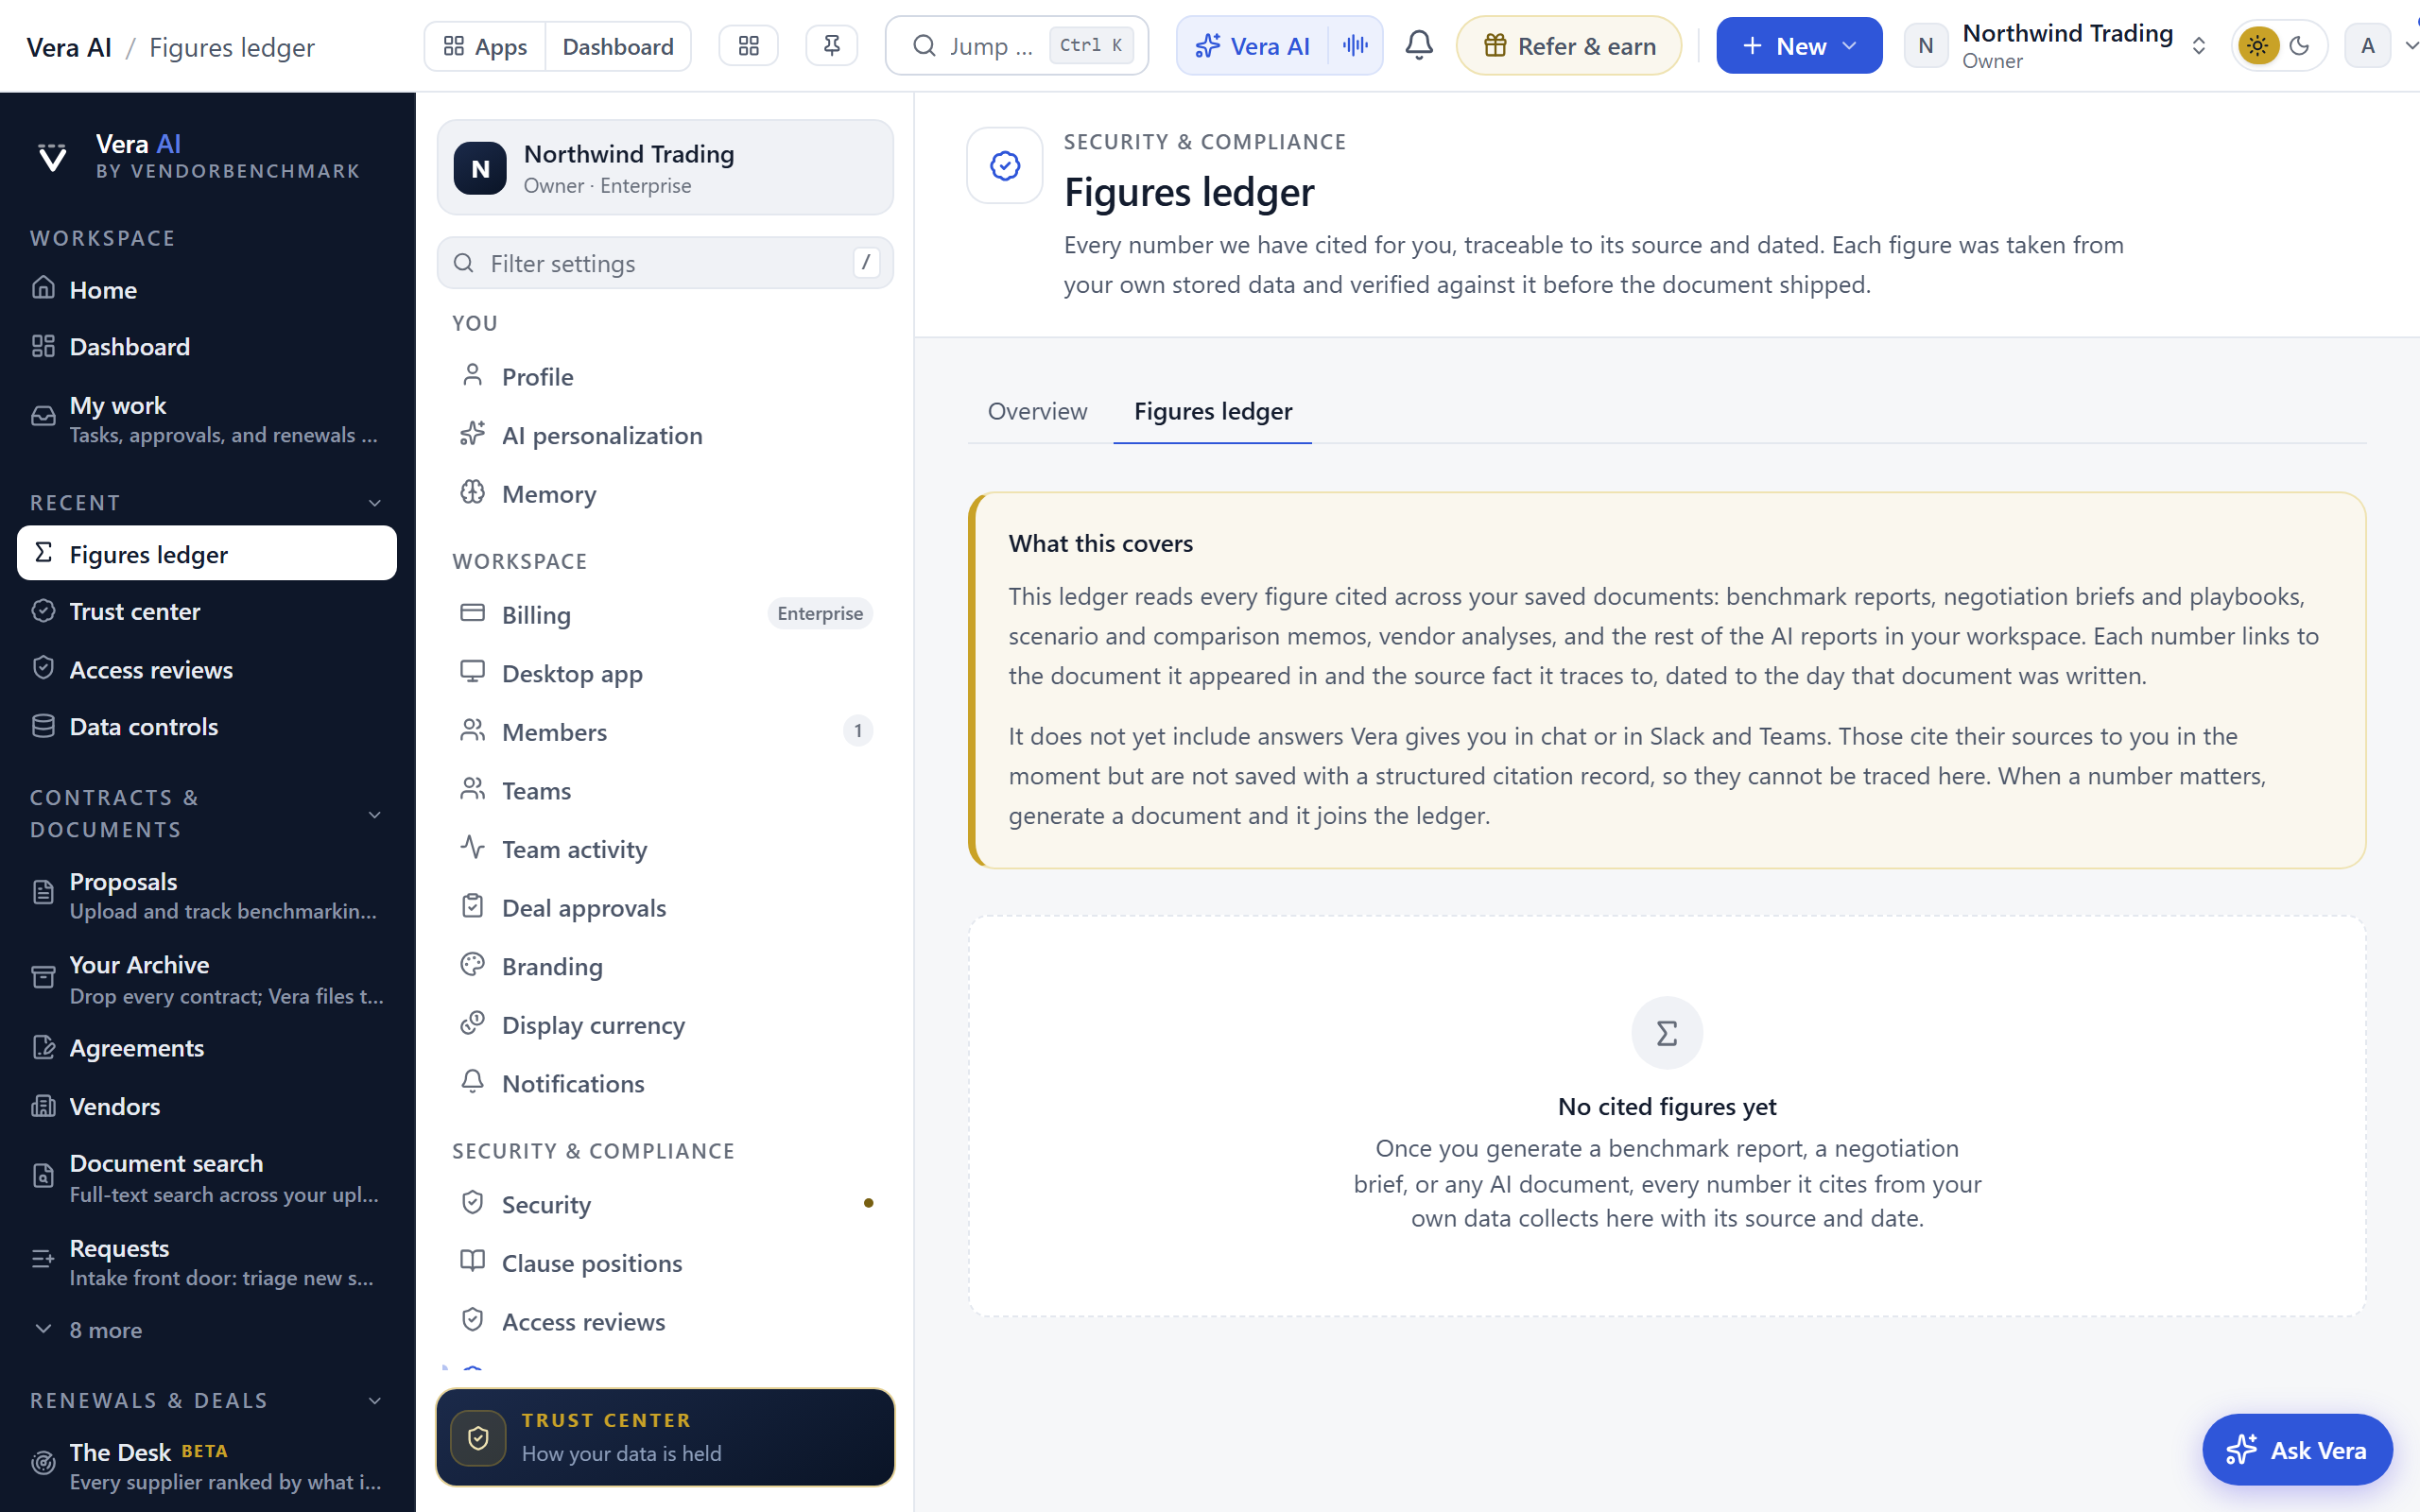
Every number the platform has cited for you, in one place. The ledger lists each figure across your reports and briefs, linked to the source fact it traces to and the day that fact was current, so any number you forward can be stood behind.
On the screen
- Cited figures — one row per number the platform has printed for you, with the document it appeared in, the source fact behind it, and the date that fact was current.
- Search and sort — narrow to a vendor, a document, or a value, and sort by any column.
- Not-yet-traceable note — the ledger is honest about the figures it cannot trace to a stored fact yet, rather than hiding them.
How to use it
- Look up any number a report or brief shows to see the fact it came from and when it was current.
- Search for the vendor or figure a reviewer is questioning and hand them the source in one step.
Related: Trust center · Audit log
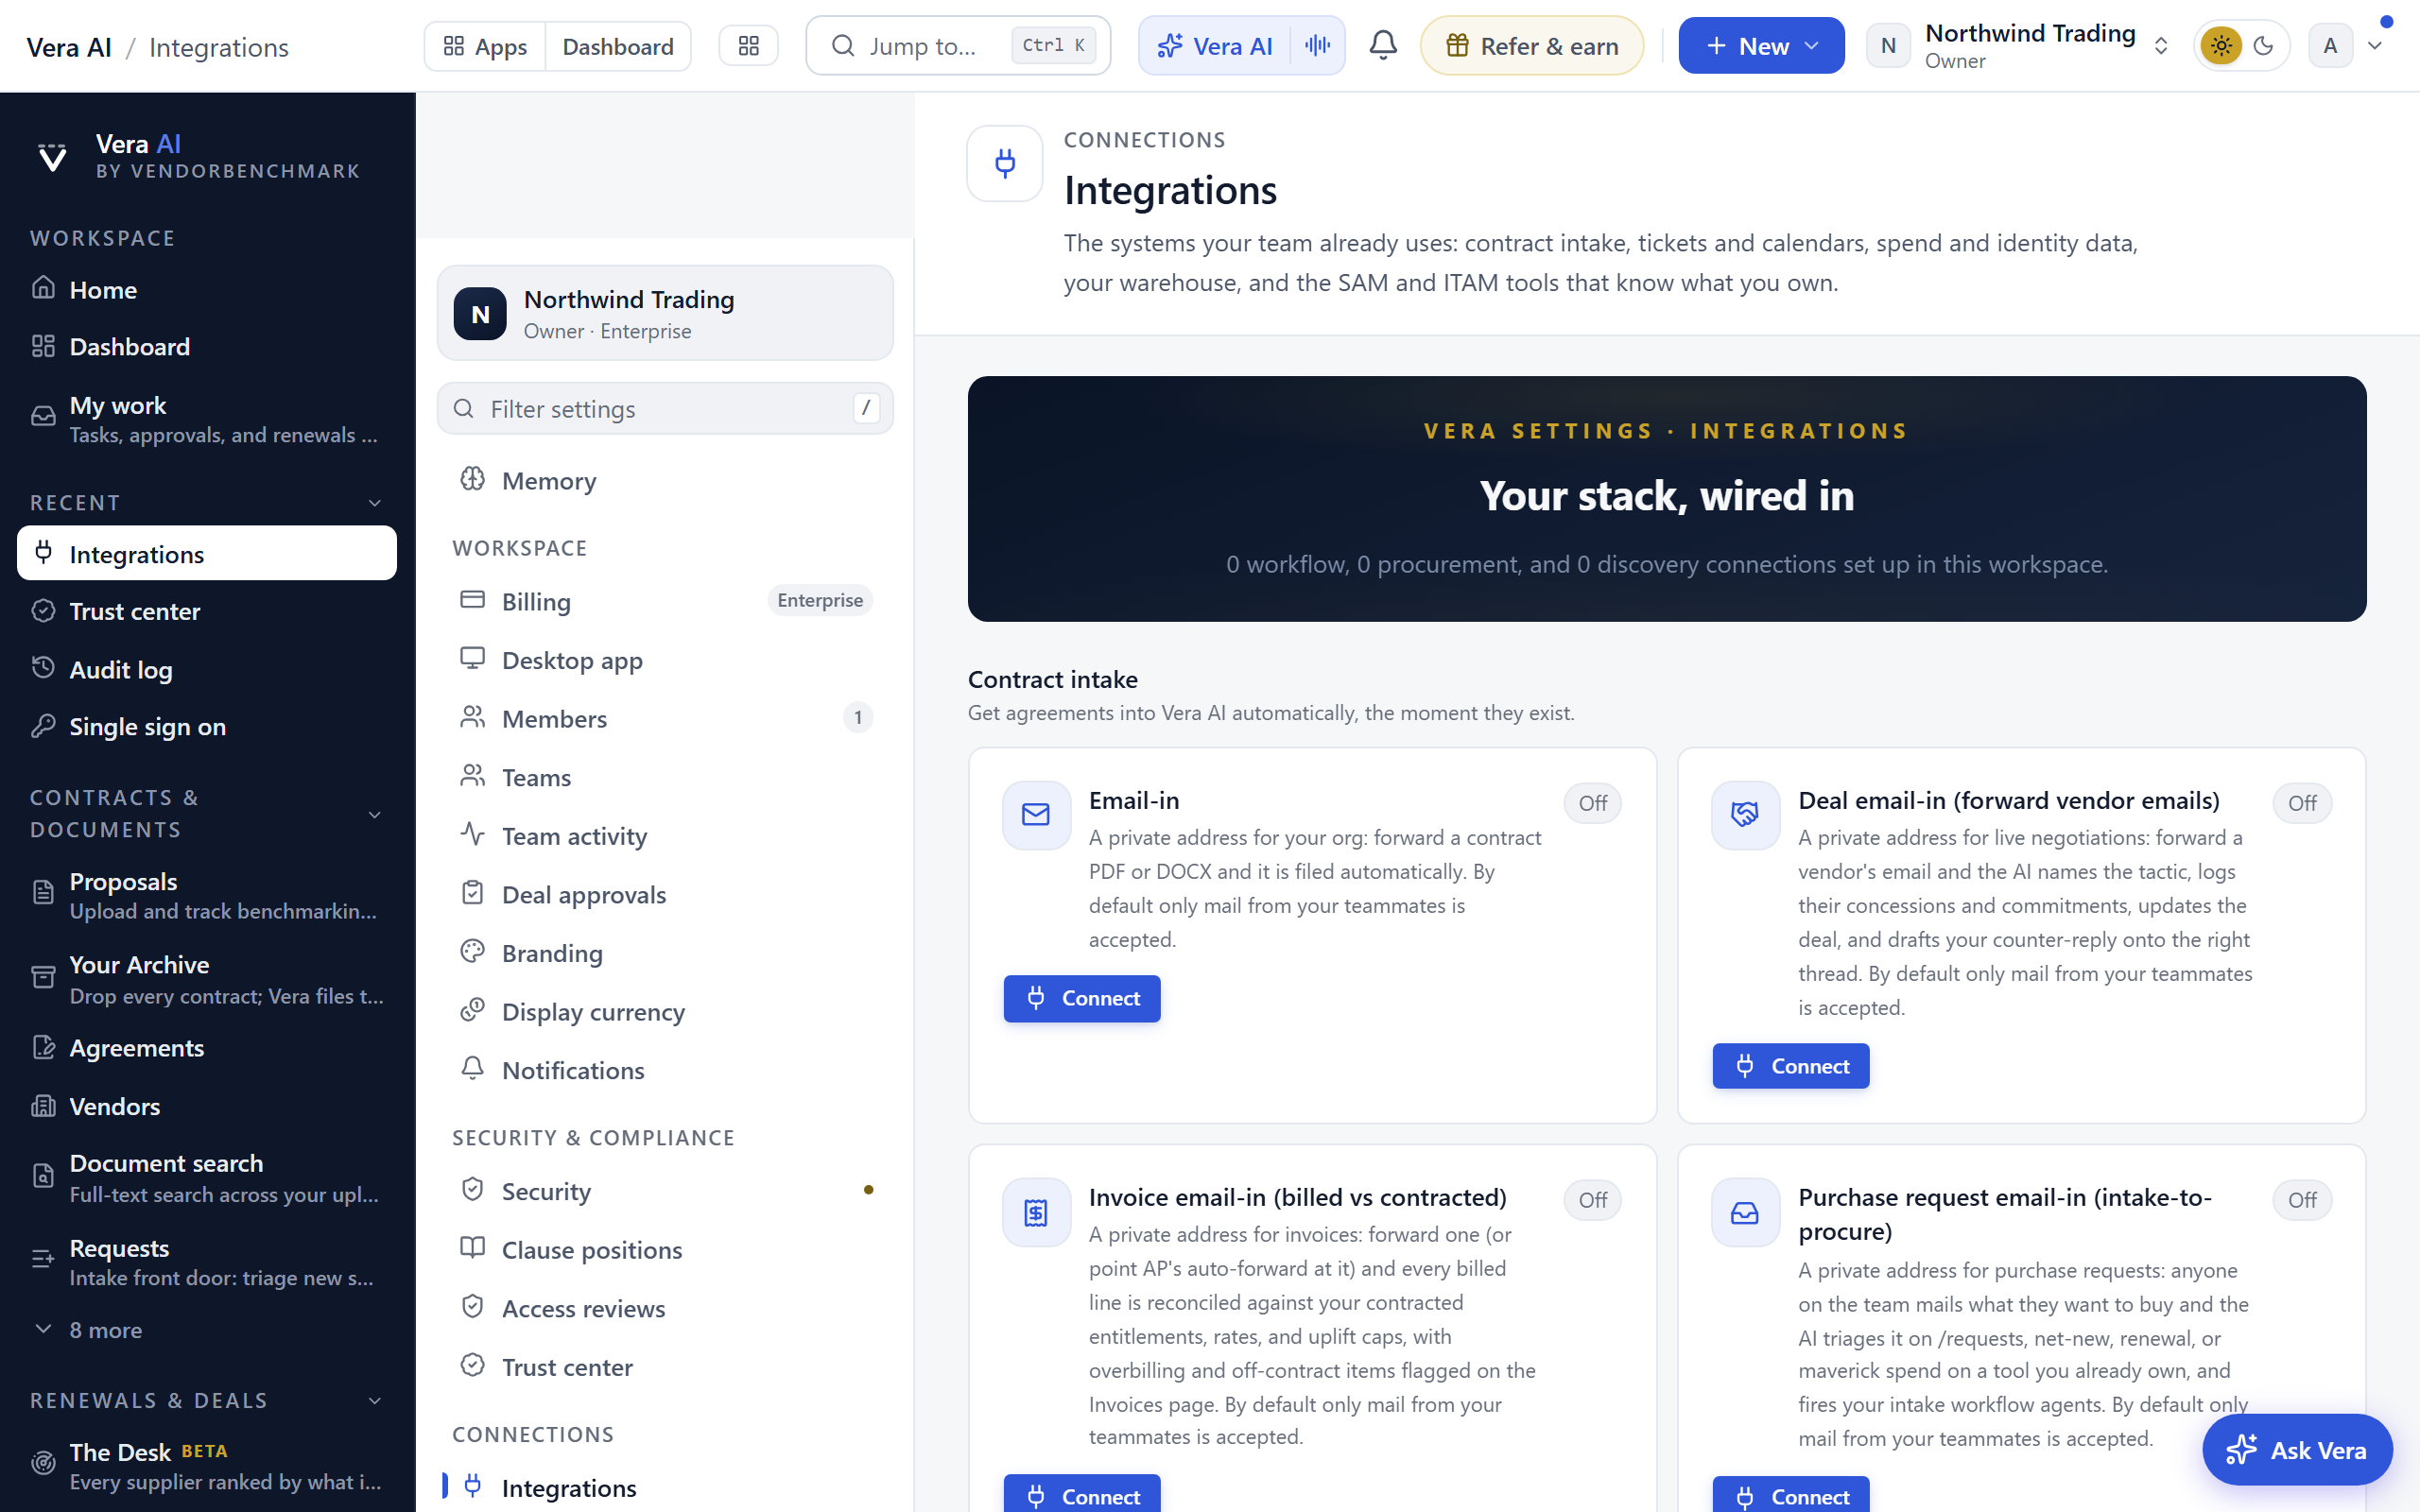
Integrations
Connect the systems your team already uses: contract intake, tickets and calendars, spend and identity data, your warehouse, and the SAM and ITAM tools that know what you own and use.
*In plain words: the plumbing between this platform and everything else you run.*
When to reach for this
- The highest-leverage owner hour (the recipe); each connection has a step-by-step walkthrough in Chapter 19.
- Checking a connector's health: Recent activity shows every sync's last result.
On the screen
- Workflow hub — contract intake (five email-in rails, DocuSign, Ironclad, Drive/SharePoint/Box folder watch), renewal workflow (Jira, ServiceNow, calendar invites, Slack, Teams), spend and usage sources (Coupa, Okta, Entra ID, the CSV importers, Smart import), warehouse export, and signed JSON event webhooks.
- Invite Vera to a meeting from your calendar — one email address per seat on the same private token as Email-in:
vera+for Vera,demo+for Vera Demo, and one per specialist on the bench by their word or first name (oracle+andmarcus+are the same chair). Add one to a meeting in Outlook or Google Calendar and that seat walks in at the start, waits to be admitted, and says who it is; a new time moves her, a cancellation stands her down, and the sender gets one reply. Copy chips on every address. The recipe is in Integration recipes. - Agent Negotiation Protocol — the opt-in card for structured agent-to-agent negotiation, with a link to the public spec.
- Procurement and ERP (P2P) — purchase orders, requisitions, and supplier records from your procure-to-pay systems, with maverick spend flagged.
- License and deployment discovery (SAM / ITAM) — connect the systems that know your entitlements and deployments; the license intelligence table shows entitled vs deployed vs active per vendor, with estimated shelfware.
- Recent activity — the latest sync results for each connected source.
How to use it
- Pick a system, enter its credentials or copy the intake address it needs, and connect.
- Let the first sync run, then review the license and procurement intelligence tables.
- Add an audit webhook if you want to stream events to your SIEM.
Related: Audit log · API · The integration catalog
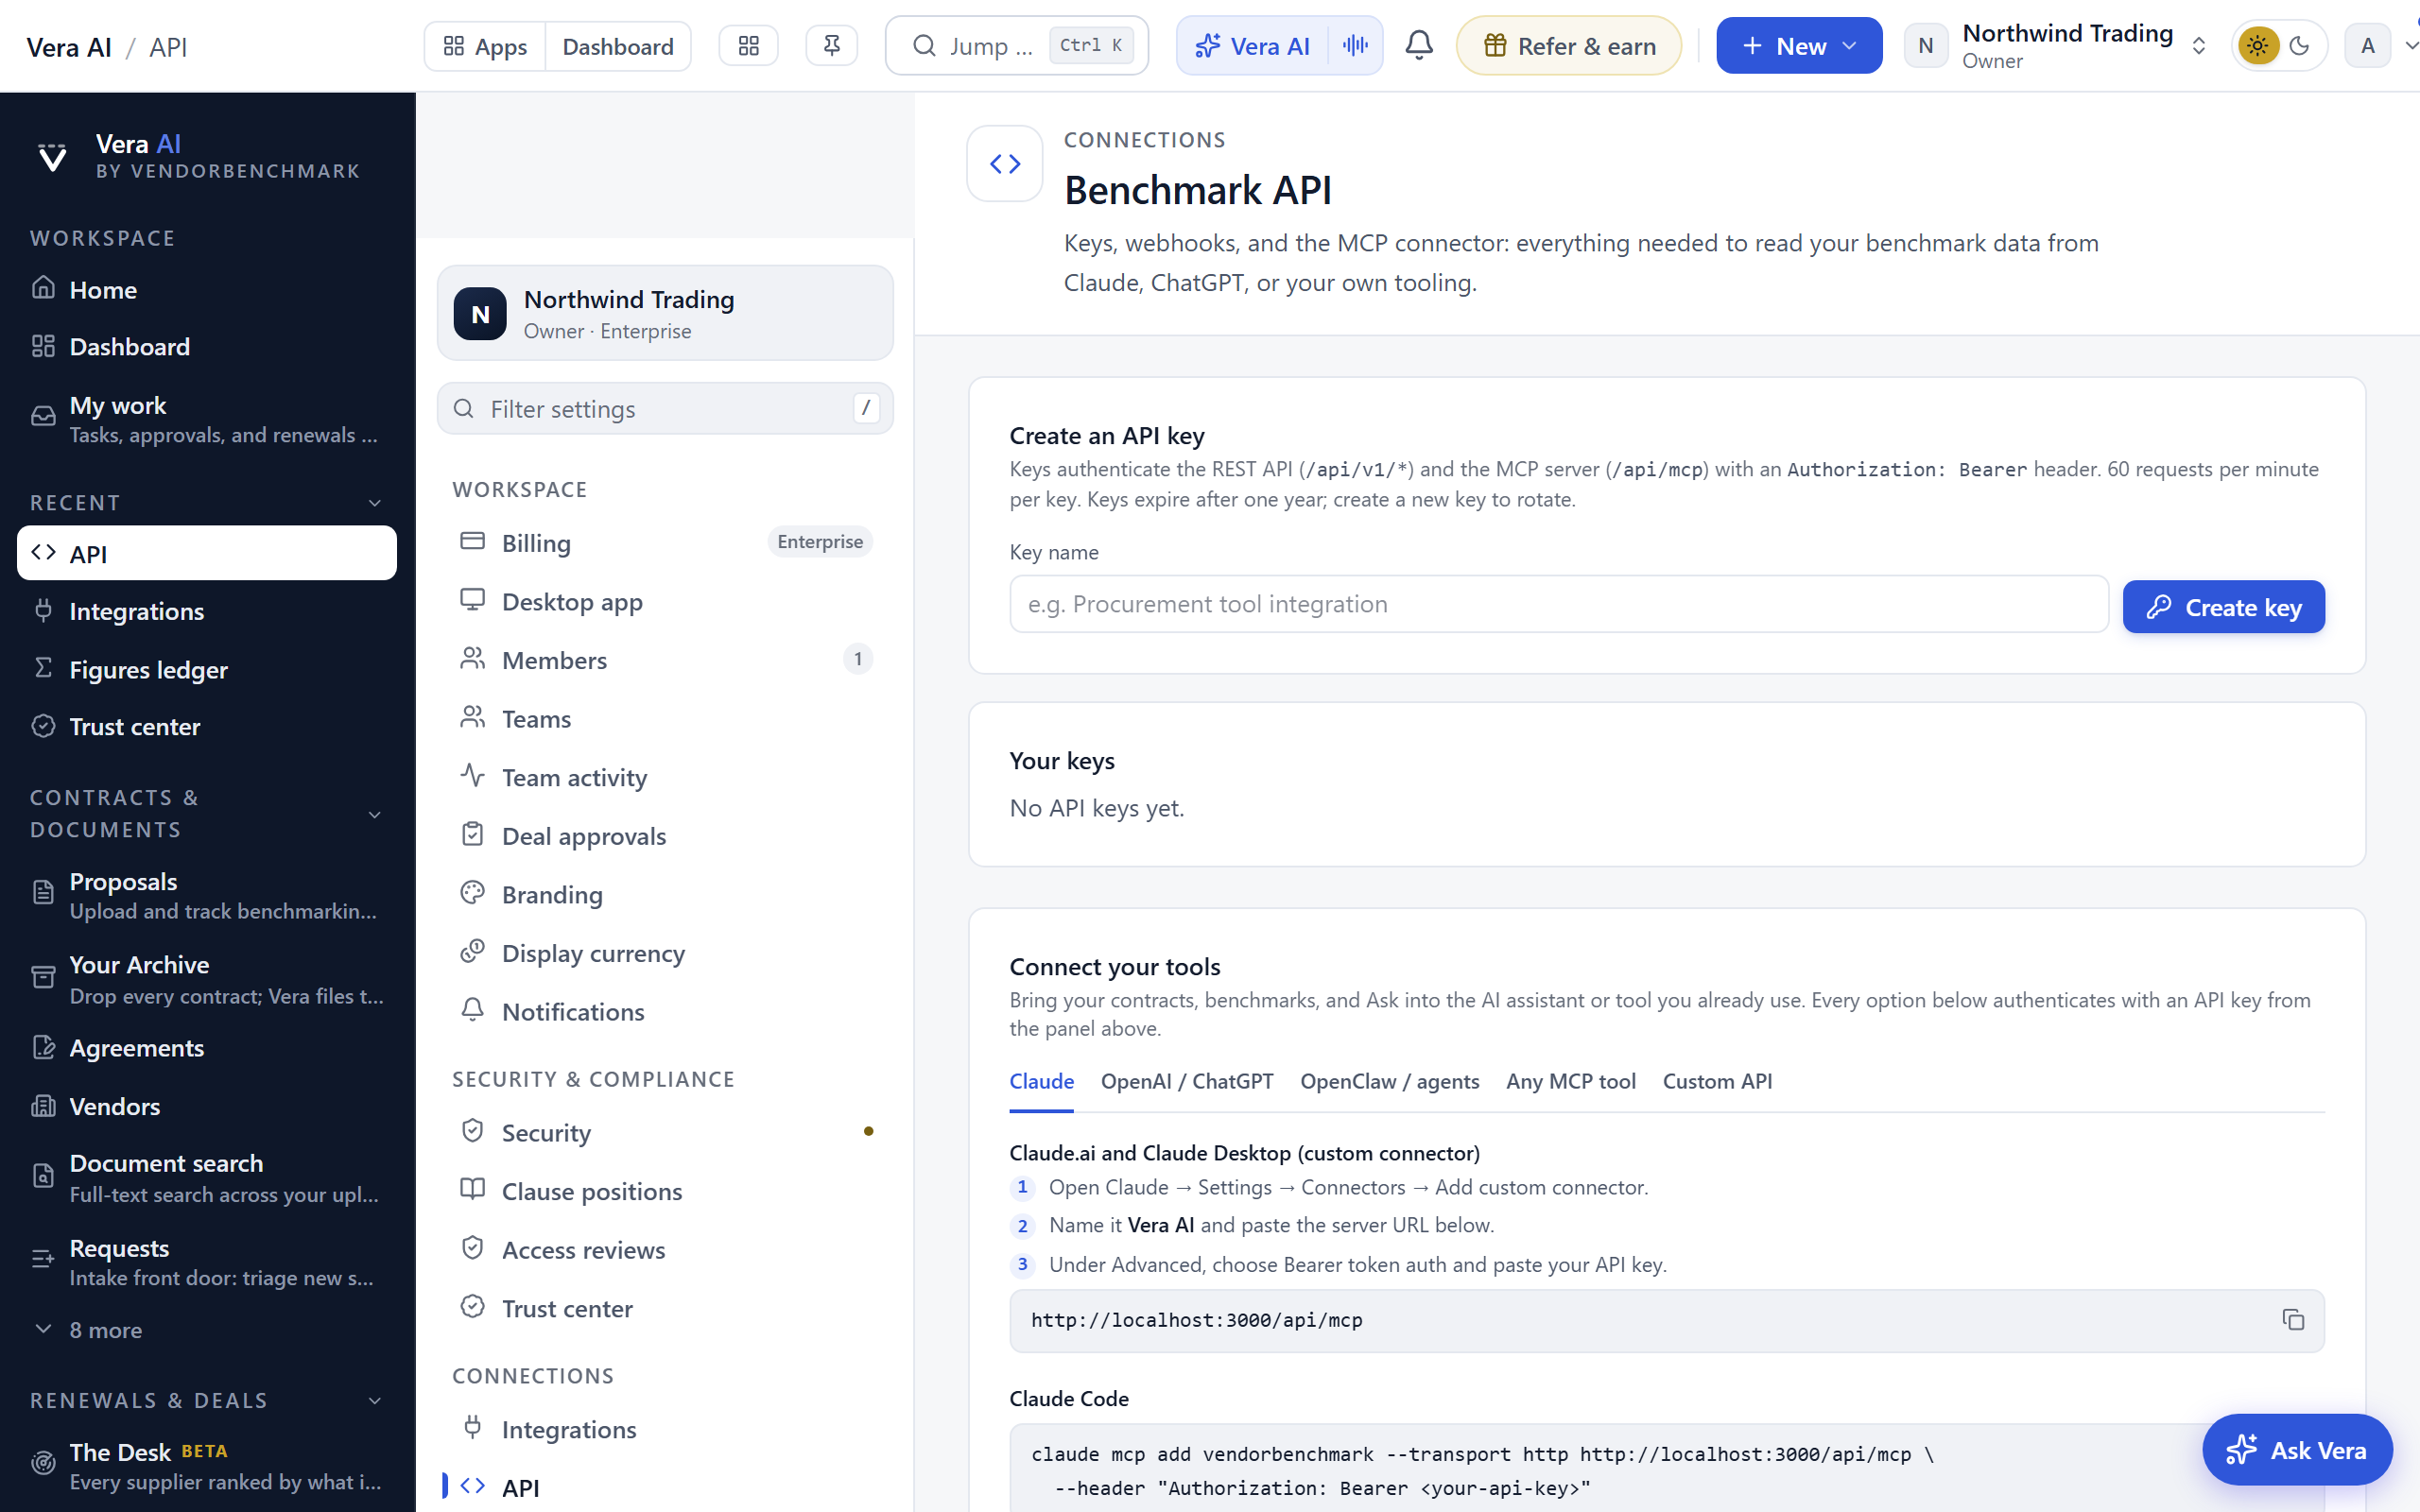
API
API keys, webhooks, and the MCP connector, so you can connect Claude, ChatGPT, or any other tool to your benchmark data.
On the screen
- API keys — create, view, and revoke keys; keys expire within a year.
- Connect — the base URL and details for connecting an external tool or the MCP connector.
How to use it
- Create an API key and store it securely; you see the full value only once.
- Point your tool or the MCP connector at the connection details shown.
- Revoke any key you no longer use.
Related: Integrations
That covers the settings. When you are not sure where a screen belongs, start from the manual index and follow the chapter that matches the rail group you are looking at.
Next: Chapter 07 · Common workflows
Was this page helpful?
Thank you. Your note goes straight to the team that writes this manual.