19 · Integration recipes
Chapter 12 is the map: what exists, what each connector feeds, and how the platform is delivered. This chapter is the wrench: one recipe per connection, walked step by step from both sides, with You know it worked when as the finish line and To undo it so nothing you try is a commitment. Most recipes need the owner role; each says so.
One honest note on the identity-provider recipes: the platform side is exact, and the identity-provider side follows each vendor's standard flow, whose menu labels shift slightly between versions. Where a label differs from what you see, trust the shape of the step: create a SAML app, exchange metadata, assign people.
Before you begin
- Know your gates. Everything in this chapter is configured by an org owner. Single sign on, SCIM, and the API are Enterprise-plan features (the plan table); the email-in addresses, chat connections, folder watch, and desktop app are not plan-gated.
- Know the operating rules, which apply to every connector: credentials are stored encrypted and used only server side, read-only scopes are requested wherever the source offers them, every sync lands under Recent activity on the Integrations page, connector-reported entitlement figures wait for human confirmation before they can drive an alert, and disconnecting a source stops its syncs immediately.
- Sequence by leverage. If you are wiring a workspace from scratch: identity first (SSO and SCIM), then the cheap intake routes (email-in, folder watch), then one usage source and one spend source, then data-out. That order is argued in Chapter 12 and it holds.
Single sign on with Okta
SAML sign-on for the workspace, governed from your Okta org.
For: org owners, with your Okta administrator · Plan: Enterprise · Time: about 30 minutes including the test sign-in
Steps
- In Okta, create the app: Applications › Create App Integration, choose SAML 2.0, and name it so your team recognizes it in their Okta dashboard (Vera AI works).
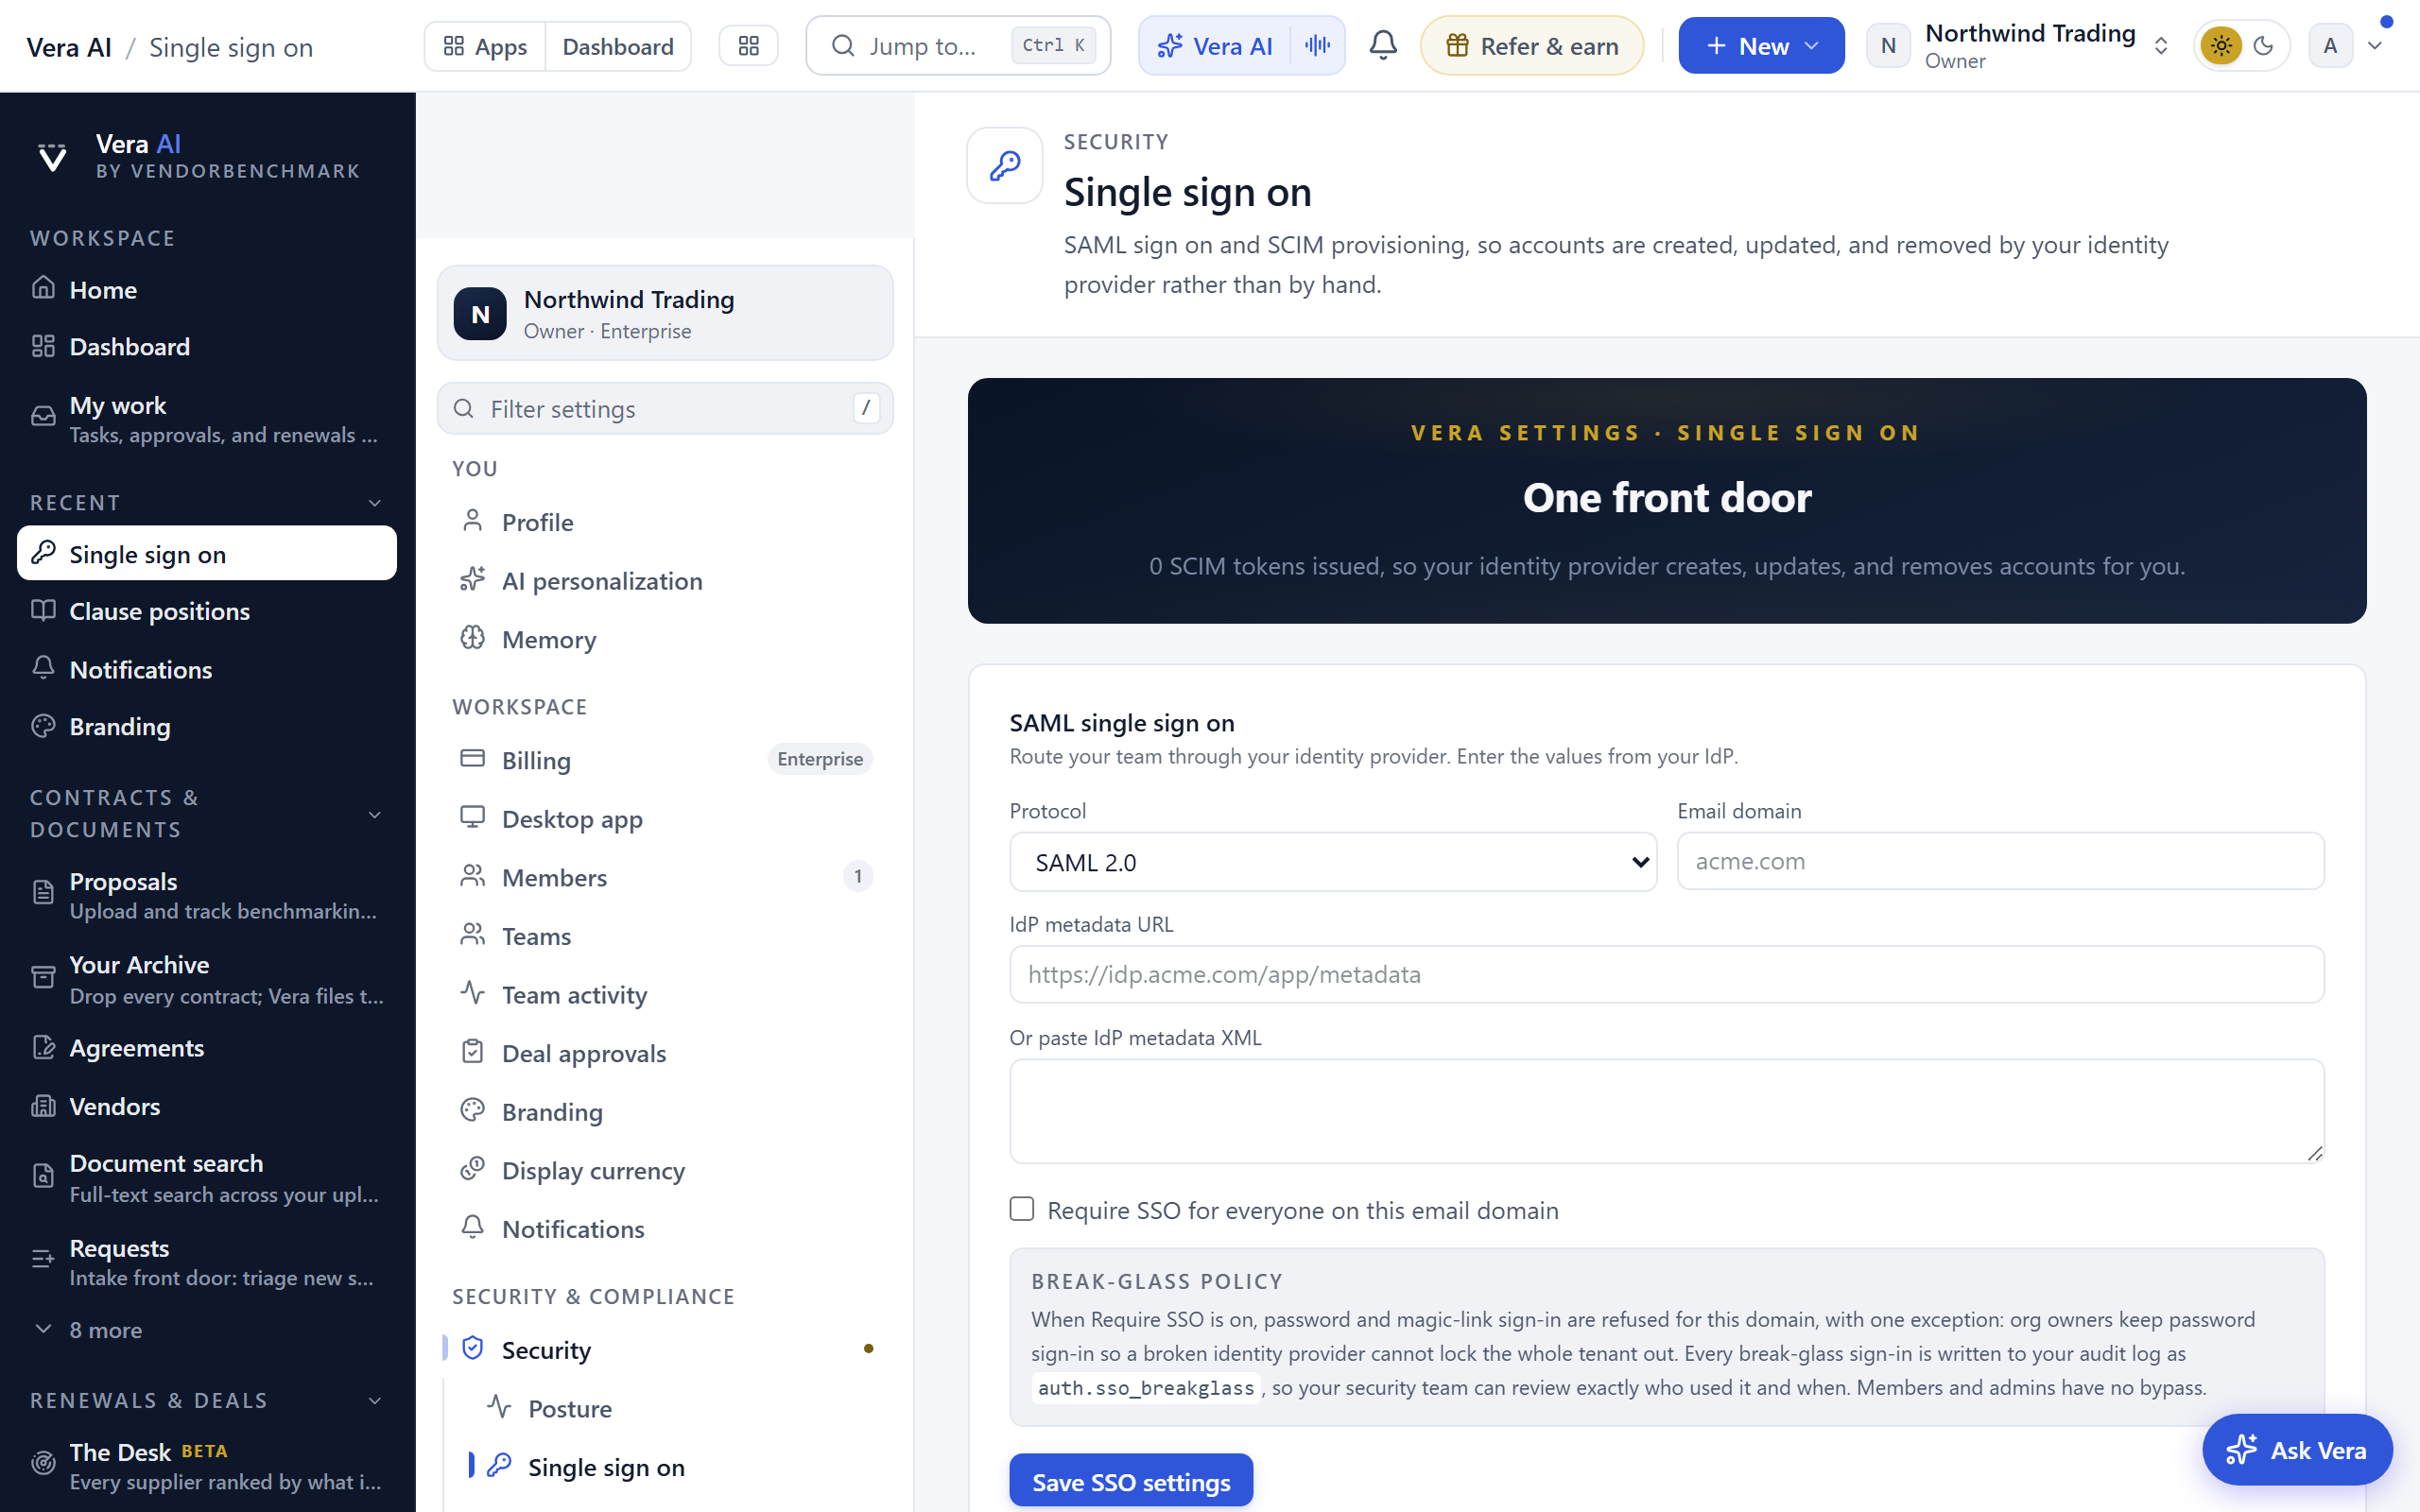
- Open Settings › Security › Single sign on in the platform in a second tab, and copy the service-provider details the page shows into Okta's SAML settings, so the assertion comes back to the right place.
- Back in Okta, finish creating the app and copy its metadata URL from the app's Sign On tab.
- On the platform's SSO page, paste the metadata URL (or the metadata XML itself if your policy prefers a static copy), set your email domain, and save. Leave Require SSO off for now.
- Assign yourself to the app in Okta and test: sign out, sign back in through Okta, and land in your workspace.
- Assign the rest of the team in Okta, and only then decide enforcement. Turning Require SSO on makes Okta the only way in for your domain, with one deliberate exception: org owners keep password sign-in as break-glass, and every break-glass sign-in is written to your audit log.
You know it worked when a teammate signs in from their Okta dashboard tile without a password and lands in the right workspace, and the sign-in appears in your audit log.
To undo it: switch Require SSO off first (never remove a required IdP's config while it is the only way in), confirm password sign-in works, then remove the configuration.
Single sign on with Microsoft Entra ID
The same recipe with Entra (formerly Azure AD) as the identity provider.
For: org owners, with your Entra administrator · Plan: Enterprise · Time: about 30 minutes
Steps
- In the Entra admin center, create the app: Enterprise applications › New application › Create your own application, choose the non-gallery option, then open its Single sign-on blade and pick SAML.
- Copy the service-provider details from Settings › Security › Single sign on into Entra's Basic SAML Configuration (Entra calls the return address the Reply URL).
- Copy Entra's App Federation Metadata Url under SAML certificates.
- On the platform's SSO page, paste the metadata URL, set your email domain, save, and leave Require SSO off until testing is done.
- Assign users or groups to the app in Entra, test a sign-in end to end, then decide enforcement. The break-glass rule is the same: owners keep password sign-in, audited.
You know it worked when the app appears in a teammate's My Apps and clicking it lands them signed in, no password prompt from us.
To undo it: Require SSO off, confirm password sign-in, then remove the configuration.
Single sign on with Google Workspace
The same recipe with Google as the identity provider.
For: org owners, with your Google Workspace admin · Plan: Enterprise · Time: about 30 minutes
Steps
- In the Google Admin console, create the app: Apps › Web and mobile apps › Add app › Add custom SAML app.
- Google shows its IdP details first: download the IdP metadata file.
- Copy the service-provider details from Settings › Security › Single sign on into Google's Service provider details step.
- On the platform's SSO page, paste the downloaded metadata as XML (Google's flow hands you the file rather than a URL), set your email domain, and save with Require SSO off.
- In Google Admin, turn the app ON for everyone (or the org units that need it), test a sign-in, then decide enforcement, with the same owner break-glass rule.
You know it worked when the app shows in a teammate's Google app launcher and the sign-in round-trips cleanly.
To undo it: Require SSO off, confirm password sign-in, then remove the configuration.
SCIM provisioning and group mapping
Accounts created, updated, and deactivated by your identity provider, so your joiner and leaver process is the single source of truth.
For: org owners, after SSO is working · Plan: Enterprise · Time: 20 minutes, plus your IdP's first sync
Steps
- On Settings › Security › Single sign on, issue a SCIM token. Treat it like a password; it is the credential your IdP will authenticate with.
- In your identity provider, enable provisioning for the app you created above and paste the SCIM endpoint details and token.
- Provision users first: membership must exist before group operations can place anyone.
- If your IdP supports group push, push the groups that should map to Teams; joining and leaving a pushed group then grants and revokes that team's confidential access automatically.
- Optionally map groups to roles: members of a mapped group get that role on every push (approver, analyst, member, or viewer), and leaving the group takes the role with it. Ownership is never assigned this way, by design; owners are promoted by owners, on Members.
You know it worked when a user created in your IdP appears on Members without an invite, and deactivating them there removes their access here.
To undo it: turn provisioning off in the IdP, then revoke the SCIM token on the SSO page. Existing accounts stay and fall back to manual management.
Vera in Slack
Alerts in the channel your team already watches, and the assistant on call in your own Slack workspace.
For: an org owner with Slack app-install rights; each person links their own DMs · Time: 15 minutes for the workspace; 2 minutes per person
Steps
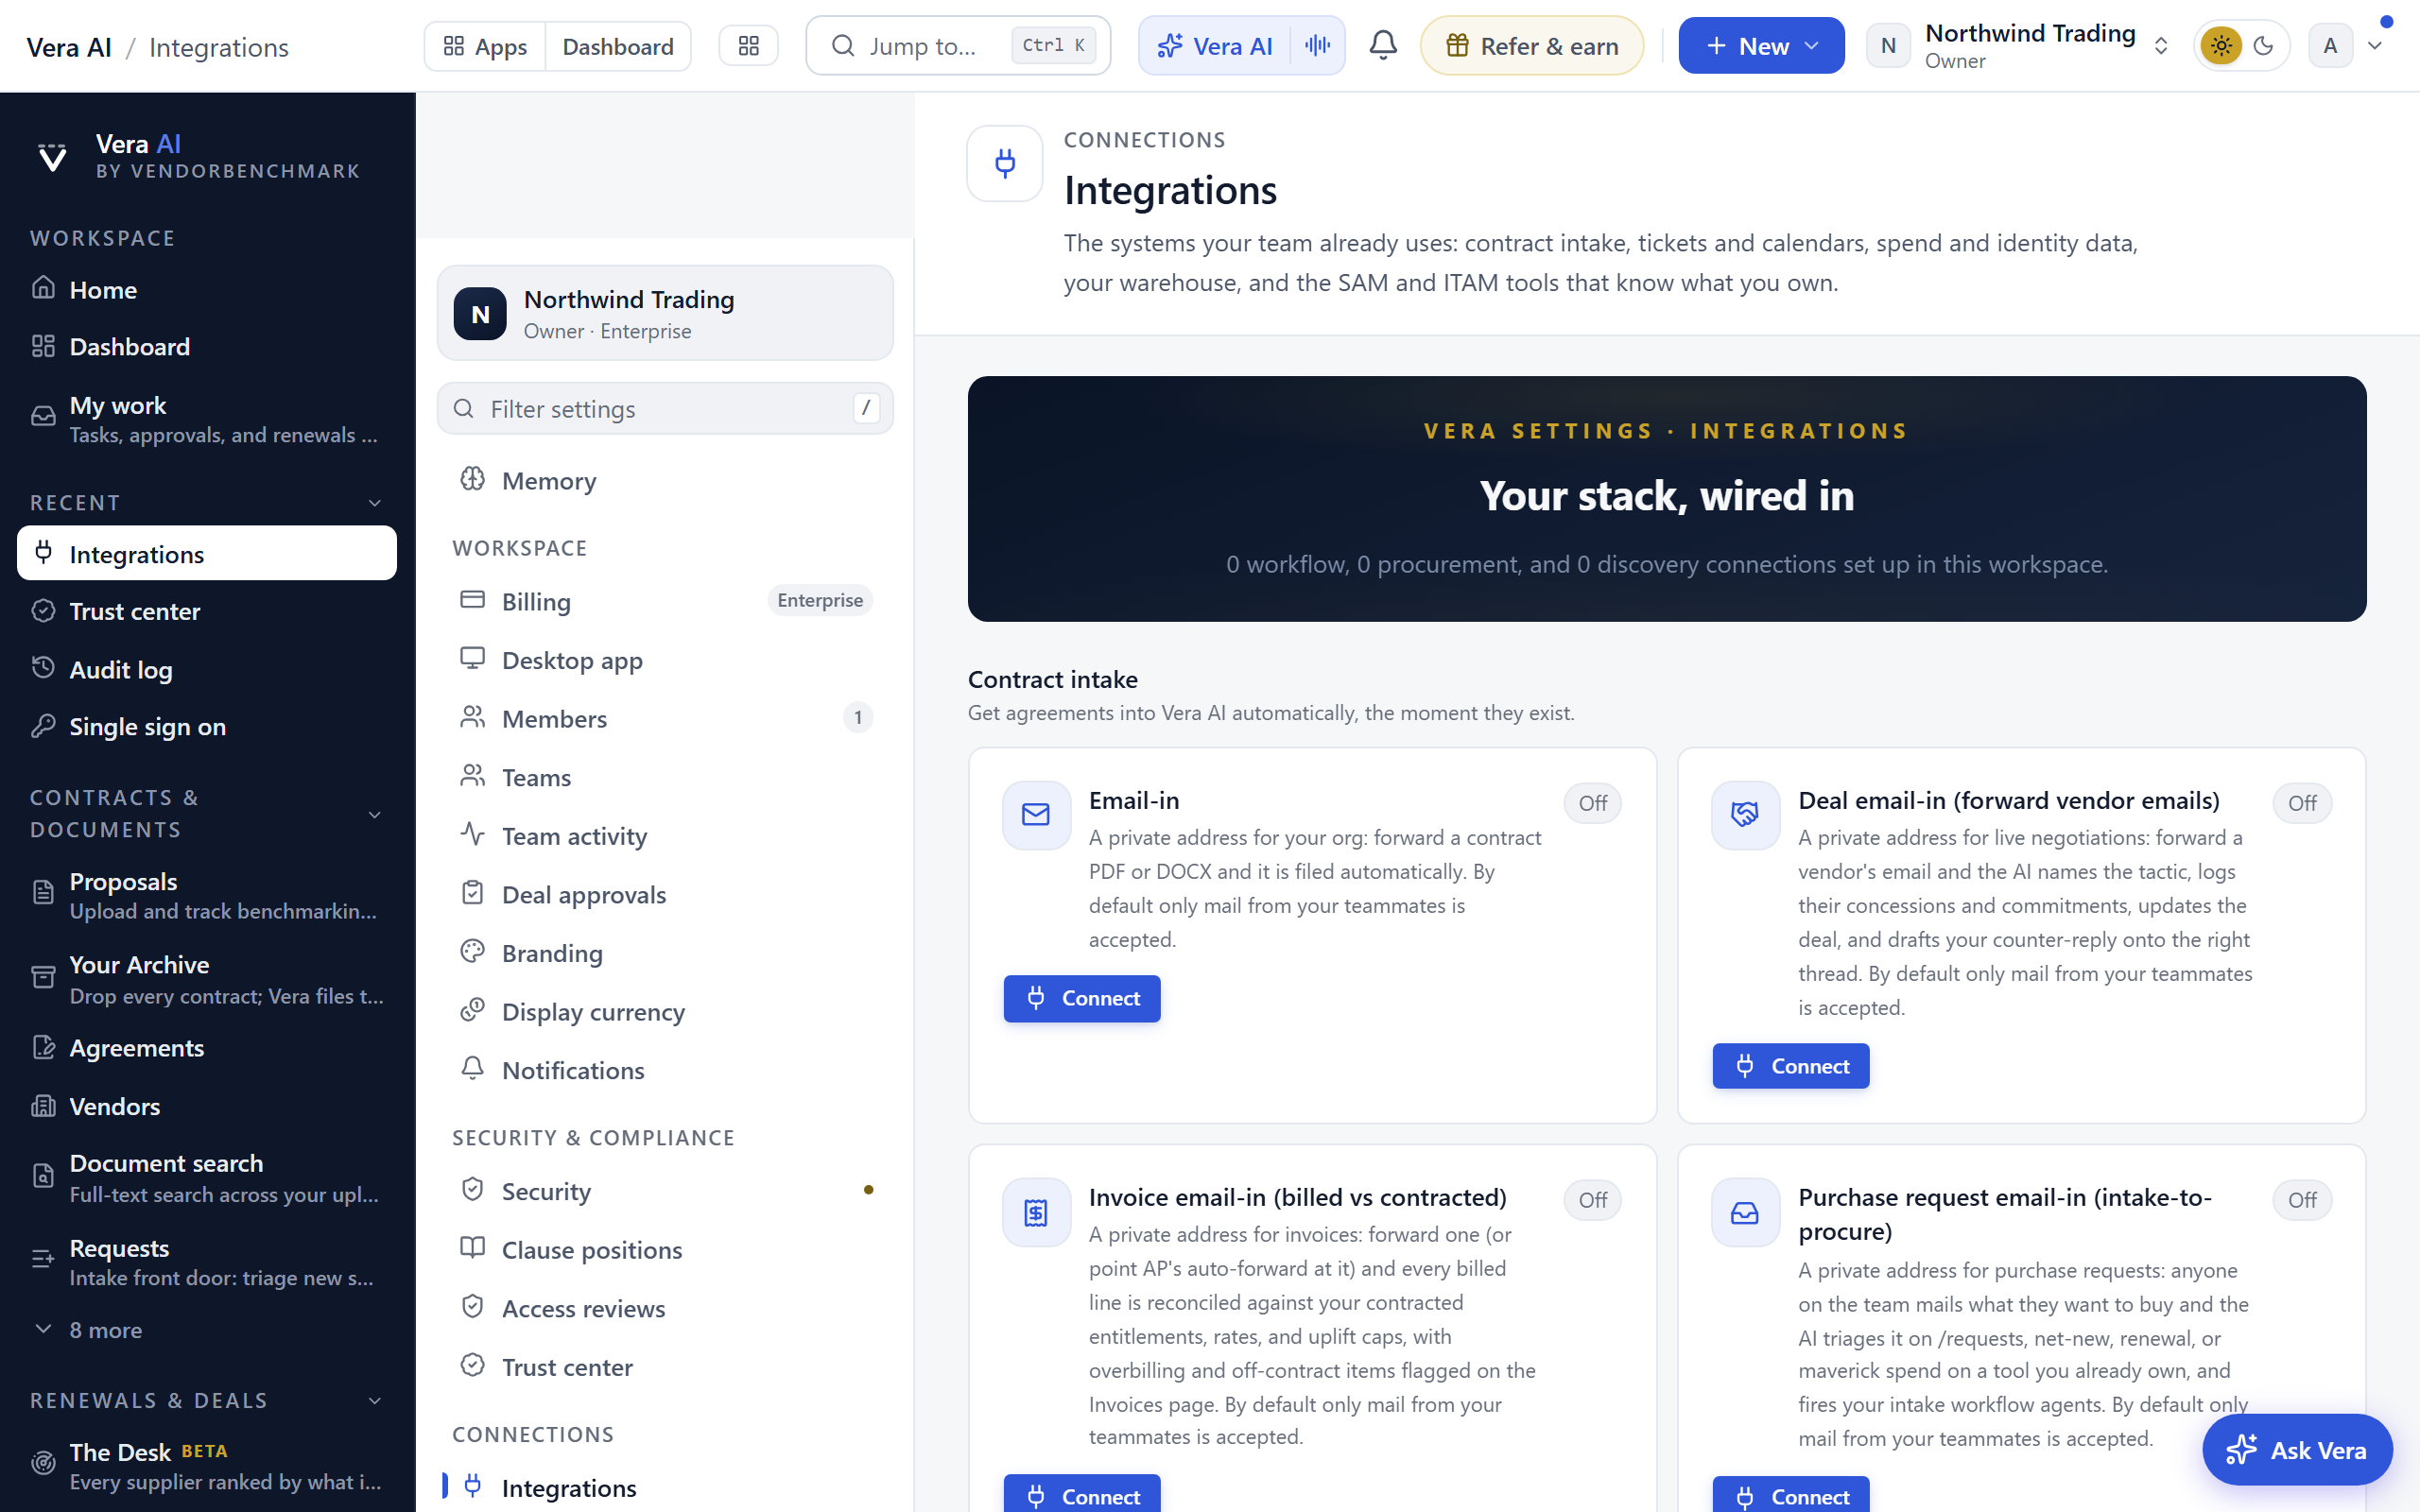
- An owner connects Slack under Settings › Connections › Integrations (it lives in the renewal and deal workflow group) and approves the install in Slack.
- Pick the shared channel for org alerts under Notifications (the owners' webhook controls), and keep it money-critical only; a noisy alert channel trains people to ignore it.
- Each person who wants renewals in their own DMs links once: send the Vera bot a direct message in your Slack, then flip the Chat DM toggle on the alert types you want under Notifications. The DM lane is strictly opt-in, per person, per alert type.
- Use the assistant where the conversation is: ask Vera in Slack about a price, a clause, or a renewal, and the answer comes back with every figure tagged to its source, exactly as in the app.
You know it worked when a test question to the bot answers in Slack, and the note above the Chat DM table confirms your account link.
To undo it: disconnect Slack on the Integrations page; DM links and channel posts stop with it.
Vera in Microsoft Teams
The same capability for Teams estates.
For: an org owner with Teams app permissions; each person links their own DMs · Time: 15 minutes for the tenant; 2 minutes per person
Steps
- An owner connects Teams under Settings › Connections › Integrations and approves it in your tenant.
- Choose the shared alert channel under Notifications, same discipline as Slack: money-critical only.
- Each person links their DM lane by messaging the Vera bot once in Teams, then opting in per alert type under Notifications.
- Ask Vera in the channel or the DM; figures arrive cited, as everywhere else.
You know it worked when the bot answers in Teams and your linked account is confirmed on the Notifications page.
To undo it: disconnect Teams on the Integrations page.
The email-in addresses
Five private addresses that turn forwarding into filing. The cheapest integration on the platform, and usually the first one worth doing.
For: an org owner provisions; the whole team uses · Time: 10 minutes to provision and share all five
Steps
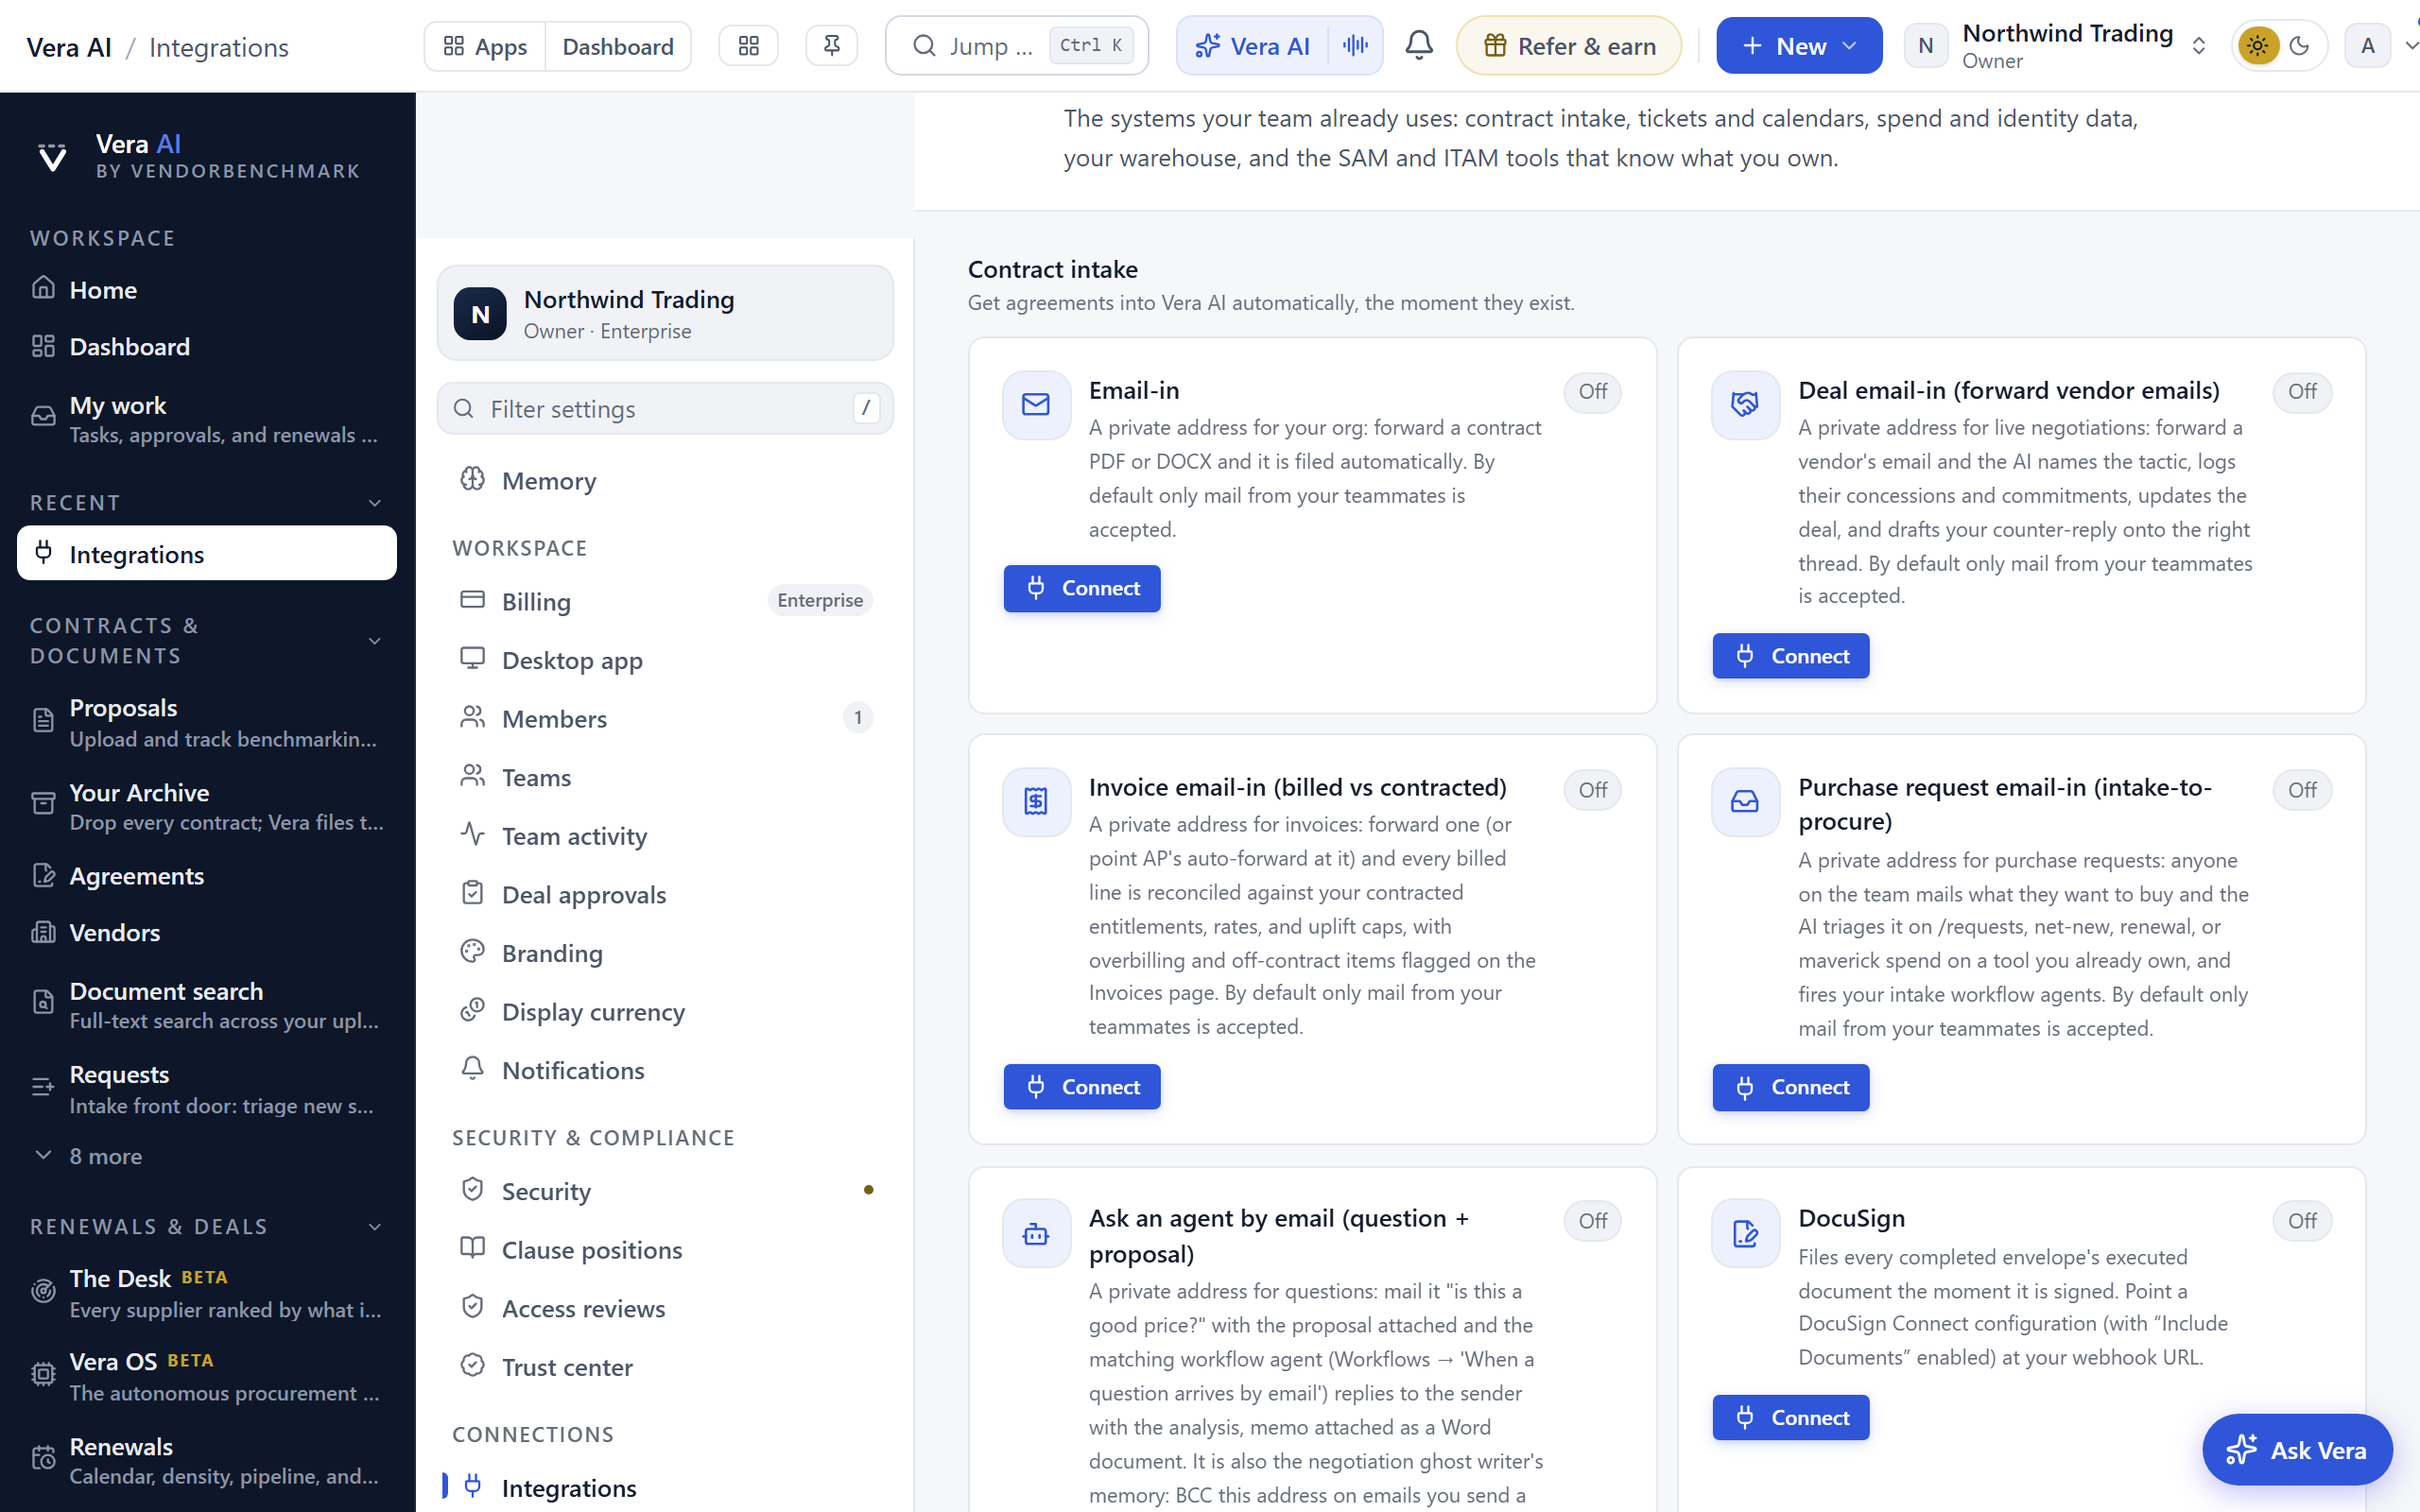
- On Settings › Connections › Integrations, provision the addresses you want; each is one click, and each address is private to your organization and unguessable by design, so mail sent to yours can only land in your workspace:
- Contract email-in — forwarded proposals become tracked Analyst Benchmark.
- Deal email-in — forward a live vendor thread onto the deal record.
- Invoice email-in — forwarded invoices reconcile on Invoices.
- Purchase request email-in — teammates raise Requests by mail.
- Ask an agent by email — a question plus a document; the answer returns to the sender's inbox.
- Put the addresses where people will actually find them: the team wiki, and as contacts in shared mailboxes. The invoice address belongs in your AP team's hands.
- Send one real test to each address you provisioned.
You know it worked when a forwarded proposal appears on Analyst Benchmark reading as its document, and a forwarded invoice shows line verdicts.
To undo it: remove the address on the Integrations page; it stops accepting.
Invite Vera to a meeting from your calendar
One address per seat, on the same private token as the contract email-in address. Add it to a meeting in Outlook or Google Calendar the way you would add a colleague, and that seat walks into the meeting at the start.
For: anyone on the account; an org owner provisions Email-in once · Time: 2 minutes
Steps
- On Settings › Connections › Integrations, make sure Email-in is provisioned under Contract intake. Invite Vera to a meeting from your calendar then lists every address:
vera+<token>@the inbound domain for Vera,demo+for Vera Demo, and one per specialist on the specialist list by their word (oracle+,sap+,microsoft+,salesforce+,ibm+,servicenow+,workday+,aws+,counsel+,finops+,benchmark+and the rest) or by their first name (marcus+is the same chair asoracle+). Copy the one you want. - In your calendar, create or open the meeting on Zoom, Teams, Meet or Webex and add the address as an attendee. Send the invitation from your own mailbox: only a member of the workspace can invite a seat, and the seat is created as yours, so your live call finds her and shows where she stands.
- Read the reply. Within a minute the sender's inbox gets one note saying the seat is on the calendar, with the time as the platform read it. If the invitation carried no meeting link, or a time zone the platform could not read, the reply says so and what to change.
- At the start of the meeting she walks in, waits in the lobby until the host admits her, and says who she is. From then on she behaves as that seat does on the live call: Vera answers when the room speaks to her, a specialist argues their ground, Vera Demo has a conversation.
- Change the meeting in your calendar and she follows: a new time moves her, a new link moves her to the new meeting, a cancellation stands her down. Each change gets one reply.
You know it worked when the reply says she is on the calendar, and at meeting time a participant named Vera AI appears in the lobby asking to be let in.
To undo it: cancel the meeting, or remove the address from the attendees and send the update; she is stood down. Mid meeting, the live call keeps Mute her and Walk her out.
Folder watch on Drive, SharePoint, OneDrive, Box, Dropbox or SFTP
Documents file themselves from the folder your team already saves into.
For: org owners, with access to the folder being watched · Time: 15 minutes
Steps
- On Settings › Connections › Integrations, pick your platform: Google Drive folder watch, SharePoint folder watch, OneDrive folder watch, Dropbox folder watch, SFTP folder watch, or Box folder import for bulk loads. Coupa contract attachments and SAP Ariba contract workspaces bring in the documents held on contracts in those systems the same way.
- Authenticate with an account that can read the folder, and choose the folder. Subfolders are included, so the whole tree beneath your choice is watched. Prefer a purpose-named folder (Signed contracts) over a busy shared drive root, so the watch ingests intent rather than noise.
- Upload one test document in and watch it arrive; from then on, saving to the folder is filing. New files arrive on the connection's sync schedule, up to 10 a sync: once a day at 06:30 UTC unless you set it to every hour, every 6 hours, weekly or by hand on the Entitlement Agent's Settings, Sync schedule.
- If the folder already holds an archive, press Import everything on the connection. A background run walks the whole tree across in chunks, hundreds of files per pass, and each pass is logged under Recent activity until it reports the folder fully carried across.
You know it worked when the test file appears in your workspace and the sync shows under Recent activity.
To undo it: disconnect the watch; already-imported documents stay, and the folder is no longer read.
The desktop app, self-serve and IT-managed
VendorBenchmark Desk, the thick client: same account, same data, native window, drag-in from Explorer, Windows Hello lock.
For: anyone self-serve; IT for a managed rollout · Time: 5 minutes per machine
Steps
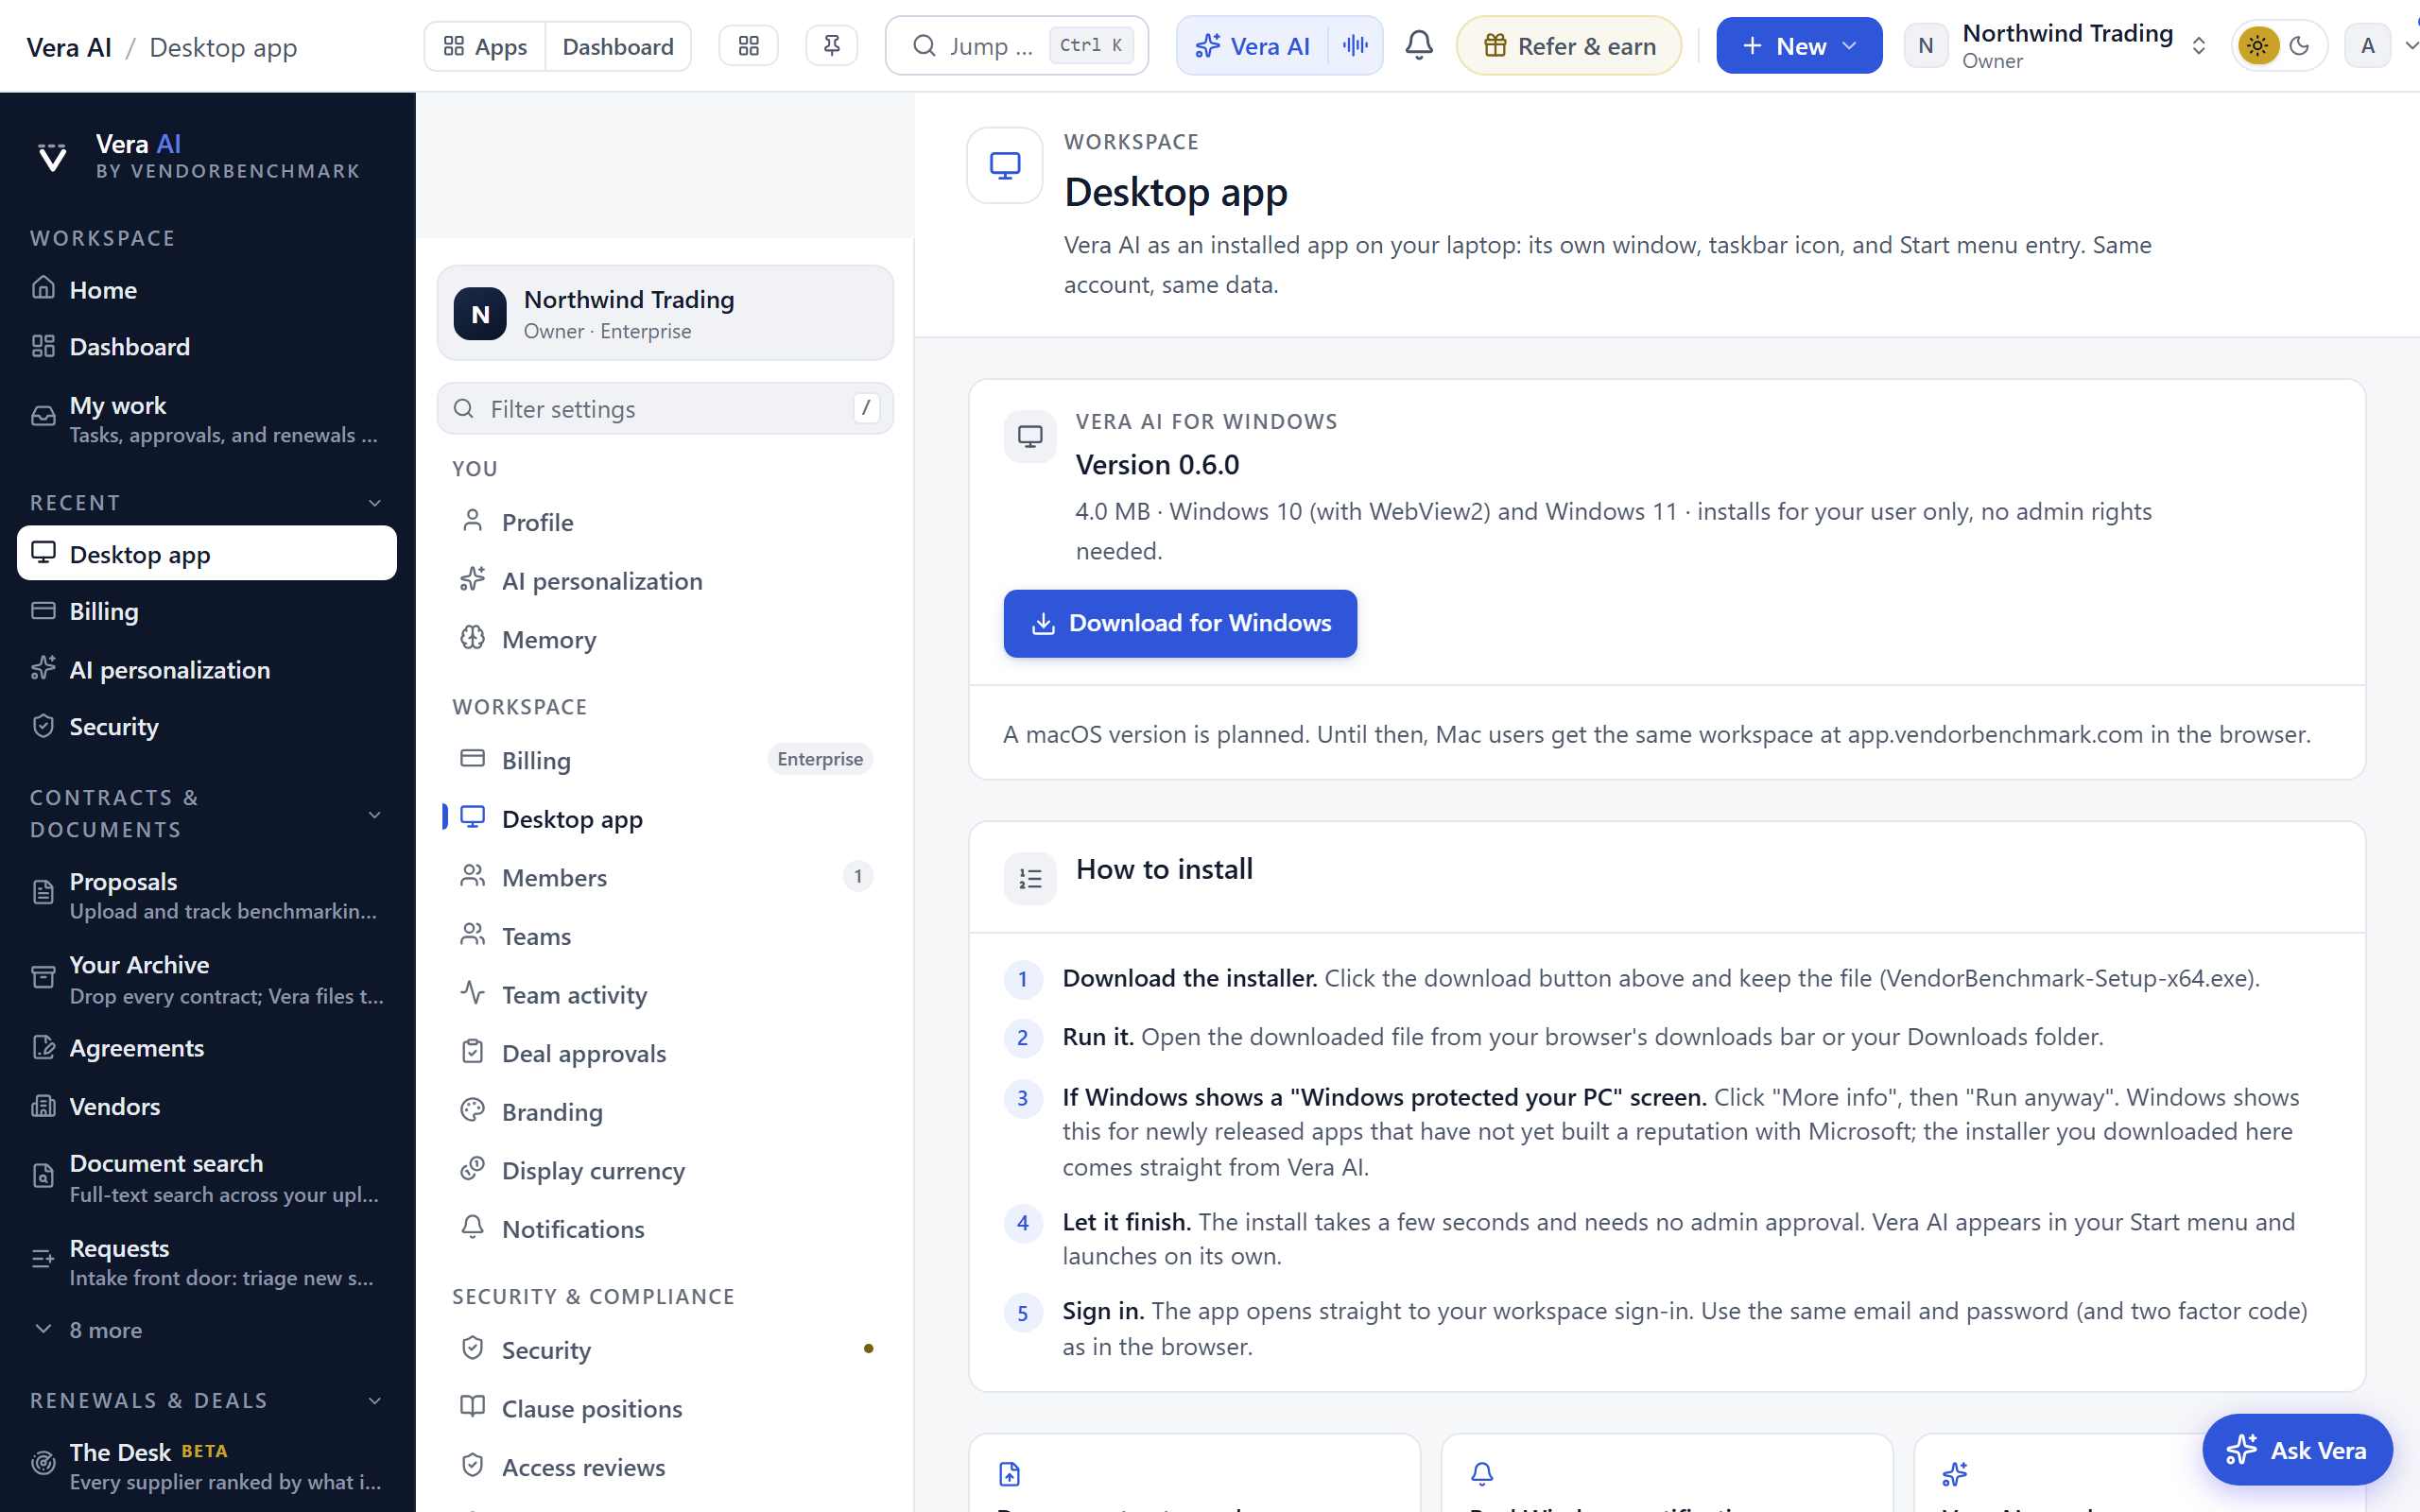
- Self-serve: open Settings › Workspace › Desktop app, press Download VendorBenchmark Desk, and run the installer. It installs per user, no admin rights needed.
- If Windows shows a "Windows protected your PC" screen, choose More info, then Run anyway; the page documents this exact case.
- Sign in with the same email, password, and two-factor code as the browser.
- IT-managed rollout: because the install is per-user and needs no elevation, a managed rollout is distribution rather than packaging: push the installer through your software portal or endpoint tool and let it run in the user context. Updates are automatic after that; there is nothing to patch centrally.
You know it worked when the app has its own taskbar identity, a contract dragged from Explorer lands as an upload, and a notice-window notification arrives natively.
To undo it: uninstall from Windows Settings; it is a client, not a data store, so the workspace is untouched. Mac users take Download VendorBenchmark Desk for Mac on the same page, one universal build for macOS 13 and later, and drag the app to the Bin to remove it.
The Microsoft Office add-in: Outlook, Word and Excel
The Vera pane inside Microsoft Office. What it does once installed is in Microsoft Office; this is how to get it there.
Only want Vera's answers and tables in your documents? That needs no install: Copy in the web app pastes into Word, Outlook and Excel already formatted (Copy into Word, Outlook and Excel).
For: anyone, for their own Office; a Microsoft 365 administrator for a whole company · Time: about 5 minutes for one person
The steps on the Microsoft side follow Microsoft's published instructions, whose button labels shift between versions. Where a label differs from what you see, trust the shape of the step: open the add-ins window, find the place for a custom add-in, and give it the file.
Which route to take
| You want it in | Route | Where it then appears |
|---|---|---|
| Outlook, any version | Outlook, for one person | every Outlook you use with that mailbox: web, new Outlook, classic Outlook, Mac |
| Word or Excel in the browser | Word and Excel on the web | that browser only, one application at a time |
| Word or Excel installed on a Mac | Word and Excel on a Mac | that Mac |
| Word or Excel installed on Windows | For a whole company, or the shared folder route | every machine the administrator assigns, or that one PC |
Get the two files first
- Open Settings › Workspace › Desktop app.
- Press Outlook file to save
vera-outlook-manifest.xml, and Office file to savevera-office-manifest.xml(Word, Excel and PowerPoint). Both land in your Downloads folder.
Outlook, for one person
- In your browser go to
https://aka.ms/olksideload. Outlook on the web opens, and the Add-Ins for Outlook window appears after a few seconds. Sign in with the mailbox you want Vera in if asked. - Choose My add-ins on the left.
- Scroll to Custom Addins at the bottom, press Add a custom add-in, then Add from File.
- Choose
vera-outlook-manifest.xmland press Install on the notice that the add-in is not from the store. - Open an email. In Outlook on the web and the new Outlook, Vera is under the Apps button in the row of buttons on the message. In classic Outlook it is on the Home ribbon in the VendorBenchmark group.
Word and Excel on the web
- Open a document in Word on the web, or a workbook in Excel on the web.
- Choose Home, then Add-ins, then More Settings.
- In the Office Add-ins window press Upload My Add-in.
- Press Browse, choose
vera-office-manifest.xml, and press Upload. - The Vera button appears on the Home tab. If it is not there when you open the other application, upload the file there too: Word and Excel on the web each keep their own list.
Word and Excel on a Mac
- Open Finder and press Cmd Shift G.
- For Word, go to
/Users/<your user name>/Library/Containers/com.microsoft.Word/Data/Documents/wef. For Excel, the same path withcom.microsoft.Excel. Create theweffolder if it is not there. - Copy
vera-office-manifest.xmlinto that folder. - Quit and reopen Word or Excel, open a document, and choose Home, then Add-ins, then Vera in the list.
Word and Excel on Windows, on one PC (the shared folder route)
Word and Excel installed on Windows have no upload button. Microsoft's route for a single PC is a shared folder that Office is told to trust.
- Make a folder, for example
C:\OfficeAddins, and copyvera-office-manifest.xmlinto it. - Right click the folder, choose Properties, open the Sharing tab, press Share, add yourself, and press Share again. Note the network path it shows, such as
\\YOUR-PC\OfficeAddins. - In Word or Excel choose File, Options, Trust Center, Trust Center Settings, then Trusted Add-in Catalogs.
- Paste the network path into Catalog Url, press Add catalog, tick Show in Menu, and press OK twice.
- Close and reopen the application.
- Choose Home, then Add-ins, then Advanced. Open SHARED FOLDER at the top, select Vera, and press Add.
For a whole company (a Microsoft 365 administrator)
- In the Microsoft 365 admin center choose Settings, then Integrated apps, then Upload custom apps.
- Choose the Office Add-in type and upload
vera-office-manifest.xml, or give its address:https://app.vendorbenchmark.com/word-addin/manifest.xml. - Choose who gets it (everyone, or named people and groups), accept the permissions it asks for, and deploy.
- Repeat with
vera-outlook-manifest.xml(addresshttps://app.vendorbenchmark.com/word-addin/manifest-outlook.xml) for Outlook. - Nobody installs anything. The Vera button appears in each assigned person's Word, Excel, PowerPoint and Outlook, on Windows, on a Mac and on the web.
Then sign in, in any of them
- Press Vera. The pane opens beside the document or the email.
- Press Sign in. The pane shows a short code.
- Press Approve in the browser and approve the code where you are already signed in to the platform. The pane signs in by itself.
You know it worked when the pane's header reads Vera for Outlook, Vera for Word or Vera for Excel, and pressing a workflow returns an answer with an insert button under it.
If it does not appear
- Classic Outlook shows nothing yet. Microsoft says a newly added add-in can take up to 24 hours to reach classic Outlook on Windows. Outlook on the web shows it at once, so check there first.
- There is no "Add a custom add-in" in Outlook. Your administrator has switched off custom add-ins. Ask them to use the whole company route.
- Word or Excel on the web lost the button. The web keeps the add-in in that browser's storage, so clearing the browser's data or changing browser means uploading the file again.
- A company rollout is not visible yet. Microsoft's deployment can take up to a day to reach everyone; closing and reopening the application picks it up sooner.
- The mailbox is not Microsoft 365 or Outlook.com. Outlook does not load add-ins on Gmail or other accounts added by IMAP.
To undo it: in Outlook, return to https://aka.ms/olksideload, choose My add-ins, and under Custom Addins press the three dots beside Vera, then Remove. Word and Excel on the web keep the add-in in the browser's own storage, so clearing that browser's data for Office removes it. On a Mac, delete the file from the wef folder and reopen the application. On Windows, remove the catalog under Trusted Add-in Catalogs. A company rollout is removed by the administrator under Integrated apps. Removing the add-in removes nothing from your workspace, and Sign out of this pane in the pane's Settings ends its sign in on that device.
Coupa, SAP Ariba and your other procurement systems
Spend, purchase orders and contract documents flow in from the procurement system you already run, and keep flowing on a schedule you choose.
For: org owners, with an administrator in the procurement system to create the API credentials · Time: 20 minutes a system
There are three kinds of connection, and a system can have more than one:
| Connection | Brings in | Feeds |
|---|---|---|
| Coupa invoices | Approved invoices, as spend by vendor and month | Spend, renewal forecasts, invoice checks |
| Purchase orders (P2P): Coupa, SAP Ariba, SAP S/4HANA, Oracle Fusion, NetSuite | Purchase orders, requisitions and suppliers | Procurement intelligence, maverick spend, vendor records |
| Contract documents: Coupa contracts, SAP Ariba contracts | The PDF and Word files held on contracts in those systems | Contract intake: each file is read like an upload and joins the Entitlement Agent and the Contract Management Portal |
What each system asks for
| System | On the platform's form | Create it in the system as |
|---|---|---|
| Coupa invoices | Coupa instance URL, API key | Setup › Integrations › API keys, with read access to invoices |
| Coupa purchase orders | Coupa instance URL, API key | Setup › Integrations › API keys, with read access to purchase orders, requisitions and suppliers |
| Coupa contracts | Coupa instance URL, API key | Setup › Integrations › API keys, with read access to contracts and their attachments |
| SAP Ariba | Data center (US, EU or APAC), realm, application API key, OAuth client ID and secret | An application on developer.ariba.com with the operational procurement reporting and supplier data APIs |
| SAP Ariba contracts | Region (us, eu or apac), realm, application key, OAuth client ID and secret | The same application, with the Contract Workspace API |
| SAP S/4HANA | API base URL, communication user, password | A communication arrangement covering the purchase order, purchase requisition and business partner APIs, read scope only |
| Oracle Fusion | Pod URL, integration user, password | A user with the Procurement REST duty roles, read access to purchase orders, requisitions and suppliers |
| NetSuite | Account ID, consumer key and secret, token ID and secret | An integration record with token based auth, and an access token for a role limited to viewing transactions and vendors |
Each system uses its own credentials for each kind of connection, so a key scoped to invoices does not also read contracts. Ask for read only access everywhere the system offers it.
Steps
- In the procurement system, create the credential from the table above, with read access only.
- On Settings › Connections › Integrations, find the connection under Spend and usage, Procurement and ERP or Contract intake and press Connect.
- Paste the values into the form and save. Secrets are encrypted before they are stored and are shown masked from then on.
- For a purchase order or contract document connection, press Sync now or Import now to run the first sync straight away. A Coupa invoice connection runs its first sync at its scheduled time.
- Open the Entitlement Agent, press Ctrl and comma, and open Sync schedule. Set how often the new connection updates: every hour, every 6 hours, once a day, once a week or only by hand, and the hour for daily and weekly syncs. How each choice behaves is set out in Intake rules and the sync schedule.
- If the contract system already holds an archive, press Import everything on the contract connection to carry it all across in the background, rather than waiting for 10 files a sync.
You know it worked when the connection shows Last sync with a time on the integrations page, the sync appears under Recent activity with how many records it brought in, and the connection's row on Sync schedule shows the last sync and the next one.
If it fails: the integrations page and the Sync schedule row both show the system's own message (for example "Coupa responded 401"). A stopped connection is not retried on its own; fix the credential in the system, save the connection's details again, and it starts again on its schedule.
To undo it: press Disconnect on the connection. Syncs stop at once; the spend, orders and contracts already brought in stay. Revoke the API key in the procurement system as well.
The API quickstart
From no key to your own data coming back over HTTPS in ten minutes.
For: org owners create keys; your developers consume them · Plan: Enterprise · Time: 10 minutes
Steps
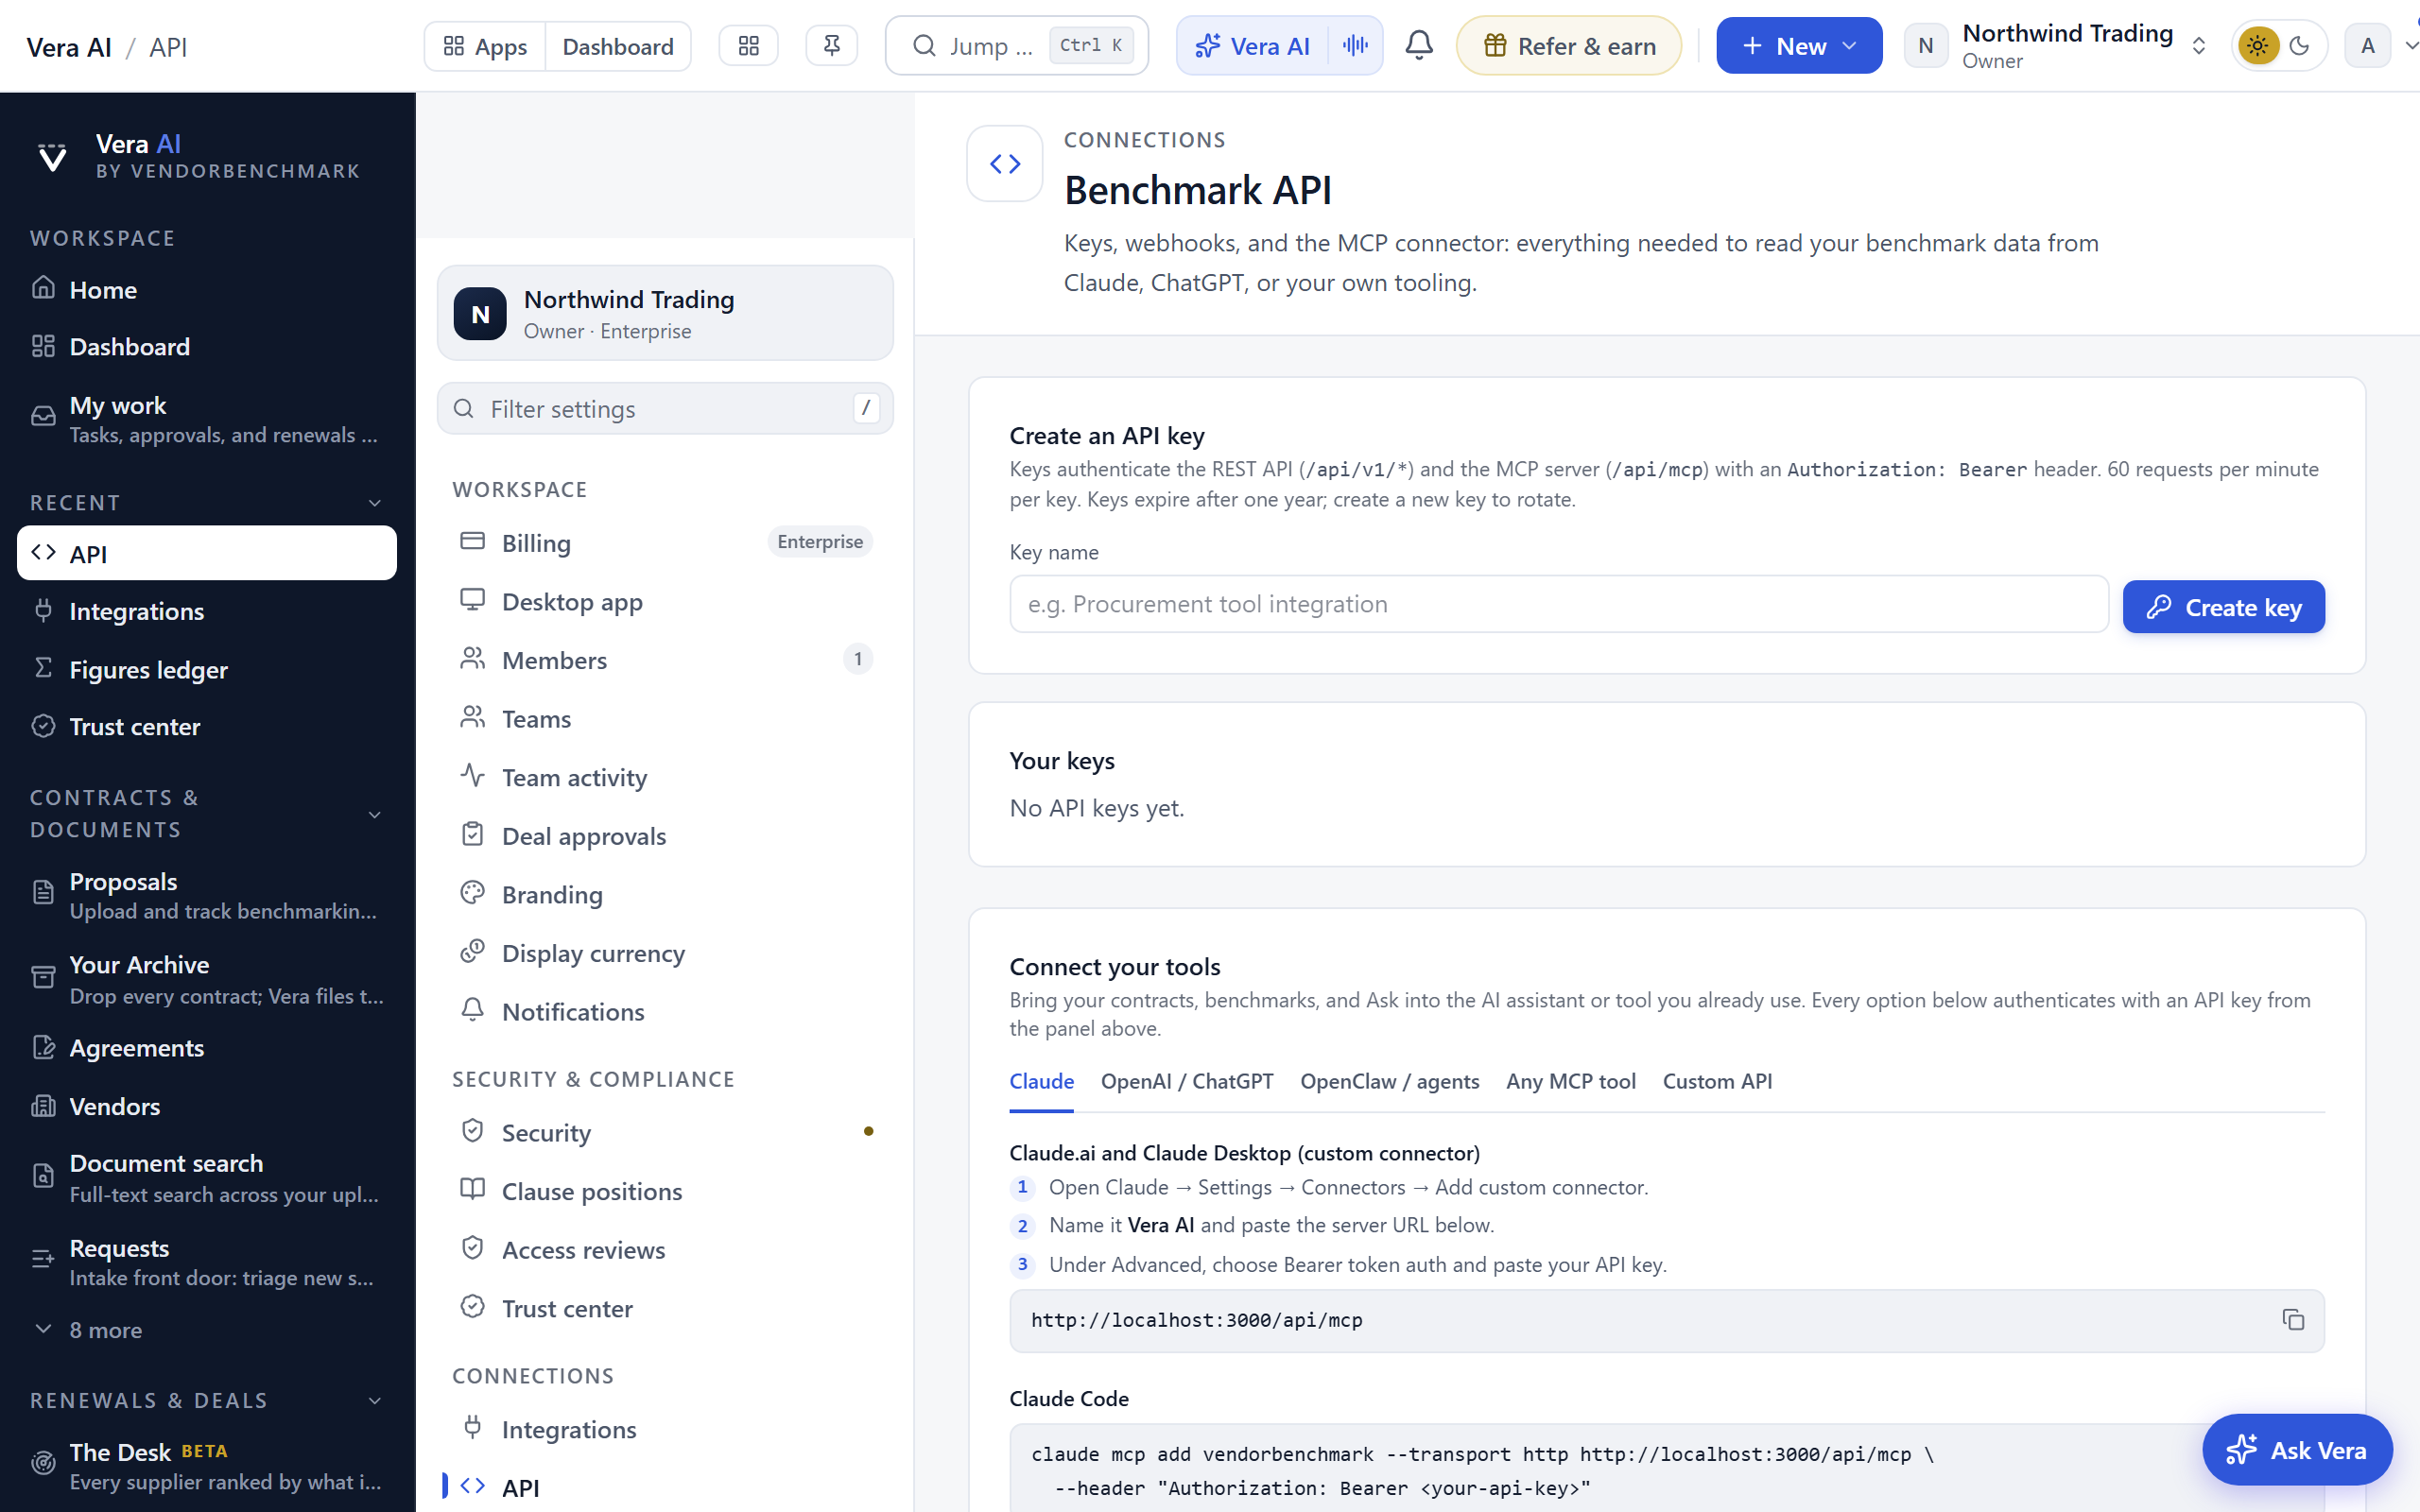
- On Settings › Connections › API, create a key. You see the full value once, so store it in your secrets manager on the spot. Keys expire within a year.
- Make the first call, the one that proves the loop, against the REST API at
/api/v1with the key as a bearer token:
curl -H "Authorization: Bearer <your-api-key>" \
https://app.vendorbenchmark.com/api/v1/contracts- Read the JSON that comes back: your own organization's contracts, under your key's permissions, which is the whole authorization model demonstrated in one request. The Connect your tools chooser on the API page carries the same snippet with your workspace's base URL filled in, plus endpoints for vendors, benchmarks, and Ask.
- Build with the key server-side only; it is a credential, not a config value, and never belongs in a browser or a repository.
You know it worked when the response is your data, and the key's use appears in your audit trail.
To undo it: revoke the key on the API page; revocation is immediate.
Connect Claude and other MCP clients
Your own AI assistants querying your benchmark data, with your permissions, over the Model Context Protocol.
For: org owners create the key; anyone with an MCP-capable client connects · Plan: Enterprise (rides the API) · Time: 10 minutes
Steps
- Create an API key as in the API quickstart; the MCP connector authenticates with the same key.
- Open Connect your tools on Settings › Connections › API and pick your client. The MCP server lives at
/api/mcpover HTTP transport, and the chooser shows a ready-to-paste block per client. - For Claude Code, the chooser's command is the whole setup:
claude mcp add vendorbenchmark --transport http https://app.vendorbenchmark.com/api/mcp \
--header "Authorization: Bearer <your-api-key>"- For ChatGPT, other MCP tools, or your own agents, use the matching block from the same chooser; the Claude API's MCP connector and the Agents SDK take the server URL and key in their standard remote-server shape.
- Test with a question only your data can answer: "which of our agreements renew in the next 90 days?" A grounded answer with your vendors in it is the proof.
You know it worked when your assistant answers from your workspace's records, not from general knowledge.
To undo it: remove the server from the client and revoke the key; either alone severs access.
Webhooks and data-out
Your data as a citizen of your estate: events pushed to your systems, tables in your warehouse, the audit stream in your SIEM.
For: org owners, with whoever runs the receiving system · Time: 20 minutes per channel
Steps
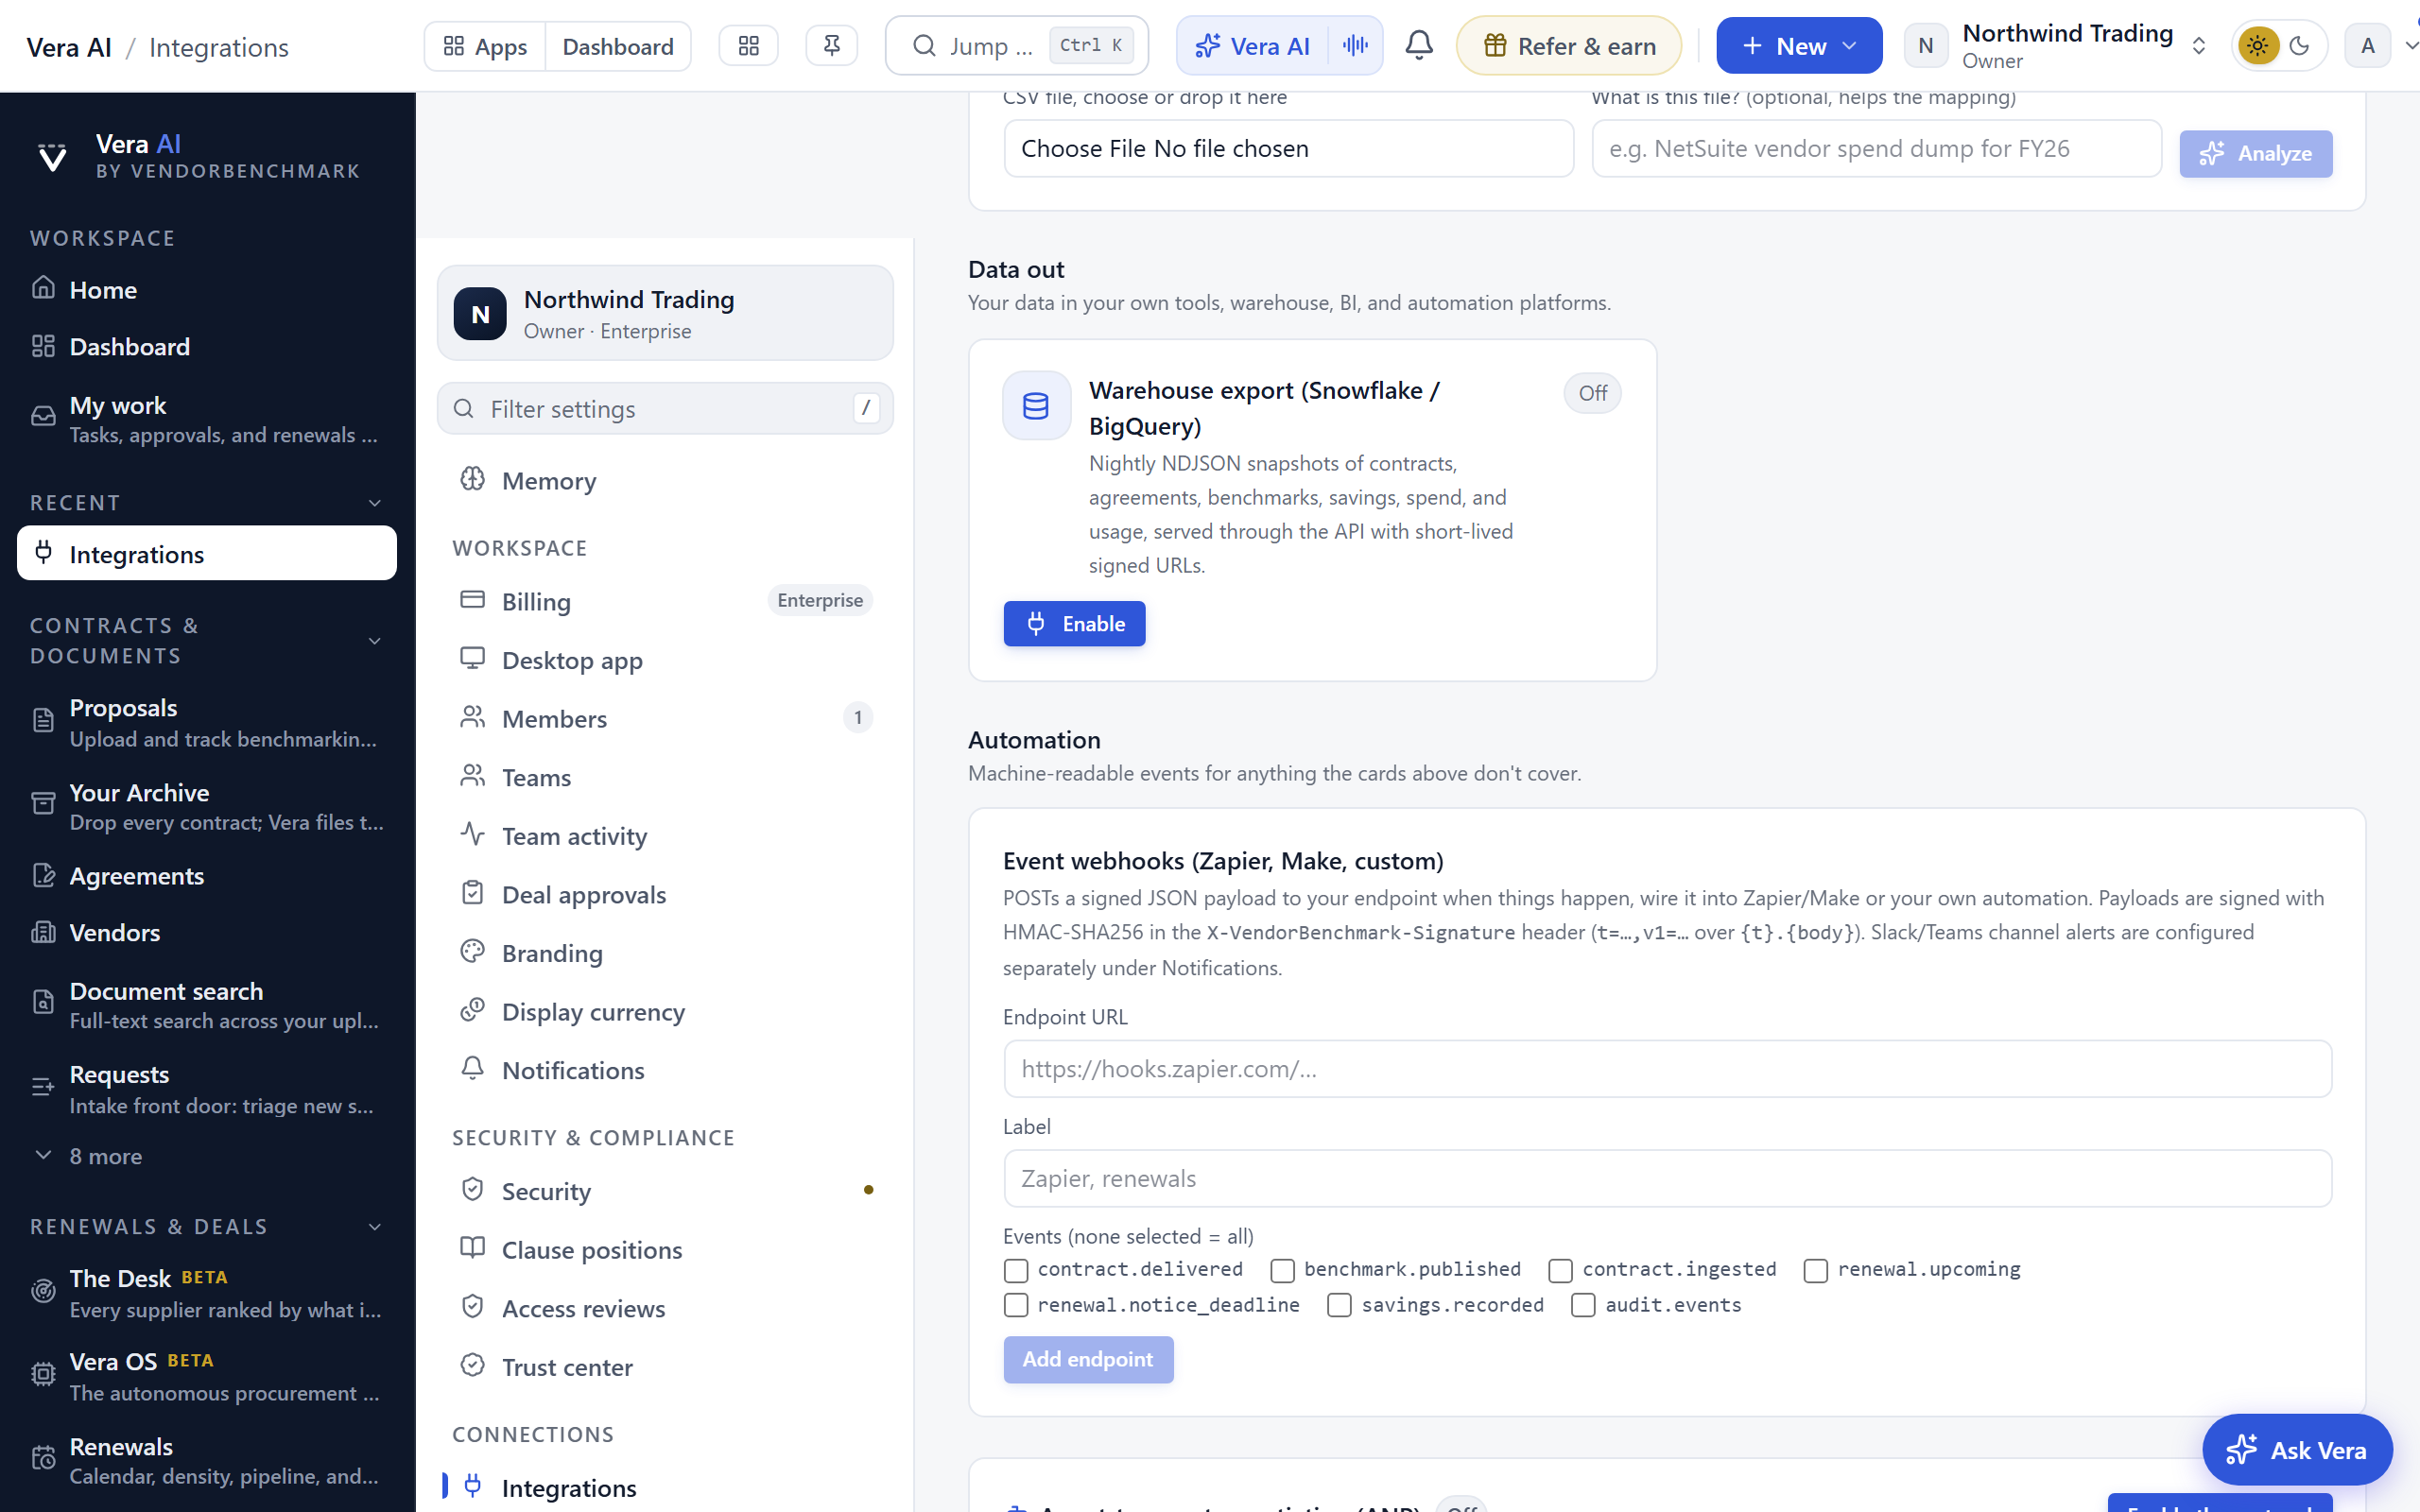
- Event webhooks: on Settings › Connections › Integrations, add your endpoint (your own service, Zapier, or Make). Events arrive as JSON, HMAC-signed with a timestamped signature. Verify the signature before trusting any payload; the signing secret exists so your systems can authenticate us the same way we authenticate inbound mail and CLM webhooks.
- The audit webhook: point it at your SIEM and the audit log streams continuously instead of being exported quarterly. Security teams should prefer this to CSV pulls.
- Warehouse export: connect Snowflake or BigQuery and the contracts, renewals, savings, and spend tables land where your analysts already work.
- Send a test event end to end before declaring any channel done, and alarm on signature failures rather than uploading them silently; a failing signature is either misconfiguration or someone knocking.
You know it worked when a real event arrives, its signature verifies, and your receiving system acted on it.
To undo it: remove the endpoint or disconnect the export; delivery stops immediately.
Related: The integration catalog · Integrations (settings reference) · Connect your data and close the gaps · The owner's handbook
Next: Chapter 12 · Integrations, clients & deployment for the architecture behind these recipes.
Was this page helpful?
Thank you. Your note goes straight to the team that writes this manual.